Link and track e-mail messages in Business Contact Manager
Keeping track of e-mail messages to and from people associated with your business can be a daunting task, and when you lose track of messages, you can lose sales opportunities, too. To address this, Business Contact Manager for Outlook turns a business record into a virtual e-mail inbox by enabling you to link e-mail messages to it.
This article describes how to link individual e-mail messages to Business Contact Manager for Outlook records and how to set up E-mail Linking and Tracking to automatically link messages to records, including Business Projects.
Important: If there are multiple users of your database, any user with access to the database can see linked e-mail messages.
What do you want to do?
Link e-mail messages to records
You can link e-mail messages to Account and Business Contact record types, and to Business Projects. And then, with a few clicks, you can view the messages that are linked to the record.
When you link Business Contacts and Business Projects to an Account, you can also view the e-mail messages that are linked to each Business Contact and Business Project in the communication history of the Account record.
Automatically link e-mail messages to records
The E-mail Linking and Tracking feature enables you to automatically link and track e-mail messages from your Accounts and Business Contacts, read old ones, and even review the messages you have sent to them. You can also automatically link e-mail messages by subject to Business Projects.
Link individual e-mail messages to records
The e-mail messages that you link to an Account, Business Contact, or Business Project record stay in Outlook. The e-mail messages are also listed in the communication history of the record, and the Communication History folder of Business Contact Manager for Outlook.
Four KB of the message is stored in the Business Contact Manager database, so that you still have access to all or part of the message, even if it is deleted from Outlook. If the original message was larger than 4 KB, you will only have access to part of the message if it is deleted from Outlook.
-
In Outlook, click or open the e-mail message that you want to link to a record.
-
On the Ribbon, in the Business group, click Link to Record.
-
In the Link to Business Contact Manager record dialog box, in the Item Type list, click the type of record that you want to find.
Note: If you choose an Opportunity record, the e-mail message is actually linked to the Account or Business Contact of the Opportunity record.
-
In the list of records, click a record.
If you want to link the item to more than one record, select those records.
How do I select more than one record?
To select records that are adjacent to each other, press the SHIFT key, and then click the first and last records of the group that you want to add. To select nonadjacent records, press the CTRL key, and then click the individual records. To select all records, click one, and then press CTRL+A.
-
Under Linked Records, click Link To.
The records you selected are listed in the Link To box.
-
Click OK.
View the e-mail messages that are linked to a record
To see the e-mail messages that are linked to a record, open the record, and then click the History tab.
The e-mail messages, as well as any other communication history items that are linked to the record are listed.
For information about other communication history items, see Track your communications with customers in Business Contact Manager.
Automatically link e-mail messages to records
From the time you enable E-mail Linking and Tracking, any new e-mail messages to or from selected e-mail addresses are automatically linked to records.
You can also search for past e-mail messages and link them to records, too.
The messages appear in the communication history of the record that contains the selected e-mail address.
If you link from an e-mail message, and there is no existing Business Contact Manager for Outlook record that matches the e-mail address, the Linking and Tracking feature creates a new Business Contact record and links the e-mail message to it.
Before linking and tracking
Before you enable E-mail Linking and Tracking, do the following:
Confirm that you have entered e-mail addresses into your Business Contact Manager for Outlook records.
-
In the Navigation Pane, under Business Contact Manager, click one of the following folders to display the workspace:
-
Contact Management.
-
Sales.
-
Project Management.
-
-
Click the tab that contains the record that you want, and then double-click the record to open it.
-
Verify that an e-mail address is listed in the E-mail address field.
Confirm that Outlook is set up to save sent messages to the Sent Items folder.
To easily link and track outgoing messages, save sent messages to your Sent Items folder.
-
Click the File tab.
-
Click Options.
-
Click Mail, and then scroll to the Save Messages section.
-
Confirm that the check box next to Save copies of messages in Sent Items folder is selected. If you also want to link and track forwarded messages, verify that the Save forwarded messages check box is selected, too.
-
Click OK.
To protect your privacy if you share your Business Contact Manager for Outlook database with other users, e-mail messages marked Personal, Private, or Confidential are not linked and tracked.
Set up E-mail Linking and Tracking
-
Click the File tab.
-
Click the Business Contact Manager tab, and then click the Manage Linking and Tracking button.
-
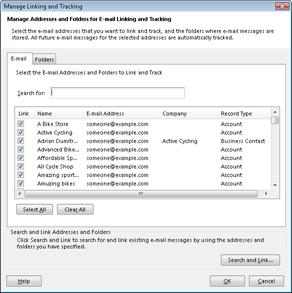
In the Manage Linking and Tracking dialog box, on the E-mail tab, select the check boxes next to the e-mail addresses that you want to link and track.
If a record contains more than one e-mail address, the Account or Business Contact record will be listed more than once.

-
Clear the check boxes next to any e-mail addresses that you do not want to link and track.
-
Click the Folders tab.
All the folders are selected by default.
Note: If you have any Outlook rules set up to route e-mail messages to different folders, make sure you select those folders on the Folders tab to link and track those messages.
-
Click OK.
All future e-mail messages to and from the selected addresses in the selected folders are automatically tracked.
You can also set up linking and tracking from an e-mail message. In your Inbox, click or open the e-mail message. On the Ribbon, in the Business group, click Link & Track. In the Link & Track dialog box, select the e-mail addresses, and then click OK. If there is no existing Business Contact Manager for Outlook record that matches the e-mail address, linking the e-mail address creates a Business Contact record.
Link past messages to your Accounts and Business Contacts
If you want to link messages that you received before enabling E-mail Linking and Tracking, Business Contact Manager for Outlook can find the messages for you and link them to your Accounts and Business Contacts.
-
Click the File tab.
-
Click the Business Contact Manager tab, and then click the Manage Linking and Tracking button.
-
In the Manage Linking and Tracking dialog box, do the following, if necessary:
-
Select the check boxes for any Accounts or Business Contacts whose messages you want to find and link.
-
Clear the check boxes next to any Accounts or Business Contacts whose past messages you do not want to link.
If a record contains more than one e-mail address, the Account or Business Contact record will be listed more than once.
-
-
If you want to specify where Business Contact Manager for Outlook searches for past messages, on the Folders tab, select or clear check boxes next to the folder names.
-
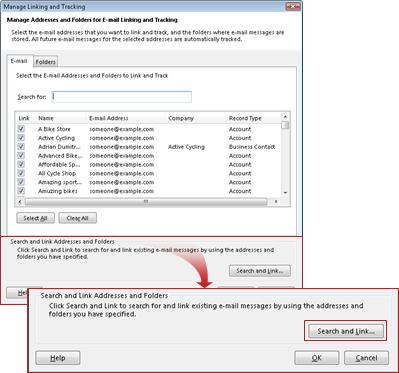
Click Search and Link.

-
In the Link Existing E-mail dialog box, if you want to exclude e-mail messages older than a certain date, select the Ignore e-mail older than check box, and then click a date from the calendar.
-
Click Start.
-
When search and link is completed, click Close.
-
If necessary, in the Manage Linking and Tracking dialog box, change your selections for future e-mail messages.
Important: If you click OK in the Manage Linking and Tracking dialog box without changing the selected e-mail addresses and folders, your future e-mail messages will be linked and tracked based on the selections you used for search and link.
-
In the Manage Linking and Tracking dialog box, click OK.
Link e-mail messages by subject to Business Projects
You can link e-mail messages to a Business Project record based on the subject of the e-mail messages. For more information about Business Project records, see Organize business projects in Business Contact Manager.
Warning: If you link messages to a Business Project and then want to disable linking and tracking, you must disable it for each unique e-mail subject.
For information, see Disable E-mail Linking and Tracking by subject later in this article.
-
Click or open the e-mail message you want to link to your Business Project record.
-
On the Ribbon, in the Business group, click Link & Track.
-
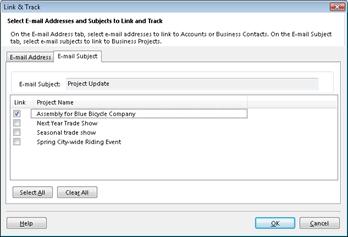
In the Link & Track dialog box, click the E-mail Subject tab.

-
Select the check box next to the project name that you want to link the e-mail message to.
-
Click OK.
Disable E-mail Linking and Tracking
If you no longer want to automatically link e-mail messages to records, you can disable E-mail Linking and Tracking.
You might want to disable E-mail Linking and Tracking if you share your database with your co-workers, because they can see all linked e-mail messages. To prevent them from seeing only those messages that are already linked, see Delete e-mail messages from a record later in this article.
Disable E-mail Linking and Tracking for Accounts and Business Contacts
-
Click the File tab.
-
Click the Business Contact Manager tab, and then click the Manage Linking and Tracking button.
-
In the Manage Linking and Tracking dialog box, on both the E-mail and Folders tabs, click the Clear All button to clear all check boxes.
If you want to disable linking and tracking only for certain records, clear those check boxes.
-
Click OK.
Note: Disabling E-mail Linking and Tracking stops linking any future e-mail messages to your records. If you want to remove e-mail messages that are currently linked to your records, you will need to delete them after you disable E-mail Linking and Tracking. For information, see Delete e-mail messages from a record later in this article.
Disable E-mail Linking and Tracking by subject
-
In the Navigation Pane, under Business Contact Manager, click Project Management.
-
On the Business Projects tab, double-click the project that you want.
-
On the Ribbon, in the Show group, click History.
-
Right-click the e-mail message with the subject that you want to stop linking and tracking, and then click Link & Track.
-
Do the following:
-
Disable E-mail Linking and Tracking for Accounts and Business Contacts If necessary, on the E-mail Address tab, click Clear All to stop linking and tracking messages for Accounts and Business Contacts.
-
Disable E-mail Linking and Tracking for Business Projects Click the E-mail Subject tab, and then click Clear All.
You can disable E-mail Linking and Tracking for only those Business Projects, Accounts, and Business Contacts that are linked to the selected message. To disable linking and tracking for Business Projects, you must disable it for each unique e-mail subject.
-
-
Click OK.
Note: Disabling E-mail Linking and Tracking stops linking any future e-mail messages to your records. If you want to remove e-mail messages that are currently linked to your records, you will need to delete them after you disable E-mail Linking and Tracking. For information, see Delete e-mail messages from a record later in this article.
Understand privacy and security issues with E-mail Linking and Tracking in a shared database
When you share a database, you share all the information in the database with everyone who has access to it. If you have set up automatic linking and tracking of your e-mail messages, all existing and future e-mail messages and other communication history items that are linked to your records are available to all users who access the database. For information about sharing a database, see Share your Business Contact Manager data with other users.
If there are multiple users of your database Any user with access to the database can see linked messages and other communication history items.
-
If you want to prevent your co-workers from accessing linked e-mail messages, but still want to use E-mail Linking and Tracking for future messages, delete the existing messages from the records before you share your database. For more information, see Delete e-mail messages from a record later in this article.
-
If you do not want your co-workers to have access to future e-mail messages, but want them to have access to past messages, disable linking and tracking before you share your database. See the Disable E-mail Linking and Tracking section earlier in this article.
-
If you want to prevent your co-workers from accessing all existing and future e-mail messages that are linked to records, disable e-mail linking and tracking and delete e-mail messages from all records before you share your database.
If you are the only person who uses your database, or if you share the database to make a copy of it on your portable computer The security considerations are minimal—such as keeping your password secure. You can safely enable any e-mail address for linking and tracking because no one else can see the messages.
Note: To make a copy of your database to use when you are out of the office, you must first share your Business Contact Manager database—but there is still only one user of the database. For information about making a copy of the database, see Share your Business Contact Manager data with other users.
Delete e-mail messages from a record
An e-mail message can be linked to more than one record. When you remove a linked message from one record, it is deleted from the communication history of only that record. If the e-mail message is linked to other records, they are not affected. For example, if an e-mail message is linked to both a Lead and an unrelated Account, deleting the e-mail message from the Lead does not delete the message from the Account record.
Deleting an e-mail message from a record does not delete the e-mail message in Outlook.
-
In the Navigation Pane, under Business Contact Manager, click one of the following folders to display the workspace:
-
Contact Management.
-
Sales.
-
Project Management.
-
-
Click the tab that contains the record that you want, and then double-click the record to open it.
-
On the Ribbon, in the Show group, click the History button.
E-mail messages, as well as any other communication history items that are linked to the record are listed.
To display only the e-mail messages on the History page, on the Ribbon, click the View tab. Click the Item Type button, and then click E-mails.
-
Select the e-mail messages that you want to delete.
To select records that are adjacent to each other, press the SHIFT key, and then click the first and last records of the group that you want to delete. To select nonadjacent records, press the CTRL key, and then click the individual records.
-
Click the Remove button.
For more information about deleted records, see Delete Business Contact Manager records.
For information about how to restore deleted items, see Restore a record in Business Contact Manager.
Delete all e-mail messages from records
-
In the Navigation Pane, click the Business Contact Manager button.
-
Under Business Records, click Communication History.
-
Click the Item Type column header to sort the list by Item Type.
-
Select all of the e-mail messages, or select all of the e-mail messages you want to delete.
To select records that are adjacent to each other, press the SHIFT key, and then click the first and last records of the group that you want to delete. To select nonadjacent records, press the CTRL key, and then click the individual records.
-
Right-click the selected e-mail messages, and then click Delete.
For information about other communication history items, see Track your communications with customers in Business Contact Manager.
No comments:
Post a Comment