Tuesday, May 31, 2022

Change your presence status in lync

Presence statuses include Available, Busy, Away, and Do Not Disturb. Your status is based on your Microsoft Outlook Calendar, if you use Outlook, or your Lync activities. For example, if you have a meeting currently scheduled in Outlook, your status appears as "In a meeting" in Lync. When you're in a Lync audio or video call, your presence indicator appears red, as Busy, and your status is updated to "In a call." But you can also manually set your presence status to control how or whether you want people to get in touch with you. And, your presence can also include a personal note that appears in your Contacts list and on your contact card. This gives people more information about what you're up to.

Change your presence status

  • Click the status menu drop-down arrow below your name on the Lync main window, and then click the status you want to show other people.

To revert from the status you set and have Lync automatically update your status, click the status menu and then click Reset Status.

Choose the appropriate status

Make sure you set your status accurately. The table below describes each presence status that other people may see for you, what each status means, and which ones you can set yourself.

Tip: The presence statuses are pre-set in Lync, which means you can't create a custom status, but you can give your contacts more details about where you are or what you're doing by adding a personal note. See the next section for details.

Presence Status

Description

How this status gets set

Available Available

You're online and available to contact.

Lync sets this status when it detects you're using your computer. You can also set this status when you want others to know you're in your office even though the computer is idle.

Busy Busy

You're busy and don't want to be interrupted.

Lync sets this status when, according to your Outlook Calendar, if you use Outlook, you have an appointment. You can also select this status from the drop-down arrow. If you do manually set Lync to Busy, it will revert back to your Outlook Calendar status in 24 hours, if you do not change it before then.

Busy In a call

You're in a Lync call (a two-way audio call) and don't want to be disturbed.

Lync sets this status when it detects that you're in a Lync call.

Busy In a meeting

You're in a meeting and don't want to be disturbed.

Lync sets this status when it detects that you're in a Lync Meeting or when you're scheduled to be in a meeting according to your Outlook calendar, if you use Outlook.

Busy In a conference call

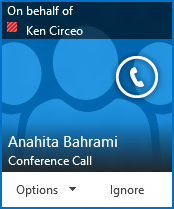
You're in a Lync conference call (a Lync Meeting with audio) and don't want to be disturbed.

Lync sets this status when it detects that you're participating in a Lync conference call.

Do Not Disturb Presenting

You're giving a presentation and can't be disturbed.

Lync sets this status when it detects that you're either sharing your screen or projecting.

Do Not Disturb Do not disturb

You don't want to be disturbed and will see conversation notifications only if sent by someone in your Workgroup.

You select this status from the drop-down arrow. If you do manually set Lync to Do not disturb, it will revert back to your Outlook Calendar status in 24 hours, if you do not change your status before then.

Away Be Right Back

You're stepping away from the computer for a few moments.

You select this status from the drop-down arrow.

Away Inactive/Away

You're logged on but your computer has been idle, or you've been away from your computer for a specified (set by you) period of time.

Lync sets your status to "inactive" when your computer's been idle for five minutes, and to "away" when your status has been inactive for five minutes. (To change these default values, click the Options Options arrow button , click Status, and then click the arrows next to Show me as Inactive when my status has been idle for this many minutes and Show me as Away when my status has been Inactive for this many minutes.) You can also select this status from the drop-down arrow.

Away Off Work

You're not working and not available to be contacted.

You select this status from the drop-down arrow.

Offline Offline

You're not signed in. You'll appear as Offline to people whom you've blocked from seeing your presence.

Lync sets this status when you log off your computer.

Unknown Unknown

Your presence isn't known.

This status may appear to contacts who are not using Lync as their instant messaging program.

Note: If you use Outlook and you turn on the out-of-office notification, the note you write in Outlook displays in Lync as well, and a red star or asterisk (*) appears next to your presence status at bottom of your picture display area.

Add or remove a personal note

Type a personal note, such as "Working from home," at the top of your Lync main window, to share current details about your status. The note will appear with your contact card. Change the note as often as you like.

To add a personal note

  • In the Lync main window, click the note box above your name, and then type a note, such as "Working from home" or "Working on a deadline, please IM instead of stopping by."

To remove your personal note

  • Click the note box above your name, and, on your keyboard, press BackSpace, and then press Enter. The text in the box reverts to the default message, "What's happening today?"

Turn your out-of-office notification on or off

If your Lync account is synchronized to your Outlook calendar, an out-of-office message displays as your personal note in Lync whenever you turn on the out-of-office notification in Outlook. So, for example, when you're going to be on vacation, you might set up your out-of-office notification in Outlook indicating that you're on vacation (and sharing any relevant information, such as whether you'll be checking email and who your backup is). This notification is published in your contact card and other contact listings that are displayed to your contacts in Lync.

Important: When you return from vacation, remember to turn off the out-of-office notification. You have to go into Outlook to do this. You can't delete the note from Lync.

To turn on the notification in Outlook

  • In Outlook, click the File tab, click the Automatic Replies button, click Send automatic replies, and then write your out-of-office message and schedule it for display.

To turn off the notification in Outlook and thereby remove the message from your Lync display

  • In Outlook, click the File tab, and then click the Turn off button in the Automatic Replies panel. (It can take up to thirty minutes for the note to disappear from your Lync display.)

To sync your Lync and Outlook accounts

  1. In the Lync main window, click the Options button.

  2. In Lync - Options, click Personal.

  3. Select the Update my presence based on my calendar information check box.

  4. Select the Display my Out of Office information to contacts in my Friends and Family, Workgroup, and Colleagues privacy relationships check box to sync your Lync and Outlook accounts.

Top of Page

Display only the last four digits of identification numbers

Let's say, for common security measures, you want to display only the last four digits of an identification or Social Security number, credit card number, or other number and replace the rest of the digits with asterisks. Whether the digits in your cell are formatted as text, numbers, or the special Social Security number format, you can use the same functions. To display only the last four digits of identification numbers, use the CONCATENATE, RIGHT, and REPT functions. 

Example

The example may be easier to understand if you copy it to a blank worksheet.

How to copy an example

  1. Create a blank workbook or worksheet.

  2. Select the example in the Help topic.

    Note: Do not select the row or column headers.

    Selecting an example from Help

    Selecting an example from Help

  3. Press CTRL+C.

  4. In the worksheet, select cell A1, and press CTRL+V.

  5. To switch between viewing the results and viewing the formulas that return the results, press CTRL+` (grave accent), or on the Formulas tab, in the Formula Auditing group, click the Show Formulas button.

A

B

1

Type

Data

2

Social Security Number

555-55-5555

3

Credit Card Number

5555-5555-5555-5555

4

Formula

Description (Result)

5

=CONCATENATE("***-**-", RIGHT(B2,4))

Combines the last four digits of the SSN with the "***-**-" text string (***-**-5555)

6

=CONCATENATE(REPT("****-",3), RIGHT(B3,4))

Repeats the "****-" text string three times and combines the result with the the last four digits of the credit card number w(****-****-****-5555)

Security Note: In the example, you should hide column B and protect the worksheet so that the original data cannot be viewed.

Function details

CONCATENATE

RIGHT, RIGHTB

REPT

Conditional formatting compatibility issues

The Compatibility Checker found one or more conditional formatting-related compatibility issues.

Important: Before you continue saving the workbook to an earlier file format, you should address issues that cause a significant loss of functionality so that you can prevent permanent loss of data or incorrect functionality.

Issues that cause a minor loss of fidelity might or might not have to be resolved before you continue saving the workbook—data or functionality is not lost, but the workbook might not look or work exactly the same way when you open it in an earlier version of Microsoft Excel.

In this article

Issues that cause a significant loss of functionality

Issue

Solution

Some cells in this workbook contain conditional formatting, which refers to values on other worksheets. These conditional formats won't be saved.

What it means   Beginning in Excel 2007, conditional formatting rules can refer to values on other worksheets. These rules are not supported in earlier versions, and will be lost if you save the file in the Excel 97-2003 file format.

What to do   Click Find in the Compatibility Checker dialog box to locate each instance of this issue. For each case, copy the source data to a new range of cells on the worksheet containing the formatted cells and then update the conditional formatting rule to use the new range.

One or more cells in this workbook contain a conditional formatting icon set arrangement that is not supported in earlier versions of Excel. These conditional formats will not be saved.

What it means   New conditional formats were introduced in Excel 2007, including icon sets. The Excel 97-2003 file format does not support conditional formatting rules that use icon sets. If you save the file in that file format the conditional formatting for the cell(s) in question will be discarded in the saved file.

What to do   Click Find in the Compatibility Checker dialog box to locate each instance of the icon set arrangement. For each instance, choose a conditional format that is supported in Excel 97-2003, such as formatting the cell with a color. After you replace all the instances, you can save the file in the Excel 97-2003 file format.

Some cells have more conditional formats than are supported by the selected file format. Only the first three conditions will be displayed in earlier versions of Excel.

What it means    In Excel 2007 and later, conditional formatting can contain up to sixty-four conditions, but in Excel 97-2003, you will see the first three conditions only.

However, all conditional formatting rules remain available in the workbook and are applied when the workbook is opened again in Excel 2007 and later, unless the rules were edited in Excel 97-2003.

What to do    In the Compatibility Checker, click Find to locate cells that have conditional formatting applied that use more than three conditions, and then make the necessary changes to use no more than three conditions.

Some cells have overlapping conditional formatting ranges. Earlier versions of Excel will not evaluate all of the conditional formatting rules on the overlapping cells. The overlapping cells will show different conditional formatting.

What it means    Overlapping conditional formatting ranges are not supported in Excel 97-2003, and the conditional formatting is not displayed as expected.

However, all conditional formatting rules remain available in the workbook and are applied when the workbook is opened again in Excel 2007 and later, unless the rules were edited in Excel 97-2003.

What to do    In the Compatibility Checker, click Find to locate cells that have overlapping conditional formatting ranges, and then make the necessary changes to avoid overlap.

One or more cells in this workbook contain a conditional formatting type that is not supported in earlier versions of Excel, such as data bars, color scales, or icon sets.

What it means    In Excel 97-2003, you will not see conditional formatting types, such as data bars, color scales, icon sets, top or bottom ranked values, above or below average values, unique or duplicate values, and table column comparison to determine which cells to format.

However, all conditional formatting rules remain available in the workbook and are applied when the workbook is opened again in Excel 2007 and later, unless the rules were edited in Excel 97-2003.

What to do    In the Compatibility Checker, click Find to locate cells that have conditional formatting types that are new in Excel 2007 and later, and then make the necessary changes to use only formatting types that are supported in the earlier versions of Excel.

Some cells contain conditional formatting with the Stop if True option cleared. Earlier versions of Excel do not recognize this option and will stop after the first true condition.

What it means    In Excel 97-2003, conditional formatting without stopping when the condition has been met is not an option. Conditional formatting is no longer applied after the first condition is true.

However, all conditional formatting rules remain available in the workbook and are applied when the workbook is opened again in Excel 2007 and later, unless the rules were edited in Excel 97-2003.

What to do    In the Compatibility Checker, click Find to locate cells that contain conditional formatting with the Stop if True option cleared, and then click Fix to resolve the compatibility issue.

One or more cells in this workbook contain a conditional formatting type on a nonadjacent range (such as top/bottom N, top/bottom N%, above/below average, or above/below standard deviation). This is not supported in earlier versions of Excel.

What it means    In Excel 97-2003, you will not see conditional formatting in nonadjacent cells.

However, all conditional formatting rules remain available in the workbook and are applied when the workbook is opened again in Excel 2007 and later, unless the rules were edited in Excel 97-2003.

What to do    In the Compatibility Checker, click Find to locate cells that contain a conditional formatting type on a nonadjacent range, and then make the necessary changes to use conditional formatting rules that are available in earlier versions of Excel.

Some PivotTables in this workbook contain conditional formatting that may not function correctly in earlier versions of Excel. The conditional formatting rules will not display the same results when you use these PivotTables in earlier versions of Excel.

What it means    Conditional formatting results you see in Excel 97-2003 PivotTable reports will not be the same as in Excel 2007 and later PivotTable reports.

However, all conditional formatting rules remain available in the workbook and are applied when the workbook is opened again in Excel 2007 and later, unless the rules were edited in Excel 97-2003.

What to do    In the Compatibility Checker, click Find to locate PivotTable report fields that contain conditional formatting rules, and then apply conditional formatting rules that are available in the earlier versions of Excel.

One or more cells in this workbook contain conditional formatting which refers to values on other worksheets. These conditional formats will not be supported in earlier versions of Excel.

What it means    In Excel 97-2003, conditional formatting that refers to values on other worksheets is not displayed.

However, all conditional formatting rules remain available in the workbook and are applied when the workbook is opened again in Excel 2010 and later, unless the rules were edited in Excel 97-2007.

What to do    In the Compatibility Checker, click Find to locate cells that contain conditional formatting that refers to values on other worksheets, and then apply conditional formatting that does not refer to values on other worksheets.

One or more cells in this workbook contain conditional formatting using the 'Text that contains' format with a cell reference or formula. These conditional formats will not be supported in earlier versions of Excel.

What it means     In Excel 97-2007, conditional formatting that use formulas for text that contains rules is not displayed on the worksheet.

However, all conditional formatting rules remain available in the workbook and are applied when the workbook is opened again in Excel 2010 and later, unless the rules were edited in Excel 97-2007.

What to do    In the Compatibility Checker, click Find to locate cells that contain conditional formatting that uses formulas for text that contains rules, and then apply conditional formatting that is supported in earlier versions of Excel.

One or more cells in this workbook contain a rule that will not be supported in earlier versions of Excel because there is a formula error in its range.

What it means    In Excel 97-2007, conditional formatting that use range-based rules cannot be displayed correctly on the worksheet when the range-based rules contain formula errors.

What to do    In the Compatibility Checker, click Find to locate cells that contain range-based rules that contain formula errors, and then make the necessary changes so that range-based rules do not contain formula errors.

One or more cells in this workbook contain a conditional formatting icon set arrangement that is not supported in earlier versions of Excel.

What it means    In Excel 97-2007, conditional formatting that displays a specific icon set arrangement is not supported and the icon set arrangement is not displayed on the worksheet.

However, all conditional formatting rules remain available in the workbook and are applied when the workbook is opened again in Excel 2010 and later, unless the rules were edited in Excel 97-2007.

What to do    In the Compatibility Checker, click Find to locate cells that contain conditional formatting that display a specific icon set arrangement, and then make sure that conditional formatting does not display that icon set arrangement.

One or more cells in this workbook contain a data bar rule that uses a "Negative Value" setting. These data bars will not be supported in earlier versions of Excel.

What it means    In Excel 97-2007, conditional formatting that contains a data bar rule that uses a negative value is not displayed on the worksheet.

However, all conditional formatting rules remain available in the workbook and are applied when the workbook is opened again in Excel 2010 and later, unless the rules were edited in Excel 97-2007.

What to do    In the Compatibility Checker, click Find to locate cells that contain conditional formatting that contains negative data bars because the negative value format is set to Automatic in the New Formatting Rule dialog box (Home tab, Styles group, Conditional Formatting, New Rule) or the Axis Settings have been set to Automatic or Cell midpoint in the Negative Value and Axis Settings dialog box (Home tab, Styles group, Conditional Formatting, New Rule, Data Bar format style, Negative Values and Axis button), and then make the necessary changes.

One or more cells in this workbook contain conditional formatting which refers to more than 8192 discontinuous areas of cells. These conditional formats will not be saved.

What it means    In Excel 97-2007, conditional formatting that refers to more than 8192 discontinuous areas of cells is not displayed on the worksheet.

However, all conditional formatting rules remain available in the workbook and are applied when the workbook is opened again in Excel 2010 and later, unless the rules were edited in Excel 97-2007.

What to do    In the Compatibility Checker, click Find to locate cells that contain conditional formatting that refer to more than 8192 discontinuous areas of cells, and then change the number of discontinuous areas of cells the conditional formatting refers to.

Top of Page

Issues that cause a minor loss of fidelity

Issue

Solution

One or more cells in this workbook contain a data bar rule that uses a fill, border, or "bar direction" setting. These data bars will not be supported in earlier versions of Excel.

What it means    In Excel 97-2007, conditional formatting that contains a data bar rule that uses a solid color fill or border or left to right and right to left bar direction settings for data bars is not displayed on the worksheet.

However, all conditional formatting rules remain available in the workbook and are applied when the workbook is opened again in Excel 2010 and later, unless the rules were edited in Excel 97-2007.

What to do    In the Compatibility Checker, click Find to locate cells that contain a conditional formatting data bar rule that uses a solid color fill or border or left to right and right to left settings for data bars, and then and then make the necessary changes.

Top of Page

Accessibility features in video playback on powerpoint

PowerPoint supports the playback of video with multiple audio tracks. It also supports closed captions and subtitles that are embedded in video files.

The closed-captioning feature in PowerPoint 2016 is only available for Office 2016 Click-to-Run installations; MSI-based installations don't have the closed-captioning feature.

  1. Open an Office 2016 application.

  2. On the File menu, select Account.

  3. For Office 2016 Click-to-Run installations, you'll have an Update Options button.

    MSI-based installations don't have an Update Options button. You'll only see the About <application name> button.

    Click-to-run installations have an Update Options button on the Account page. MSI-based installations don't have this button.

Let's say you have a PowerPoint slide that you've added a video to. If that video has any of the following things in it, then an Audio and Subtitles icon appears on the play bar of the video in Slide Show:

  • Multiple audio tracks (in a supported format)

  • Embedded closed captions (in a supported video format)

  • Embedded subtitles (in a supported video format)

Turn on closed captions or subtitles by using the keyboard

  1. Press the Tab key repeatedly until the focus is on the video.

  2. Press Alt+J (on Windows) or Option+J (on Mac or iOS) to show the Audio and Subtitles menu.

  3. Press the arrow keys to place the focus on the track you want to use.

  4. Press Enter to select the track.

You can click the icon (Audio and Subtitles menu for PowerPoint videos for Windows, Audio and Subtitles menu for PowerPoint videos for Mac) to see the list of available tracks, captions, or subtitles, and then click the name of one you want to use.

In PowerPoint 2016, playback of closed captions and subtitles is only supported on Windows 10 and above.  In PowerPoint 2016, playback of alternate audio tracks is supported on Windows 8.1 and above.

Videos that have captions, subtitles, or multiple audio tracks

Closed captions and subtitles are words that display on top of the video as it is playing. They are used by people that are deaf or hard of hearing, people that do not understand the language used in the video or are learning the language, and in situations where the volume on the audio must be turned down. The person viewing the video can choose whether to show the closed captions or subtitles.

  • Subtitles typically contain only a transcription (or translation) of the dialogue.

  • Closed captions typically also describe audio cues such as music or sound effects that occur off-screen.

Some videos include additional audio tracks that include video descriptions, director's commentary, or other languages. Video description means audio-narrated descriptions of a video's key visual elements. These descriptions are inserted into natural pauses in the program's dialogue. Video description makes video more accessible to individuals who are blind or visually impaired.

Set up a lync meeting on behalf of someone else

Setting up a Lync Meeting on behalf of someone else, for example a manager, is similar to setting up one for yourself. First, the person you're scheduling the meeting for needs to add you as a delegate in their Outlook calendar and in Lync. Then, you can set up Lync Meetings, start impromptu Lync Meetings, and start conference calls on behalf of that person.

Note:  To be or have a delegate, you must be using Outlook.

Get set up as a delegate

Note: You can designate up to 25 delegates, and you can act as a delegate for up to 25 delegators.

First, the steps below must be done by the person who is giving delegate access.

  1. In Outlook, click File > Account Settings > Delegate Access > Add.

  2. Find and add the name of the person who is going to be the delegate.

  3. Click the Calendar menu, and select Editor rights.

    For more information, see Allow someone else to manage your mail and calendar.

    Screenshot of adding delegate in outlook

Start a meeting or call as a delegate

As a delegate, you can access the calendar of the person you're a delegate for and set up a Lync Meeting just like any other meeting. To schedule a Lync Meeting on behalf of someone you're a delegate for, simply follow the steps at Set up a Lync Meeting.

As a delegate, you can also start an impromptu meeting, by using the Meet Now feature or a conference call for someone else.

Use Meet Now to start a Lync Meeting

  1. In the Lync main window, click the Options menu, and then click Show Menu Bar.

  2. On the menu bar, click Meet Now.

Screenshot of starting a meet now as a delegate

  1. Click the name of the person who has given you delegate access. This opens a meeting window.

  2. Pause on the people menu to invite participants. Invitees receive an alert that notifies them of a meeting request.

Start a conference call

  1. In your Contacts list, select the names of the invitees, including the person who has given you delegate access, by holding down the Ctrl key on your keyboard and clicking the names.

  2. Right-click the selection, and point to Start a Conference Call.

  3. Point to the name of the person who has given you delegate access, and then click Lync Call.

    Conference call alert

Troubleshoot co authoring word documents

Word Online and versions of desktop Word as far back as Word 2010 provide the ability for more than one person to edit a document at the same time (co-authoring). If you can't co-author a document, one or more of the following reasons might be the cause:

  • The document is open in a version of the Word desktop application that doesn't support co-authoring (such Word 2007 or earlier, or Word for Mac 2008 or earlier). If you want to co-author in the Word desktop application, use Word 2010 or later.

  • The document is stored on a server that does not support co-authoring. Store your document on OneDrive to take advantage of co-authoring in Word Online.

  • The file format is not supported. Only .docx documents can be co-authored in Word Online. When you click Edit in Browser, Word Online prompts you to convert a .doc file to the new format. Click Convert, and then click Edit. Be sure your co-authors work with the .docx document. You might want to append "backup" to the file name of the original document, which Word Online stores in the same folder as the .docx copy it creates.

  • The document is marked as final to prevent accidental changes. If you need to edit the document, open it in Word and turn off Mark as Final. (Click Open in Word. In Word 2007 click the Microsoft Office Button, point to Prepare, and then click Mark as Final. In Word 2010 and later click Edit Anyway in the Marked as Final bar across the top of the document. Save the document. If you opened it in Word 2007, close the document so that it can be edited in Word Online.)

  • The document contains an OLE object, or the body of the document contains an ActiveX control.

  • The document does not have the Store random numbers to improve Combine accuracy check box selected. (On the ribbon, click the File tab, click Options to display the Word Options dialog box, click Trust Center, click Trust Center Settings to display the Trust Center dialog box, click Privacy Options, and then under the Document-specific settings section, make sure the Store random numbers to improve Combine accuracy check box is selected.)

  • The document is a very large file size. For tips on reducing the file size of documents see Reduce the file size of a picture.

  • Certain Microsoft Office group policy settings prevent co-authoring, including Disable Automerge Client Policy and Disable Co-Authoring Client Policy.

  • The document uses master documents with subdocuments or contains HTML frame sets.

Note: In SharePoint 2010 and in SharePoint 2013 on-premises, Word Online is called Word Web App.

Top of Page

Set the status date for project reporting

Usually, you report your project's progress on a day you set— the status date, to use project management-speak. For example, if you want sales report figures for last month, you set the status date to the last day of that month. Or, if progress reports are due Friday, but were sent in late, you might set the status date back to Friday before reporting on progress information.

The status date is almost never the current date, so you need to set it:

  1. Choose Project > Status Date.

  2. Select the new status date.
    To set the status date back to the current date, either enter the current date, or enter NA in the date field.

View the status date on the Gantt Chart

  1. On the Gantt Chart, choose Format > Gridlines.

  2. Under Line to change, pick Status Date, and then select a line style and color.

How does the status date affect progress updates?

When you enter progress as percent complete or actual work to date, Project uses the status date to determine where to place actual work and where to schedule remaining work. You can modify the default settings for how the status date is used for placing actual work and remaining work where you want, particularly when assignments are completed earlier or later than scheduled.

To modify the default settings, choose File > Options > Advanced, and scroll to the Calculation options for this project section. 

  • Move end of completed parts after status date back to status date

    Consider tasks that are scheduled after the status date, and have actuals entered against them. If the Move end of completed parts after status date back to status date check box is selected, then if a task is scheduled after the status date and you enter actuals against it, Project moves the actual, completed portion of the task so that the completed work ends on the status date and any remaining work remains scheduled to begin in the future. Therefore, if the status date is set to today, and you enter actuals, the work is assumed to finish today, not in the future. But the remaining work is not expected to start until the future:

  • And move start of remaining parts back to status date 

    If the Move start of remaining parts before status data forward to status date check box is selected, you can also select the And move start of remaining parts back to status date check box. With both check boxes selected, Project moves the entire task around the status date to show that work was done on the task and completed as of the status date and remaining work is continuing as of the status date:

  • Move start of remaining parts before status data forward to status date

    Consider tasks that are scheduled before the status date and that have actuals entered against them. If the Move start of remaining parts before status data forward to status date check box is selected, then if a task is scheduled before the status date and you enter actuals against it, Project leaves the actual portion of the task as scheduled, but moves any remaining work to the status date. Therefore, if the status date is set to today and you enter actuals, the work is assumed to have been completed when it was scheduled, but it is assumed that the remaining work will begin immediately instead of in the past (before the status date):

  • And move end of completed parts forward to status date

    If the Move start of remaining parts before status date forward to status date check box is selected, you can also select the And move end of completed parts forward to status date check box. With both check boxes selected, Project moves the entire task around the status date, to show that work was done on the task and completed as of the status date and that remaining work is continuing as of the status date:

These settings are particularly useful when you want to see "ahead of schedule" progress lines. They're also useful for changing how earned value is accrued.

If you change these settings, Project does not move the actual or remaining work at all; work remains where it was originally scheduled, even if you report that the work was completed several weeks earlier than scheduled.

Note: These settings do not control the placement of actual and remaining work when you track progress by entering actual work by time period.

How does the status date affect earned value?

Certain earned value costs are calculated as of the status date. For example, the budgeted cost of work scheduled (BCWS) is the portion of the cost that is planned to be spent on a task between the task's start date and the status date. For example, the total planned budget for a four-day task is $100, and it starts on a Monday. If the status date is set to the following Wednesday, the BCWS is $75. When you change the status date, the earned value calculations reflect costs up to and including the status date.

How does the status date affect calculations for progress lines?

If you use progress lines to display progress information, you can display progress lines for the status date, current date, or regular intervals. To be sure that progress lines are shown correctly, choose File > Options > Advanced, and scroll to the Calculation options for this project section. (In Project 2007, choose Tools > Options > Calculation.) Select the Edits to total task % complete will be spread to the status date check box. This setting ensures that Project evenly spreads the work reported through percentage complete up to the status date. Then, when you display progress lines, the progress lines reflect the likely progress of work on any given date.

Basic tasks using a screen reader with project

Decorative icon. Screen reader content

This article is for people with visual impairments who use a screen reader program with Office products and is part of the Office Accessibility content set. For more general help, see Microsoft Support home.

Use Project for the web with your keyboard and screen reader, to quickly do all essential basic tasks, such as opening projects or roadmaps and adding projects or roadmaps to favorites. We have tested it with Narrator, but it might work with other screen readers as long as they follow common accessibility standards and techniques.

Notes: 

  • New Microsoft 365 features are released gradually to Microsoft 365 subscribers, so your app might not have these features yet. To learn how you can get new features faster, join the Office Insider program.

  • To learn more about screen readers, go to How screen readers work with Microsoft Office.

  • When you use Project for the web, we recommend that you use Microsoft Edge as your web browser. Because Project for the web runs in your web browser, the keyboard shortcuts are different from those in the desktop program. For example, you'll use Ctrl+F6 instead of F6 for jumping in and out of the commands. Also, common shortcuts like F1 (Help) and Ctrl+O (Open) apply to the web browser – not Project for the web.

In this topic

Open and sign in to Project for the web

  1. In your web browser, go to www.office.com. If needed, sign in to your Microsoft 365 account.

  2. Press the Tab key until you hear "Project," and press Enter.

    If you don't hear "Project," press the Tab key until you hear "Explore all your apps," and press Enter. Press the Tab key until you hear "Build a project plan, assign tasks, track progress, and manage budgets" and press Enter.

    Project for the web opens in Project Home.

Open a project or roadmap

You can open a project or roadmap from the Favorites list or the projects and roadmaps list.

Open a project or roadmap from the Favorites list

If you've added the project or roadmap to your favorites, you can quickly browse to and open the project or roadmap you want.

  1. In Project Home, press the Tab key until you hear the project or roadmap you want to open.

  2. To open the project or roadmap, press Enter.

Open a project or roadmap from the projects and roadmaps list

If you haven't added the project or roadmap to your favorites, you can open it from the projects and roadmaps list.

  1. In Project Home, press the Tab key until you hear the name of the currently selected tab in the projects and roadmaps list, for example, "Recent tab item."

  2. To move to another tab, press the Right or Left arrow key until you reach the tab you want, and press Enter to select and open it.

  3. Press the Tab key once to move the focus to the list of projects and roadmaps on the selected tab.

  4. Press the Down or Up arrow key until you find the project or roadmap you want to open.

  5. To open the project or roadmap, press Enter.

Add a project or roadmap to favorites

To easily find and navigate to a project or roadmap that you frequently work on, add it to your favorites.

  1. In Project Home, move the focus to the project or roadmap you want to add to favorites as instructed in Open a project or a roadmap.

  2. Once the focus is on the right project or roadmap, press the Right arrow key until you hear "Add this item to favorites," and press Enter. The item is added to the Favorites list.

See also

Use a screen reader to create a new project in Project

Use a screen reader to review or edit an existing project in Project

Use a screen reader to work with the grid view in Project

Keyboard shortcuts for Project

Use a screen reader to explore and navigate Project

Use Project Online with your keyboard and screen reader, to quickly do all essential basic tasks, such as signing in, searching for projects, opening projects, and exporting projects to Excel. We have tested it with Narrator, JAWS, and NVDA, but it might work with other screen readers as long as they follow common accessibility standards and techniques.

Notes: 

  • New Microsoft 365 features are released gradually to Microsoft 365 subscribers, so your app might not have these features yet. To learn how you can get new features faster, join the Office Insider program.

  • To learn more about screen readers, go to How screen readers work with Microsoft Office.

  • When you use Project Online, we recommend that you use Microsoft Edge as your web browser. Because Project Online runs in your web browser, the keyboard shortcuts are different from those in the desktop program. For example, you'll use Ctrl+F6 instead of F6 for jumping in and out of the commands. Also, common shortcuts like F1 (Help) and Ctrl+O (Open) apply to the web browser – not Project Online.

In this topic

Sign in to Project Online

Sign in for the first time

  1. When launching Project Online, you hear: "Sign into your account."

  2. You hear: "Enter your email, phone, or Skype." Type the necessary information.

  3. Press the Tab key until you hear "Next button," and then press Enter.

  4. Press the Tab key until you hear: "Enter password." Type your password.

  5. Press the Tab key until you hear "Sign in button," and then press Enter.

Sign in after the first use

  1. When launching Project Online, you hear: "Sign into your account."

  2. You hear: "Sign in with," followed by the login credentials you have used before. Press Enter.

  3. You hear: "Enter password." Type your password.

  4. Press the Tab key until you hear "Sign in button," and then press Enter.

Sign in with different credentials

  1. When launching Project Online, you hear: "Sign into your account."

  2. You hear: "Sign in with," followed by the login credentials you have used before. Press the Tab key until you hear "Use another account button," and then press Enter.

  3. You hear: "Enter your email, phone, or Skype." Type the necessary information.

  4. Press the Tab key until you hear "Next button," and then press Enter.

  5. Press the Tab key until you hear: "Enter password." Type your password.

  6. Press the Tab key until you hear "Sign in button," and then press Enter.

Search for projects

  1. In any of the main views of Project Online, press the Tab key until you hear: "Search this site."

  2. Type your search term into the search textbox and press Enter.

  3. To navigate the list of search results, press the Tab key until you hear the name of the desired project, and press Enter to open it.

Open a project

You can open and edit your project either in your browser or in the desktop version of Microsoft Project.

  1. In any of the main views of Project Online, press the Tab key until you hear "Projects," and then press Enter. The Project Center view opens.

  2. Press the Tab key until you hear the name of the project you want to open and then press Enter to select it in the projects list.

  3. Press Shift+Tab until you hear "Projects tab," and then press Enter.

  4. Press the Tab key until you hear "Open button," and then press Spacebar.

  5. Do one of the following:

    • To open the project in read-only mode, press the Tab key until you hear "In browser," and then press Enter.

    • To open the project for editing, press the Tab key until you hear "In browser for editing," and then press Enter.

    • To open the project in Microsoft Project, press the Tab key until you hear "Microsoft Project," and then press Enter.

    • To open the project in Microsoft Project for editing, press the Tab key until you hear "Microsoft Project for editing," and then press Enter.

Export to Excel

  1. In the Project Center view of Project Online press the Tab key until you hear "Project details," and press Enter.

  2. Press the Tab key until you hear "Options schedule tools group," and press Enter.

  3. Press the Tab key until you hear "Export to Excel," and press Enter.

  4. Your browser opens a dialog giving you the option to either open the exported file or to save it to a location on your computer. To move the focus to the dialog, press Alt+N. Select between the options by pressing the Tab key until you hear the one you want, then press Enter.

See also

Use a screen reader to create a new project in Project

Use a screen reader to review or edit an existing project in Project

Keyboard shortcuts for Project

Use a screen reader to explore and navigate Project

Technical support for customers with disabilities

Microsoft wants to provide the best possible experience for all our customers. If you have a disability or questions related to accessibility, please contact the Microsoft Disability Answer Desk for technical assistance. The Disability Answer Desk support team is trained in using many popular assistive technologies and can offer assistance in English, Spanish, French, and American Sign Language. Please go to the Microsoft Disability Answer Desk site to find out the contact details for your region.

If you are a government, commercial, or enterprise user, please contact the enterprise Disability Answer Desk.