Friday, January 24, 2020

Using apple watch with microsoft to do

To use your Apple Watch with Microsoft To Do, you can connect your Outlook.com or Exchange account. Just head to your iPhone's settings, select Accounts & Passwords and then Add Account. Then select Exchange or Outlook.com and simply follow the prompts to add your account.

Once you've added your account, you'll also need to enable Reminders for that account. Just select Accounts & Passwords once more and then select either Exchange or Outlook.com. Then make sure that Reminders is toggled on for that account.

Now your tasks from Microsoft To Do will sync to Reminders, where they'll also be visible on your Apple Watch.  

Create new documents at office com

Your browser does not support video. Install Microsoft Silverlight, Adobe Flash Player, or Internet Explorer 9.

Try it!

When you create a new document at Office.com, it's automatically saved to OneDrive. This lets you quickly share it with anyone you need to collaborate with.

  1. Sign in to Office.com.

  2. Select New.

  3. Choose the type of document you want.

  4. While working on the web, it saves automatically. Select Share to send it to others to collaborate with.

Want more?

Office Online Quick Starts

Create a calculated control

You can use calculated controls on forms and reports in Access databases to display the results of a calculation. For example, if you have a report that displays the number of items sold and the price of each unit, you can add a calculated text box that multiplies those two fields to display the total price. The Control Source property of the calculated text box contains an expression that multiplies two fields (the number of items times the unit price) to obtain the result.

What do you want to do?

Create a calculated control

Change a bound control to a calculated control

Learn which types of controls can be used as calculated controls

Create a calculated control

This procedure helps you create a calculated control without using a control wizard.

  1. Right-click the form or report in the Navigation Pane, and then click Design View.

  2. On the Design tab, in the Controls group, click the tool for the type of control you want to create.

    For a list of control types that can be used as calculated controls, see the section Learn which types of controls can be used as calculated controls.

  3. Position the pointer where you want the control to be placed on the form or report, and then click on the form or report to insert the control.

  4. If a control wizard starts, click Cancel to close it.

  5. Select the control, press F4 to display the property sheet, and then type an expression in the Control Source property box. To use the Expression Builder to create the expression, click Builder button next to the Control Source property box.

  6. Switch to Form view or Report view and verify that the calculated control works as you expect.

    Notes: 

    • Precede each expression with the = operator. For example: =[UnitPrice]*.75.

    • For more information about creating expressions, see the article Learn to build an expression.

    • If you need more room to type an expression in the Control Source property box, press SHIFT+F2 to open the Zoom box.

    • If your form or report is based on a query, you might want to put the expression in the query instead of in a calculated control. Doing this can improve performance and, if you are going to calculate totals for groups of records, it is easier to use the name of a calculated field in an aggregate function.

    • When you sort on a calculated control in a form or report, ensure that the Format property of the control is set appropriately. Otherwise, calculated numeric or date values might sort alphabetically instead of numerically.

Top of Page

Change a bound control to a calculated control

A good way to create a calculated control is by first creating a bound control (for example, by dragging a field from the Field List pane to your form or report), and then editing the bound control's Control Source property to create an expression. This works well, as long as you ensure that the name of the control does not conflict with any of the field names contained in the expression. For more information about creating a bound control by dragging a field from the Field List pane, see the article Add a field to a form or report.

Assuming you have already created your bound control, use the following procedure to change it to a calculated control and avoid any name conflicts.

  1. Right-click the form or report in the Navigation Pane, and then click Design View.

  2. Click the field you want to change, and then press F4 to open the property sheet.

  3. On the All tab of the property sheet, if the Name property matches the Control Source property, edit the Name property so that the two properties do not match. Ensure that the name you enter is not a reserved word or the name of another field in your database. For more information about reserved words, see the article Learn about Access reserved words and symbols.

  4. Edit the string in the Control Source property box so that it contains the expression you want.

  5. Press CTRL+S to save your changes.

  6. Switch to Layout view or Form view and verify that the calculated control works as you expect.

If the control does not display the data you want (for example, if Access displays #Name? in the control), check the record source of the form or report to ensure that all the fields you used in the expression are available. If the record source is a query, you might need to add one or more fields to the query before the expression will work.

Notes: 

  • Precede each expression with the = operator. For example: =[UnitPrice]*.75.

  • If you need more room to type an expression in the Control Source property box, press SHIFT+F2 to open the Zoom box.

  • If your form or report is based on a query, you might want to put the expression in the query instead of in a calculated control. Doing this can improve performance and, if you are going to calculate totals for groups of records, it is easier to use the name of a calculated field in an aggregate function.

  • When you sort on a calculated control in a form or report, ensure the Format property of the control is set appropriately. Otherwise, calculated numeric or date values may sort alphabetically instead of numerically.

Top of Page

Learn which types of controls can be used as calculated controls

Text boxes are the most popular choice for a calculated control because they can display so many different types of data. However, any control that has a Control Source property can be used as a calculated control. In many cases, it doesn't make sense to use a certain control type as a calculated control, because you can't update that control the way you can update a bound or unbound control. For example, if you place a check box control on a form and then enter an expression in the Control Source property of the check box, you can no longer select or clear the check box by clicking it. The check box appears selected or cleared, based on the results of the expression. If you click the check box, Access displays an alert on the Access status bar: Control can't be edited; it's bound to the expression <your expression>. On a report, however, it may be useful to base a check box control on the results of a calculation, because controls on reports are used only to display information.

Top of Page

Reactivate an account that has been blocked

If you receive the message "Your account is currently unavailable" when you try to access your OneDrive, your account might have been temporarily blocked due to unusually large traffic volume, suspicious activity, or a violation of the Microsoft Services Agreement or code of conduct.

Note: If you recently verified your Microsoft account by entering a security code that you received as a text message, or if you shared a large number of files, the block will be removed within 24 hours.

To check your account status or reactivate your account, go to the Microsoft services account reset page page and follow the on-screen instructions.

See also More fixes for recent OneDrive issues.

Need more help?

Online

Get online help
See more support pages for OneDrive.
For the OneDrive mobile app, see Troubleshoot OneDrive mobile app problems.

Email Support icon

Email support
If you still need help, shake your mobile device while you're in the OneDrive app or email the OneDrive support team.

Office 365 community forums

Account Support
For help with your Microsoft account or subscriptions, visit Microsoft Account Help.

View tab

The View tab enables you to switch between Normal or Master Page, and Single Page or Two-Page Spread views. This tab also gives you control over showing boundaries, guides, rulers, and other layout tools, zooming the size of your view of the publication, and managing Publisher windows you have open.

View tab showing with the Views, Layout, Show, Zoom, and Window groups in Publisher 2010

Views

The Views group gives you the ability to quickly switch between Normal or Master Page views of your publication.

View your working page or the Master Page in Publisher 2010

By default the Normal view is selected. This is the view of your publication pages and where you do most of the work of creating your publication. Master Page view shows you the page or pages that contain the elements that you want to repeat on multiple pages in a publication. By using master pages for these common elements, you can give your publication a more consistent appearance. In publications that have more than one page, you can create multiple master pages for a more versatile publication design. Multiple master pages provide a variety of layouts that you can apply to any of the pages in your publication.

Tip:  You can also move in and out of the Master Page view by pressing CTRL+M.

Layout

The Layout group is where you switch between a Single Page or Two-Page Spread view of your publication.

Layout group on the View tab in Publisher 2010

Single Page is the default view and shows each page individually in both the workspace and the Page Navigation pane. A two-page spread is a printing convention that represents leading and trailing pages in a bound or folded project such as a book, booklet, newsletter, or greeting card. Often, the layout of pages in a two-page spread mirror one another. Two-Page Spread will show you two side-by-side pages in both the workspace and the Page Navigation pane if your publication has three or more pages.

Show

The Show group gives you the ability to select which layout assistance controls show on your publication workspace, such as the ruler, layout guides, and page navigation. Each of the layout assistance controls is revealed or hidden by selecting and deselecting its check-box.
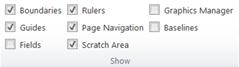
View different layout elements in a Publisher 2010 publication

Boundaries

This selection reveals or hides the boundaries for objects such as shapes, pictures, and text boxes. These boundaries do not appear when you print your publication, but help you layout the page by showing you the space that the object takes on the page.

Guides

This check-box shows or hides the layout guides in your publication. Guides help you align objects on the page. For more information, please see Structure the page with layout guides.

Fields

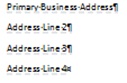
This option will show you which objects on the page are inserted fields, such as Business Information or catalog merge fields. When this check-box is selected field objects will be underlined with a subtle grey dashed line:

View the fields in a Publisher 2010 publication

Rulers

This controls whether or not to show horizontal and vertical rulers on the left and top edges of your workspace.

Note:  If you are using a Right-to-Left language the horizontal ruler will be on the right edge of your workspace.

Page Navigation

This selection hides or shows the Page Navigation pane to the left of your workspace.

Note:  If you are using a Right-to-Left language the Page Navigation pane will be to the right of your workspace.

Scratch Area

If you move objects off of the page they are in the scratch area. The scratch area enables you to have several objects readily available to you as you layout the page. To view all the objects in the scratch area, check the Scratch Area option. To hide the scratch area objects and see a clean view of your page, uncheck the Scratch Area option. Objects that are partially on the page will appear clipped so that the portion in the Scratch Area is not shown.

Graphics Manager

The Graphics Manager task pane helps you to efficiently manage all the pictures that you have inserted into your publication, such as embedded pictures or linked pictures. For more information, please see Manage pictures with the Graphics Manager task pane.

Baselines

You can use baseline guides to precisely align text lines across multiple columns. This selection will show or hide the baseline guides in your publication. For more information, please see Structure the page with layout guides.

Zoom

The Zoom group contains several tools for controlling how large the page appears on your display so that you can better see and work with details by zooming in, or better see the page as a whole by zooming out.
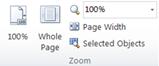
Zoom the view of your publication in Publishr 2010

100%

Clicking this button will return the display of the selected page or two-page spread to 100% actual size.

Whole Page

This button will zoom the page so that the entire page or two-page spread will fit in your display window.

Zoom

This selection box enables you to precisely select your zoom level. You can either select from the options in the pull-down menu, or enter any percentage and press ENTER.

Page Width

This button will zoom the page so that its width fits in your display window. This may mean that the page height extends above and below your display window.

Selected Objects

This option becomes available when you select one or more objects, such as text boxes or pictures. Clicking this button will zoom the page so that the selected objects fill your display window. To return to a different zoom simply select one of the other options in the Zoom group.

Window

This group helps you manage several Publisher windows at once.
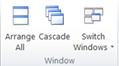
View different Publisher 2010 windows

Arrange All

Clicking this button will resize and move your currently open Publisher windows so that they are side by side.

Cascade

This option will cause all you open Publisher windows to resize and move so that the windows cascade from upper left to lower right.

Switch Windows

This pull down will show you all open Publisher windows and enable you to select and jump to any of those windows.

Top of Page

Thursday, January 23, 2020

Edit an email subject line

You can change the subject of any message you receive.

Important: Even though you can change the subject of a message and save the new subject line, by default, Outlook shows you messages grouped by Conversation Topic. In order to see the newly changed subject line in your message list, you will need to Create, change, or customize a view.

Change the subject line of a message you've received

  1. Double-click the message to open it. You can't change the message subject from the Reading Pane.

  2. Select the subject line. Hint: click anywhere inside the subject line. Once you see a blinking cursor, press CTRL+A to select the entire subject line.

    You can edit the subject line of a received message.
  3. Type your new subject.

  4. Click the Save icon in the top left corner of the message window, then close the message.

    Click Save to save your changes.
  5. Your new subject will show up in the Reading Pane, but the message list will still show the original conversation topic.

    Outlook groups messages by conversation topic in the message list.

Use a screen reader to review or edit an existing project in project

Read out loud symbol with the label Screen reader content. This topic is about using a screen reader with Office

This article is for people with visual impairments who use a screen reader program with the Office products and is part of the Office Accessibility content set. For more general help, see Office Support home.

Use Project with your keyboard and a screen reader to review and edit both local and Project Online projects. We have tested it with Narrator and JAWS, but it might work with other screen readers as long as they follow common accessibility standards and techniques.

Notes: 

In this topic

Open a recently used project

When you start Project, it opens a list of recently used projects and project templates.

  1. Press the Tab key twice to move to the Recent projects list. You hear "Recent," followed by the name of the first project on the list.

  2. Press the Down and Up arrow keys to move in the list of recent projects. When you hear the name of the project you want to open, press Enter.

Work with Project Online

It's easy to work on a shared project with your colleagues when you have access to Project Online.

Create a Project Online account

  1. Press Alt+F, I, and then press N to open the Project Web App Accounts dialog.

  2. Press the Tab key until you hear "Add button," and then press Spacebar. The Account Properties dialog opens.

  3. You hear: "Account name, editing." With JAWS, you hear: "Account Properties." Type a name for the account, and then press the Tab key.

  4. Type or paste the complete server URL. If you don't know the server URL, contact your server administrator.

    Note: The URL must start with http:// or https:// and contain less than 129 characters. If you use the less secure http:// option, Project asks you to confirm the URL.

  5. Press the Tab key until you hear "OK button," and then press Enter.

  6. To confirm that you have the Choose an account mode selected, press Shift+Tab until you hear: "Selected, Choose an account." If you hear "Selected, Use my default account," press the Down arrow key once.

  7. Press the Tab key until you hear "OK button," and then press Enter.

  8. Press Esc to return to the main view of Project.

  9. To start using the new account, close and restart Project. To learn how to sign in to the account, refer to Sign in to your Project Online account.

Sign in to your Project Online account

You only have to sign in to your Project Online account once. Project remembers your credentials.

  1. When you start Project after creating a Project Online account, you hear: "Login, Profile, Computer." Press the Down arrow key until you hear the name of the online account.

  2. Press the Tab key until you hear "OK button," and then press Enter.

  3. When you use an online account for the first time, you hear: "Sign in." Type your email address.

  4. Press the Tab key until you hear "Focus on Next button," and then press Enter.

  5. You hear: "Sign in to your account, enter password." Type the password.

  6. Press the Tab key until you hear "Sign in button," and then press Enter. When you hear "Blank Project button," you know that the sign-in process has finished.

Open a project from Project Online

After signing in once, you can open online projects as easily as if they were stored on your computer. To learn how to sign in to an online account, refer to Sign in to your Project Online account.

  1. When you start Project, you hear: "Login, Profile, Computer." Press the Down arrow key until you hear the name of the online account you want to use.

  2. Press the Tab key until you hear "OK button," and then press Enter.

  3. Press the Tab key until you hear "Open other projects, hyperlink," and then press Enter. You hear: "Recent projects, list updated."

    Tip: The above applies when you have just opened Project. To open an online project later, press Alt+F, O, Y, 1, and then continue from step 3.

  4. Press the Tab key until you hear "Recent tab item," and then press the Up or Down arrow key until you hear "Project Web App," followed by the name of your test account.

  5. Press the Tab key until you hear "Project Web App, off, Browse, button," and then press Enter. You hear: "Shell folder view, table, show me the list of all projects."

  6. Press Spacebar, and then press Enter. You hear: "Shell folder view," followed by the name of the first project and the number of projects, for example, "1 of 10."

  7. Use the Down and Up arrow keys to find the project you want to open, and then press Enter.

Note: Project may prompt you to select Yes or No when you open an online project. This means that the project you opened uses a different currency from the one specified by the server. If you want to overwrite the project currency with the server currency, select the Yes button, otherwise select No. Press the Tab key to move between the buttons, and then press Enter to confirm the selection.

Add a new column to the Gantt chart

Your project opens in the Gantt Chart view, which is the simplest view to work in. The focus is in the top left corner of the chart. In many projects, the default columns are not sufficient.

  1. Press the Left and Right arrow keys to find the column that is to the right of the place where you want to add a column. Your screen reader announces what is written in the current cell, followed by the name of the column.

  2. Press Alt+J, F, U to insert a new column to the left of the currently selected column. Press the Down and Up arrow keys to find the column name you want, and then press Enter to add it to the chart. With Narrator, you can type a partial name and then use the Down and Up arrow keys to browse the predefined column names that match. For example, if you type actual, Project suggests Actual Cost, Actual Duration, and so on.

Note: Instead of choosing a predefined column name, you can type your own. With JAWS, this is the option you should use, as JAWS doesn't announce the column name until after you have added it.

Add tasks to the Timeline

  1. To move to the Timeline view, press Alt+H, G, and then press L.

  2. Press Alt+J, F, and then press X. You hear: "Add Tasks to Timeline," followed by the project's name.

  3. The focus is on the top-level task, which includes the whole project. To select which tasks you want to add to the Timeline, use the Down and Up arrow keys to move between the tasks, and press Spacebar to add the currently selected task.

  4. When you have selected all the tasks you want, press Enter to close the Add Tasks to Timeline dialog. The Timeline is updated to match your selections.

Use summary tasks

You can indent tasks to show hierarchy, that is, to turn your task list into an outline of your project. An indented task becomes a subtask of the task above it, which becomes a summary task.

Tip: Avoid assigning resources to summary tasks. Assign them to the subtasks instead, or you might not be able to resolve overallocations.

  1. To move to the Gantt Chart view, press Alt+H, G, and then press G.

  2. Use the arrow keys to find the right task in the Task Name column. Your screen reader announces what is written in the current cell, followed by the name of the column.

  3. Press Alt+Shift+Right arrow key to indent the current task, making it a subtask. This makes the task above it a summary task. With JAWS, you hear: "Level 2."

    Note: With Narrator, you only hear "Expanded" or "Collapsed" when the focus is on a summary task. You can add the WBS column to the Gantt Chart view to make the task hierarchy clearer. The WBS column shows the row number of each task, and subtasks use different numbering. For example, if the summary task is number 7, its subtasks are 7.1, 7.2, and so on. To learn how to add a column, go to Add a new column to the Gantt chart.

  4. To add another subtask to the summary task, press the Down arrow key to go to the next row in the Task Name column, then press Alt+Shift+Right arrow key.

  5. If you need to return a subtask to a normal task, press Alt+Shift+Left arrow key. With JAWS, you hear "Level 1."

Tip: You can hide a subtask from view by pressing Alt+Shift+Minus sign (-) on the numeric keypad. You hear: "Subtract." To expand the summary task again, press Alt+Shift+Plus sign (+).

See also

Use a screen reader to create a new project in Project

Keyboard shortcuts for Project

Set up your device to work with accessibility in Office 365

Use a screen reader to explore and navigate Project

Use Project Online with your keyboard and a screen reader to review or edit a project. We have tested it with Narrator, but it might work with other screen readers as long as they follow common accessibility standards and techniques.

Notes: 

  • New Office 365 features are released gradually to Office 365 subscribers, so your app might not have these features yet. To learn how you can get new features faster, join the Office Insider program.

  • To learn more about screen readers, go to How screen readers work with Microsoft Office.

  • When you use Project Online, we recommend that you use Microsoft Edge as your web browser. Because Project Online runs in your web browser, the keyboard shortcuts are different from those in the desktop program. For example, you'll use Ctrl+F6 instead of F6 for jumping in and out of the commands. Also, common shortcuts like F1 (Help) and Ctrl+O (Open) apply to the web browser – not Project Online.

In this topic

Check out a project

In the Project view, press the Tab key until you hear "Edit button," and press Enter.

Read and edit project details

  1. In the Project view, press the Tab key until you hear "Project details," and press Enter.

  2. Press the Tab key until you hear "Project tab," and press Enter.

  3. Press the Tab key until you hear "Edit button," and press Enter.

  4. Press the Tab key to cycle through the project detail fields and edit them using the keyboard.

  5. To change the project start date, press the Tab key until you hear "Select a date from the calendar button," and press Enter. The calendar popup opens. Select a date with the Left and Right arrow keys and press Enter.

  6. To save your changes, press the Tab key until you hear "Save button," and press Enter.

  7. Press the Tab key until you hear "Close button," and press Enter.

  8. The Close dialog opens, asking if you want to check in the project. Do one of the following:

    • To check in the project, press Enter.

    • To keep the project checked out, press Ctrl+Tab. You hear: "Do you want to check your project in? Selected, check it in." Press R to move to the next option. You hear: "Not selected, keep it checked out." Press Enter to select the option, press the Tab key to highlight the OK button, and then press Enter to close the dialog.

Add tasks to a timeline

  1. In the Project view, press the Tab key until you hear "Task schedule tools group," and press Enter.

  2. Press the Tab key until you hear: "Table." You can navigate the table rows by pressing Ctrl+Alt+Up or Down arrow keys, and the table columns by pressing Ctrl+Alt+Left or Right arrow keys. When you have found the task you want to add to the timeline, press Enter to select it.

  3. Press Ctrl+F6 to leave the table.

  4. Press the Tab key until you hear "Add to timeline button," and press Enter to add the task to the timeline.

Use summary tasks

You can indent tasks to show hierarchy, that is, to turn your task list into an outline of your project. An indented task becomes a subtask of the task above it, which becomes a summary task.

  1. In the Project view, press the Tab key until you hear "Task schedule tools group," and press Enter.

  2. Press the Tab key until you hear: "Table." You can navigate the table rows by pressing Ctrl+Alt+Up or Down arrow keys, and the table columns by pressing Ctrl+Alt+Left or Right arrow keys. When you have found the task you want to indent, press Enter to select it.

  3. Press Ctrl+F6 to leave the table.

  4. Press the Tab key until you hear "Indent button," and press Enter to indent the task.

Save and publish changes, and check in

Save changes in a project

In the Project view, press the Tab key until you hear "Save button," and press Enter.

Publish the project schedule

  1. In the Project view, press the Tab key until you hear "Task schedule tools group," and press Enter.

  2. Press the Tab key until you hear "Publish button," and press Enter.

Close and check in a project

  1. In the Project view, press the Tab key until you hear "Close button," and then press Enter.

  2. The Close dialog opens, asking if you want to check in the project. Press Enter to check in the project.

See also

Use a screen reader to create a new project in Project

Use a screen reader to build a team in Project

Keyboard shortcuts in Project Online

Basic tasks using a screen reader with Project

Use a screen reader to explore and navigate Project

Technical support for customers with disabilities

Microsoft wants to provide the best possible experience for all our customers. If you have a disability or questions related to accessibility, please contact the Microsoft Disability Answer Desk for technical assistance. The Disability Answer Desk support team is trained in using many popular assistive technologies and can offer assistance in English, Spanish, French, and American Sign Language. Please go to the Microsoft Disability Answer Desk site to find out the contact details for your region.

If you are a government, commercial, or enterprise user, please contact the enterprise Disability Answer Desk.

Add and format in powerpoint for the web

Add text

  • Tap inside the text placeholder, and start typing.

  • For text bullets, place your cursor in the line of text, and on the Home tab, select a bullet style in the Paragraph group.

Input Text box with text in PowerPoint

Insert pictures

  1. Select where you want to insert the picture on the slide.

  2. Select Insert > Pictures and where to find the image: This device, OneDrive, or Bing pictures.

  3. In the dialog box that opens, browse to the picture that you want to insert, tap that picture, and then Insert.

Insert a picture

Insert Shapes, Icons, and SmartArt

The Insert tab allows you to add visual appeal to your slides.

  • Select Insert > Shapes and in the drop-down select the shape.

  • Select Insert > Icons and in the drop-down select the icon.

  • Select Insert > SmartArt and in the gallery tap the layout for the SmartArt graphic you want.

Insert tab

Insert videos

  1. In your web browser, locate the video you want.

  2. For an online video, copy the URL of the web page from the Address bar of your browser.

  3. Switch back to PowerPoint and select the slide where you want to place the video.

  4. On the Insert tab of the ribbon, select Online Video.

  5. In the Online Video dialog box, paste the URL you copied in step 2.

  6. Select Insert.

Input video menu in PowerPoint
Expand your Office skills
Explore training
Get new features first
Join Office Insiders