Thursday, June 16, 2022

View multiple calendars at the same time

You can see multiple calendars at the same time side-by-side or combined into a stacked overlay view to help you see availability across calendars.

Open a calendar in a new window

  1. In Calendar, in the Navigation Pane, right-click the name of the calendar that you want to view.

  2. Click Open in New Window.

    Click Open in New Window on the right-click menu

Open a calendar in side-by-side view

  • In Calendar, in the Navigation Pane, select the check box of another calendar that you want to view.

    The calendar that you selected opens next to the calendar that already appears.

    Example of three calendars side by side

Overlay the calendars

  1. In Calendar, in the Navigation Pane, select the check box of another calendar that you want to view.

    The calendar that you selected opens next to calendar that is already displayed. Each successive calendar opens next to the one most recently opened.

  2. On the calendar tab, click View in Overlay Mode.

    Click the View in Overlay Mode arrow

    That calendar is now in overlay mode with the one you opened first — usually your default calendar.

  3. To add another calendar to the overlay, repeat step 2.

Remove a calendar from the overlay stack

  1. In Calendar, on the tab of the calendar that you want to remove from the overlay stack, click View in Side-by-Side Mode.

    Click the View in Side-by-Side Mode arrow

    The tab moves back to the right. The calendar that you selected no longer appears in overlay mode.

  2. To remove a calendar from view, clear its check box in the Navigation Pane or click Close on the calendar tab.

Top of Page

Create a signature and automatic reply

Your browser does not support video. Install Microsoft Silverlight, Adobe Flash Player, or Internet Explorer 9.

Try it!

Add a personal touch to every email with a signature or set an automatic reply when you're on vacation or out of office in Outlook on the web.

Create a signature

  1. Select Settings > View all Outlook settings.

  2. Select Compose and reply.

  3. Create your signature.

  4. Choose if you want to include your signature on new messages and messages you reply to or forward.

  5. Select Save.

Create an automatic reply

  1. Select Settings > View all Outlook settings.

  2. Select Automatic replies.

  3. Turn on automatic replies.

  4. If you want, choose to:

    • Set a start and end date

    • Block my calendar for this period

    • Automatically decline new invitations for events that occur during this period

    • Decline and cancel my meetings during this period

  5. Type your message.

  6. Choose if you want to send a response to people outside your organization. If so, type another message.

  7. Select Save.

Want more?

Create and add an email signature in Outlook on the web

Send automatic (Out of Office) replies in Outlook on the web

Get help with Outlook on the web

Outlook help & training

Office for the web Quick Starts

Wednesday, June 15, 2022

Create and edit a contact

Your browser does not support video. Install Microsoft Silverlight, Adobe Flash Player, or Internet Explorer 9.

Try it!

Create and edit contacts in Outlook on the web to keep the information about people you work with up-to-date.

Create a contact

  1. Select People.

  2. Select New contact.

  3. Add contact details.

  4. Choose Add more for more options.

  5. Select Create to finish.

Edit a contact

  1. Select a contact.

  2. Choose the Contact tab.

  3. Select Edit contact.

  4. Make the changes you want.

    Note: Some information is provided by your organization and you won't be able to edit it.

  5. Select Save.

Want more?

Using contacts (People) in Outlook on the web

Create, view, and edit contacts and contact lists in Outlook on the web

Get help with Outlook on the web

Outlook help & training

Office for the web Quick Starts

Create bpmn compliant processes

Business Process Model and Notation (BPMN) is a standard way to represent business processes graphically. Visio includes a template that contains the graphical elements described by the BPMN 2.0 specification, following the Analytic conformance class.

Only the basic BPMN 2.0 shapes are included in the BPMN Basic Shapes stencil. Other shapes can be derived from the basic shapes by using the options provided on the shape's right-click menu. Simply drag the basic type of shape you want onto the canvas, select the shape, then right-click the shape and select from the different options on the menu. 

To find the right template to start from, go to File > New and, in the search box, type BPMN Diagram.

  1. For each step in the process you want to model, drag a shape from the stencil to the page, and connect the shapes as usual.

    1. The BPMN specification calls for three types of connectors: Sequence Flow, Message Flow, and Association. Connectors you add by using AutoConnect or the Connector tool are Sequence Flow connectors by default. You can change the type by right-clicking the connector and then clicking the type you want in the shortcut menu.

    2. For general information about connecting shapes, see Add connectors between shapes.

  2. Right-click shapes to set the attributes of each object.

    • Every BPMN shape has some underlying data, or attributes. These attributes specify the appearance of the shape, as well as additional data associated with the shape. Right-click the shape to view and change the main attributes in the shortcut menu.

  3. Validate the workflow against the BPMN rule set.

    1. On the Process tab, in the Diagram Validation group, click Check Diagram.

    2. Fix any problems that appear in the Issues window.

Validation checks only the graphical elements; it doesn't check the accuracy of attribute values. For more information about validation, see Validate a structured diagram.

Some visual changes that can be performed on shapes in flowcharts and other diagrams are not allowed in BPMN diagrams, because they are not allowed by the BPMN 2.0 specification. For example, you can't change the appearance of a sequence flow line to a grey dashed line, because it would look like a message flow.

For details about BPMN 2.0 and Analytic conformance, visit the web site of the Object Management Group at http://www.bpmn.org.

We're sorry. At this time, Visio for the web doesn't support creating BPMN diagrams. To emphasize your interest in having this feature, please send us your feedback to help us prioritize new features in future updates. See How do I give feedback on Microsoft Office? for more information.

Unichar function

This article describes the formula syntax and usage of the UNICHAR function in Microsoft Excel.

Description

Returns the Unicode character that is referenced by the given numeric value.

Syntax

UNICHAR(number)

The UNICHAR function syntax has the following arguments.

  • Number    Required. Number is the Unicode number that represents the character.

Remarks

  • The Unicode character that is returned can be a string of characters, for example in UTF-8 or UTF-16 codes.

  • If Unicode numbers are partial surrogates and data types that are not valid, UNICHAR returns the #N/A error value.

  • If numbers are numeric values that fall outside the allowable range, UNICHAR returns the #VALUE! error value.

  • If number is zero (0), UNICHAR returns the #VALUE! error value.

Example

Copy the example data in the following table, and paste it in cell A1 of a new Excel worksheet. For formulas to show results, select them, press F2, and then press Enter. If you need to, you can adjust the column widths to see all the data.

Formula

Description

Result

=UNICHAR(66)

Returns the character represented by the unicode number 66 (uppercase B).

B

=UNICHAR(32)

Returns the character represented by the unicode number 32 (space character).

Space character

=UNICHAR(0)

The unicode number 0 returns the error value #VALUE!

#VALUE!

Top of Page

Video create custom animations with motion paths

Your browser does not support video. Install Microsoft Silverlight, Adobe Flash Player, or Internet Explorer 9.

If you are the adventurous type, you can create some pretty amazing presentations with lots of motion path animations. It's not all that difficult once you get the hang of it.

Customize with motion paths

You can create some pretty amazing presentations with lots of motion path animations:

On the ANIMATIONS tab, click More in the Animation Gallery, and under Motion Paths, do one of the following:

  • Click Lines , Arcs , Turns , Shapes or Loops. The path chosen appears as a dotted line on the selected object or text. The green arrow indicates the path's beginning and the red arrow indicates its end. Drag either end to put the endpoints where you want them.

  • Click Custom Path. When you click where you want the motion path to start, the pointer appears as a cross-hair.

To draw a path of connected straight lines   , click where you want the motion path to start. Move the pointer and click to create a line between the two click points. Move and click again to draw another line. Double-click to stop drawing lines.

To draw a freehand path   , click where you want the motion to start. Hold the left mouse button and move the pointer on the path that you want the object to follow. Double-click at the motion's final endpoint.

If you are the adventurous type, you can create some pretty amazing presentations with lots of motion path animations.

You'll see that it is not all that difficult, once you get the hang of it. But let's start out small.

Click the shape called Behind Shape 1.

Now if we add an Entrance animation like Fly In, we can control where the shape ends up, and the Direction and Sequence with Effect Options.

But we can't control where the shape begins, or the path it takes.

To do that we need to use motion paths. Go down to Motion Paths and select Lines.

This is the motion path: the line describes the path; the green arrow indicates where the shape starts; and the red arrow indicates where the shape ends.

Select the path. This half-transparent shape shows the shape at its endpoint.

Drag the red arrow and position the endpoint over the in-front shape.

Then, preview the animation. And the first shape moves behind the second one.

Motion paths can be a lot of fun.

Try some other ones, like Arcs and Loops.

Also, click Custom Path, if you want to draw your own motion path.

Let's go back to the previous slide and add a motion path to Behind Shape 2.

Use the Animation Painter to copy the animation.

Then, select the motion path, and move its endpoint on top of the in-front shape.

Preview the animation.

The animation works alright, but the second behind shape ends up covering up the shape we want to keep on top.

This is a problem you'll run into more often when you are creating custom animations. But it's easy to fix.

Right-click the shape and click Send to Back, Send Backward.

Now preview the animation.

That's the way we want it.

You see, all the objects on the slide are organized into layers.

By sending the shape backward, we moved it to a layer behind the in-front shape.

Here's another thing you can do to create custom animations.

This ball shape actually contains two animations: a motion path that moves the shape horizontally and a Spin animation that makes the ball appear to roll as it moves.

To add multiple animations to an object, select the first animation in this gallery.

Then, click Add Animation to add the others.

Also, don't forget about those additional effect and timing options.

Here's another way to open that dialog box in the Animation Pane.

Click the arrow next to the animation, and click Effect Options.

I added Auto-reverse to the animations, so the objects return to their original positions.

So now, you have everything you need to get started with the animations in PowerPoint.

The best way to understand animations is to experiment on your own.

For more information, check out the links in the course summary.

Switch between outlook folders

The left side of the Outlook window is the folder pane. Like folders in a file cabinet, it's how you organize email messages, contacts, tasks, and other Outlook items.

When you click a folder, you see the items it contains. For example, click Inbox to see your new messages. Messages in a folder show in the message list.

If the folder contains subfolders, click Folder Pane folder expand button
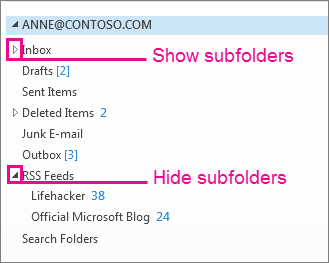
. That expands the folder list so you can see the additional folders. To collapse the folder view so you don't see subfolders, click Folder Pane folder collapse button.

Show and hide subfolders

The contents of the Folder Pane change based on what you're doing. For example, when you're working with your Calendar, the Date Navigator appears at the top of the Folder Pane. When you're reading mail messages, the Favorites section—a set of mail folders you frequently want to use—is in the Folder Pane in addition to your mail folders.

In Outlook 2003, Outlook 2007, and Outlook 2010, the Folder Pane was called the Navigation Pane.

Skype for business clients

You can use Skype for Business on your desktop, mobile phone, tablet, browser, and more. Find help for all of these in the links below.

Skype for Business Client Resources Landing Page Skype for Business for Mix

Curious about what's next for Skype for Business?

Want to learn even more about the new features in Skype for Business Online, see:

See Also

Skype Blogs

Office Blogs

Skype for Business Preview

Fuzzy match support for get transform power query

When you join table columns, you no longer require and exact match. Fuzzy matching lets you compare items in separate lists and join them if they're close to each other. You can even set the matching tolerance, or Similarity Threshold.

A common use case for fuzzy matching is with freeform text fields, such as in a survey  where the question of your favorite fruit might have typos, singulars, plurals, uppercase, lowercase and other variations that are not an exact match.

Fuzzy matching is only supported on merge operations over text columns. Power Query uses the Jaccard similarity algorithm to measure the similarity between pairs of instances.

Procedure

  1. To open a query, locate one previously loaded from the Power Query Editor, select a cell in the data, and then select Query > Edit. For more information see Create, edit, and load a query in Excel (Power Query).

  2. Select Home > Combine > Merge Queries. You can also select Merge Queries as New. The Merge dialog box appears with the primary table at the top.

  3. Select the column you want to use for your fuzzy match. In this example, we select First Name.

  4. From the drop-down list, select the secondary table, and then select the corresponding fuzzy match column. In this example, we select First Name.

  5. Select a Join Kind. There are several different ways to join. Left Outer is the default and the most common. For more information on each kind of join, see Merge queries.

  6. Select Use fuzzy matching to perform the merge, select Fuzzy matching options, and then select from the following options:

    • Similarity Threshold     Indicates how similar two values need to be in order to match. The minimum value of 0.00 causes all values to match each other. The maximum value of 1.00 only allows exact matches. The default value is 0.80.

    • Ignore case     Indicates whether text values should be compared in a case sensitive or insensitive manner. The default behavior is case insensitive, which means case is ignored.

    • Maximum number of matches     Controls the maximum number of matching rows that will be returned for each input row. For example, if you only want to find one matching row for each input row, specify a value of 1. The default behavior is to return all matches.

    • Transformation table    Specify another query that holds a mapping table, so that some values can be auto-mapped as part of the matching logic. For example, defining a two-column table with a "From" and "To" text columns with values "Microsoft" and "MSFT" will make these two values be considered the same (similarity score of 1.00).

  7. Power Query analyzes both tables, and displays a message about how many matches it made. In the example, the selection matches 3 of 4 rows from the first table. Without using fuzzy matching, only 2 of 4 rows would match.

  8. If you're satisfied, select OK. If not, try different Fuzzy merge options to customize your experience.

    Power Query fuzzy merge options

  9. When satisfied, Select OK.

See Also

Power Query for Excel Help

Merge queries (Power Query)

Fuzzy merge (docs.com)

Use offline messaging in skype for business

You can now send Skype for Business messages to your contacts even if they are not signed in.

This feature lets your contacts know that you have been trying to reach them. You don't have to wait until someone is online before sending them a message. And you'll no longer receive those "this message can't be delivered" notifications when you send a message to someone who is offline.

Send a message to an offline contact

When you start to send a Skype for Business message to someone who is offline, you will receive a message confirming that even though the person is offline, they will get the message.

Message that recipient is offline.

Note: Offline messaging can be used for person-to-person conversations only.

Retrieve a missed message

If you have received messages while you were offline, you will be notified in Skype for Business and also via Windows Alerts.

See your missed messages in Skype for Business

Access missed messages from your Skype for Business IM page

In Skype for Business:

  • Double-click to open a missed conversation.

  • Unread messages with the conversation will be indicated by an orange dot.

  • Missed conversation indicators will clear automatically after the conversations have been viewed or after they've been tabbed through.

Be notified if have missed messages via Windows Alerts

Windows Alerts will let you know if you have missed messages.

Be notified of missed messages via Windows Alerts

Don't see this feature yet?

If you find that offline messaging isn't available in your Skype for Business client, it might be because:

  • It's coming soon    The feature will be rolling out to your organization in an upcoming Office update for Skype for Business 2016 Click-to-Run client.

  • It hasn't been enabled yet    The offline messaging feature depends on the EnableIMAutoArchiving property to be set to True. If the setting is set to False, offline messaging will not be enabled. Contact your workplace technical support team for assistance, and send them a link to the admin help topic Turn on or off Offline Messages for admins.

  • Exchange Service is not available    You need to have Exchange Online or Exchange Server 2013 to see online messaging in Skype for Business. Contact your workplace technical support team for assistance.

Fixed function

This article describes the formula syntax and usage of the FIXED function in Microsoft Excel.

Description

Rounds a number to the specified number of decimals, formats the number in decimal format using a period and commas, and returns the result as text.

Syntax

FIXED(number, [decimals], [no_commas])

The FIXED function syntax has the following arguments:

  • Number    Required. The number you want to round and convert to text.

  • Decimals    Optional. The number of digits to the right of the decimal point.

  • No_commas    Optional. A logical value that, if TRUE, prevents FIXED from including commas in the returned text.

Remarks

  • Numbers in Microsoft Excel can never have more than 15 significant digits, but decimals can be as large as 127.

  • If decimals is negative, number is rounded to the left of the decimal point.

  • If you omit decimals, it is assumed to be 2.

  • If no_commas is FALSE or omitted, then the returned text includes commas as usual.

  • The major difference between formatting a cell containing a number by using a command (On the Home tab, in the Number group, click the arrow next to Number, and then click Number.) and formatting a number directly with the FIXED function is that FIXED converts its result to text. A number formatted with the Cells command is still a number.

Example

Copy the example data in the following table, and paste it in cell A1 of a new Excel worksheet. For formulas to show results, select them, press F2, and then press Enter. If you need to, you can adjust the column widths to see all the data.

Data

1234.567

-1234.567

44.332

Formula

Description

Result

=FIXED(A2, 1)

Rounds the number in A2 one digit to the right of the decimal point.

1,234.6

=FIXED(A2, -1)

Rounds the number in A2 one digit to the left of the decimal point.

1,230

=FIXED(A3, -1, TRUE)

Rounds the number in A3 one digit to the left of the decimal point, without commas (the TRUE argument).

-1230

=FIXED(A4)

Rounds the number in A4 two digits to the left of the decimal point.

44.33

Instant messaging when group chat and lync 2010 run together

Group Chat and Lync 2010 are both features that are shipped with Lync Server 2010. Because the two features share several capabilities, it is helpful to know how the two interact. The behavior of the two features depends on which one is designated as the preferred client.

For example, when Group Chat is the preferred client, Contact Lists appear and can be updated within Group Chat. Lync 2010 also updates its Contact Lists with these updates. If Lync 2010 is the preferred client, Group Chat does not display the Contact List, and because it is not available, no IM messages or sessions can be initiated through Group Chat's Contact List. However, users can double-click participants in a chat room and initiate IM sessions by using Lync 2010.

When Group Chat is not the primary IM client, there are two differences. First, a Contact List which would appear in the My Chat panel if Group Chat were the primary IM client, does not appear. Second, participants in the particular chat room you are in, still have presence information associated with them. You can still initiate an IM session with them. To do this, double-click on the participant's name. A Lync 2010 chat window opens.

Conversely, if Group Chat is the default IM client, the My Chat panel includes a list of contacts and their presence information. The Participant List remains the same as when Group Chat is not the primary IM client. However, the difference is, now when you double-click a contact or a participant, instead of opening a Lync chat session, the Message Entry Area displays messages you send to the contact or participant, as well as messages you receive from the participant. You send messages to the participant by typing the text into the Message Entry Area.

User presence can be viewed in both Lync 2010 and Group Chat. However, Group Chat cannot display the extended presence states (for example, "in a call" or "in a meeting"). These are accessible through Lync 2010 or through Office Outlook.

Group Chat determines whether Lync 2010 is installed at startup. It does this by examining the registry. If Lync 2010 is installed, the Group Chat IM capability is turned off. IM conversations can still be carried out by clicking a participant. However, this opens a Lync 2010 window. If the user is offline, Lync 2010 is launched and the user is prompted to log in.

Whether Group Chat or Lync 2010 is the preferred client is determined by the DisableIM key in the registry. If IM is disabled, or if Lync 2010 is not installed, then Group Chat is determined to be the preferred client. Otherwise, Lync 2010 is the preferred client.

Top of Page

Create view statement

Creates a new view.

Note:  The Microsoft Access database engine does not support the use of CREATE VIEW, or any of the DDL statements, with non-Microsoft Access database engine databases.

Syntax

CREATE VIEW view [(field1[, field2[, ...]])] AS selectstatement

The CREATE VIEW statement has these parts:

Part

Description

view

The name of the view to be created.

field1, field2

The name of field or fields for the corresponding fields specified in selectstatement.

selectstatement

A SQL SELECT statement.


Remarks

The SELECT statement that defines the view cannot be a SELECT...INTO statement.

The SELECT statement that defines the view cannot contain any parameters.

The name of the view cannot be the same as the name of an existing table.

If the query defined by the SELECT statement is updatable, then the view is also updatable. Otherwise, the view is read-only.

If any two fields in the query defined by the SELECT statement have the same name, the view definition must include a field list specifying unique names for each of the fields in the query.


Video sort data in a range or table

Your browser does not support video. Install Microsoft Silverlight, Adobe Flash Player, or Internet Explorer 9.

Sort data in Excel quickly, in just a few clicks. To change the order of your data, sort it. To focus on a specific set of data, filter a range of cells or a table.

Select the data that you want to sort

  • Select a range of data, such as A1:L5 (multiple rows and columns), or C1:C80 (a single column). The range can include titles (headers) that you create to identify columns or rows.

Sort quickly

  1. Select a single cell in the column you want to sort.

  2. Click Sort A to Z to perform an ascending sort (A to Z or smallest number to largest).

  3. Click Sort Z to A to perform a descending sort (Z to A or largest number to smallest).

Want more?

Sort by dates

Sort data using a custom list

Filter data in a range or table

Excel is an amazing tool for analyzing data.

And Sort and Filter are some of the most commonly used features to help you do this.

To change the order of your data, you'll want to sort it.

Right-click a cell in the column you want to sort, and point to Sort.

Since the cells in this column contains only numbers, the sort options are Sort Smallest to Largest, and Sort Largest to Smallest.

Most number formats, such as Time and Currency, have the these sort options.

I click Sort Smallest to Largest, and the codes are sorted from lowest to highest value.

To focus on a specific set of your data, you can filter a range of cells or a table.

Click any cell in the range or table. On the HOME tab, click Sort & Filter, and click Filter.

Click a drop-down arrow at the top of one of the columns to display its filter options.

I click the drop-down arrow in the Category column.

Since the column contains text I get the Text Filters options. I can also uncheck and check values.

I uncheck all values, select Fruit, and click OK. And only the rows that have Fruit in the Category column are displayed.

Up next, Sort details.

Max function

Returns the largest value in a set of values.

Syntax

MAX(number1,number2,...)

Number1,number2,...     are 1 to 30 numbers for which you want to find the maximum value.

Remarks

  • You can specify arguments that are numbers, empty arguments, logical values, or text representations of numbers. Arguments that are error values or text that cannot be translated into numbers cause errors.

  • If logical values and text must not be ignored, use MAXA instead.

  • If the arguments contain no numbers, MAX returns 0 (zero).

Examples

Col1

Col2

Col3

col4

Col5

Formula

Description (Result)

10

7

9

27

2

=MAX([Col1],[Col2],[Col3],[Col4],[Col5])

Largest of the numbers (27)

10

7

9

27

2

=MAX(Col1],[Col2],[Col3],[Col4],[Col5],30)

Largest of the numbers and 30 (30)

Set up your android phone or tablet

Your browser does not support video. Install Microsoft Silverlight, Adobe Flash Player, or Internet Explorer 9.

Try it!

With OneDrive on your phone or tablet, your files are secure and accessible from anywhere, on all your devices.

  1. Download the OneDrive app from the Google Play store.

    Note: If you have a Windows 10 phone, you already have the OneDrive app.

  2. Sign in with the work or school account you use for OneDrive, to see and share your files stored in OneDrive.

  3. To add another account, like your personal OneDrive account, tap the Accounts and Settings icon iPhone profile icon and then tap Add account.

  4. If you have the Office mobile apps, like Word, Excel or PowerPoint, you can also open, view, and edit your OneDrive files from there.

Want more?

Share OneDrive files and folders

Get the most out of Microsoft 365 on Android phones and tablets

Get the most out of Microsoft 365 on iPhones and iPads

Discover more Office training at LinkedIn Learning

calc error nested array

The nested array error occurs when you try to input an array formula that contains an array. To resolve the error, try removing the second array.

For example, =MUNIT({1,2}) is asking Excel to return a 1x1 array, and a 2x2 array, which isn't currently supported. =MUNIT(2) would calculate as expected.

Nested array #CALC! error

Need more help?

You can always ask an expert in the Excel Tech Community or get support in the Answers community.

See Also

Dynamic arrays and spilled array behavior

Export access web app tables to sharepoint

This article explains how to export Access web app tables to SharePoint lists. When you export your tables, a SharePoint List is created for each table in your Access web app and data is exported to each list.

Export Access web app tables to SharePoint

To export your Access web app tables to SharePoint lists, complete the following steps.

  1. Open your Access web app in your web browser, and then click Settings > Export to SharePoint Lists.

    Export to SharePoint Lists command on the Settings gear menu

  2. You'll see a confirmation message asking if you're sure you want to export the tables. Click Yes to continue or click No if you want to stop exporting your tables.

    Screenshot of confirmation dialog box. Clicking yes exports the data to SharePoint lists and clicking no cancels the export.

    Note: If you don't have permissions to create SharePoint sub-sites, you'll see an error message after clicking Yes. You'll need to have permissions to create SharePoint sub-sites in order to export your Access web app tables to SharePoint lists through this process.

  3. SharePoint displays an informational message letting you know where it's going to export the data and that it could take several minutes to complete. Click OK to continue.

    Screenshot of export to SharePoint lists message with an OK button.

  4. SharePoint navigates you to a SharePoint list in a new subsite that displays progress of the export procedure. Refresh your browser after a few minutes to see the current state of the export. SharePoint creates a new record in this list for each separate step of the export process. You'll also receive an email notification letting you know that the export process started.

    SharePoint list with record titled requested to export Access web app

  5. When SharePoint completes exporting all tables, you'll see a record titled Export Completed in the export status list. Note, you might need to keep refreshing your browser until you see this record. You'll also receive an email notification letting you know that the export process is completed. If you don't want to keep refreshing your browser, you can just wait until you receive that email before returning to this status list.

    SharePoint list with record titled Export Completed

  6. Navigate to the Site Contents page to see all the lists created from your Access web app. Each list is named the same as your Access web app table.

    SharePoint subsite page containing lists from exported Access web app

  7. Click a list name to open the list in datasheet view to see the data and columns.

    SharePoint list with six contact records displayed

Data type conversion

The following table explains how the various data types are exported from Access web apps to SharePoint lists.

Access web app data type

SharePoint list data type

Short Text

Single line of text

LongText

Multiple lines of text

Number

Number

Date/Time

Date and Time

Currency

Currency

Yes/No

Yes/No

Hyperlink

Hyperlink or Picture

Image

Hyperlink or Picture

Lookup (for relationship)

Lookup

Lookup (static list)

Choice

Calculated

This data type is not exported.

Note: Lookup fields that use Calculated data types for their display value won't be exported.

Note: Linked tables to SharePoint lists within the Access web app won't be exported as part of this process.

Newer Posts Older Posts Home