Monday, December 31, 2018

Preview a form template

Preview a form template

To help ensure that forms based on your form template will work as expected when users fill them out, you can preview your form template to test its appearance and functionality. You can preview your form template while you design it to test a particular control or functionality. It is also a good idea to preview your form template before you publish it.

In this article

Overview

Preview a form template

Preview a form template with a full trust or restricted security level

Preview a form template with a domain security level

Preview a form template with sample data

Overview

When you design a form template, you can use the preview feature to test the functionality and appearance of your form template. Previewing and testing your form template allows you to see and work with your form template from your users' perspective. When you click Preview on the Standard toolbar, a form based on your form template opens in a separate Preview window. You can then test your form template by entering data into the controls to check various features, such as text formatting, conditional formatting, rules, formulas, and data validation. If you are using security levels or have added user roles to your form template, you can also test these features when previewing your form template. Using the Preview window allows you to identify mistakes in the design of your form template and then quickly switch to the design window, where you can correct them. To help you identify which window you are in, Preview or Design appears in the title bar of each window.

If you use a consistent set of data to test your form template, you can improve the efficiency and accuracy of your tests by using a form with sample data rather than manually entering the data each time you preview the form template. Sample data is placeholder text that appears in controls on your form and provides an example of how the text will appear in the control when a user fills it out. Sample data can be seen only when you preview the form template.

Top of Page

Preview a form template

  1. To test a user role on your form template, specify which user role you want to test the form template with.

    How?

    1. On the Tools menu, click Form Options.

    2. In the Category list, click Preview.

    3. In the Preview as list, under User role, click the user role that you want to test.

  2. To test your changes, click Preview on the Standard toolbar, or press CTRL+SHIFT+B.

Top of Page

Preview a form template with a full trust or restricted security level

  1. On the Tools menu, click Form Options.

  2. In the Category list, click Security and Trust.

  3. Under Security Level, clear the Automatically determine security level (recommended) check box, and then click the security level that you want to apply to the form template.

  4. Click OK.

  5. To test your changes, click Preview on the Standard toolbar, or press CTRL+SHIFT+B.

Top of Page

Preview a form template with a domain security level

  1. On the Tools menu, click Form Options.

  2. In the Category list, click Security and Trust.

  3. Under Security Level, clear the Automatically determine security level (recommended) check box, and then click Domain (the form can access content from the domain in which it is located).

  4. In the Category list, click Preview.

  5. In the Domain box, type the domain name where the form template will be published.

  6. Click OK.

  7. To test your changes, click Preview on the Standard toolbar, or press CTRL+SHIFT+B.

Top of Page

Preview a form template with sample data

If you plan to test a form template repeatedly, you can save time by creating a form based on your form template that contains sample data and then configuring your form template to use this sample data each time that you preview your form template. By using a form with sample data, you will not have to enter the same data every time you preview the form template.

  1. Click Preview on the Standard toolbar, or press CTRL+SHIFT+B.

  2. Type your sample data in the appropriate controls.

  3. On the File menu, click Save.

  4. In the Save As dialog box, browse to the location where you want to save the form with the sample data, and then click Save.

  5. On the Standard toolbar, click Close Preview.

  6. On the Tools menu, click Form Options.

  7. In the Category list, click Preview.

  8. In the File location box under Sample data, click Browse.

  9. In the Browse dialog box, browse to the location where you saved your form with the sample data, click the form, and then click Open.

  10. Click OK.

  11. To test your changes, click Preview on the Standard toolbar, or press CTRL+SHIFT+B.

Top of Page

Access SQL: basic concepts, vocabulary, and syntax

Access SQL: basic concepts, vocabulary, and syntax

When you want to retrieve data from a database, you ask for the data by using Structured Query Language, or SQL. SQL is a computer language that closely resembles English, but that database programs understand. Every query that you run uses SQL behind the scenes.

Understanding how SQL works can help you create better queries, and can make it easier for you to understand how to fix a query that is not returning the results that you want.

This is one of a set of articles about Access SQL. This article describes the basic use of SQL to select data, and uses examples to illustrate SQL syntax.

In this article

What is SQL?

Basic SQL clauses: SELECT, FROM, and WHERE

Sorting the results: ORDER BY

Working with summarized data: GROUP BY and HAVING

Combining query results: UNION

What is SQL?

SQL is a computer language for working with sets of facts and the relationships between them. Relational database programs, such as Microsoft Office Access, use SQL to work with data. Unlike many computer languages, SQL is not difficult to read and understand, even for a novice. Like many computer languages, SQL is an international standard that is recognized by standards bodies such as ISO and ANSI.

You use SQL to describe sets of data that can help you answer questions. When you use SQL, you must use the correct syntax. Syntax is the set of rules by which the elements of a language are correctly combined. SQL syntax is based on English syntax, and uses many of the same elements as Visual Basic for Applications (VBA) syntax.

For example, a simple SQL statement that retrieves a list of last names for contacts whose first name is Mary might resemble this:

SELECT Last_Name
FROM Contacts
WHERE First_Name = 'Mary';

Note: SQL is not only used for manipulating data, but also for creating and altering the design of database objects, such as tables. The part of SQL that is used for creating and altering database objects is called data-definition language (DDL). This topic does not cover DDL. For more information, see the article Create or modify tables or indexes by using a data-definition query.

SELECT statements

To describe a set of data by using SQL, you write a SELECT statement. A SELECT statement contains a complete description of a set of data that you want to obtain from a database. This includes the following:

  • What tables contain the data.

  • How data from different sources is related.

  • Which fields or calculations will produce the data.

  • Criteria that data must match to be included.

  • Whether and how to sort the results.

SQL clauses

Like a sentence, a SQL statement has clauses. Each clause performs a function for the SQL statement. Some clauses are required in a SELECT statement. The following table lists the most common SQL clauses.

SQL clause

What it does

Required

SELECT

Lists the fields that contain data of interest.

Yes

FROM

Lists the tables that contain the fields listed in the SELECT clause.

Yes

WHERE

Specifies field criteria that must be met by each record to be included in the results.

No

ORDER BY

Specifies how to sort the results.

No

GROUP BY

In a SQL statement that contains aggregate functions, lists fields that are not summarized in the SELECT clause.

Only if there are such fields

HAVING

In a SQL statement that contains aggregate functions, specifies conditions that apply to fields that are summarized in the SELECT statement.

No

SQL terms

Each SQL clause is composed of terms — comparable to parts of speech. The following table lists types of SQL terms.

SQL term

Comparable part of speech

Definition

Example

identifier

noun

A name that you use to identify a database object, such as the name of a field.

Customers.[Phone Number]

operator

verb or adverb

A keyword that represents an action or modifies an action.

AS

constant

noun

A value that does not change, such as a number or NULL.

42

expression

adjective

A combination of identifiers, operators, constants, and functions that evaluates to a single value.

>= Products.[Unit Price]

Top of Page

Basic SQL clauses: SELECT, FROM, and WHERE

A SQL statement takes the general form:

SELECT field_1
FROM table_1
WHERE criterion_1
;

Notes: 

  • Access ignores line breaks in a SQL statement. However, consider using a line for each clause to help improve the readability of your SQL statements for yourself and others.

  • Every SELECT statement ends with a semi-colon (;). The semi-colon can appear at the end of the last clause or on a line by itself at the end of the SQL statement.

An example in Access

The following illustrates what a SQL statement for a simple select query might look like in Access:
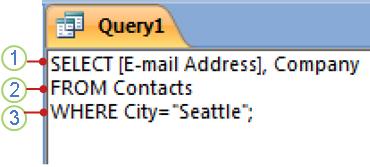
SQL object tab showing a SELECT statement

1. SELECT clause

2. FROM clause

3. WHERE clause

This example SQL statement reads "Select the data that is stored in the fields named E-mail Address and Company from the table named Contacts, specifically those records in which the value of the field City is Seattle."

Let's look at the example, one clause at a time, to see how SQL syntax works.

The SELECT clause

SELECT [E-mail Address], Company

This is the SELECT clause. It consists of an operator (SELECT) followed by two identifiers ([E-mail Address] and Company).

If an identifier contains spaces or special characters (such as "E-mail Address"), it must be enclosed in square brackets.

A SELECT clause does not have to say which tables contain the fields, and it cannot specify any conditions that must be met by the data to be included.

The SELECT clause always appears in front of the FROM clause in a SELECT statement.

The FROM clause

FROM Contacts

This is the FROM clause. It consists of an operator (FROM) followed by an identifier (Contacts).

A FROM clause does not list the fields to be selected.

The WHERE clause

WHERE City="Seattle"

This is the WHERE clause. It consists of an operator (WHERE) followed by an expression (City="Seattle").

Note: Unlike the SELECT and FROM clauses, the WHERE clause is not a required element of a SELECT statement.

You can accomplish many of the actions that SQL enables you to do by using SELECT, FROM, and WHERE clauses. More information about how you use these clauses is presented in these additional articles:

Top of Page

Sorting the results: ORDER BY

Like Microsoft Excel, Access lets you sort query results in a datasheet. You can also specify in the query how you want to sort the results when the query is run, by using an ORDER BY clause. If you use an ORDER BY clause, it is the last clause in the SQL statement.

An ORDER BY clause contains a list of the fields that you want to use for sorting, in the same order that you want to apply the sort operations.

For example, suppose that you want your results sorted first by the value of the field Company in descending order, and  — if there are records with the same value for Company — sorted next by the values in the field E-mail Address in ascending order. Your ORDER BY clause would resemble the following:

ORDER BY Company DESC, [E-mail Address]

Note: By default, Access sorts values in ascending order (A-Z, smallest to largest). Use the DESC keyword to sort values in descending order instead.

For more information about the ORDER BY clause, see the topic ORDER BY Clause.

Top of Page

Working with summarized data: GROUP BY and HAVING

Sometimes you want to work with summarized data, such as the total sales in a month, or the most expensive items in an inventory. To do this, you apply an aggregate function to a field in your SELECT clause. For example, if you want your query to show the count of e-mail addresses listed for each company, your SELECT clause might resemble the following:

SELECT COUNT([E-mail Address]), Company

The aggregate functions that you can use depend on the type of data that is in the field or expression that you want to use. For more information about the available aggregate functions, see the article SQL Aggregate Functions.

Specifying fields that are not used in an aggregate function: The GROUP BY clause

When you use aggregate functions, you usually must also create a GROUP BY clause. A GROUP BY clause lists all the fields to which you do not apply an aggregate function. If you apply aggregate functions to all the fields in a query, you do not have to create the GROUP BY clause.

A GROUP BY clause immediately follows the WHERE clause, or the FROM clause if there is no WHERE clause. A GROUP BY clause lists the fields as they appear in the SELECT clause.

For example, continuing the previous example, if your SELECT clause applies an aggregate function to [E-mail Address] but not to Company, your GROUP BY clause would resemble the following:

GROUP BY Company

For more information about the GROUP BY clause, see the topic GROUP BY Clause.

Limiting aggregate values by using group criteria: the HAVING clause

If you want to use criteria to limit your results, but the field that you want to apply criteria to is used in an aggregate function, you cannot use a WHERE clause. Instead, you use a HAVING clause. A HAVING clause works like a WHERE clause, but is used for aggregated data.

For example, suppose that you use the AVG function (which calculates an average value) with the first field in your SELECT clause:

SELECT COUNT([E-mail Address]), Company

If you want the query to restrict the results based on the value of that COUNT function, you cannot use a criteria for that field in the WHERE clause. Instead, you put the criteria in a HAVING clause. For example, if you only want the query to return rows if there are more than one e-mail addresses associated with the company, the HAVING clause might resemble the following:

HAVING COUNT([E-mail Address])>1

Note: A query can have a WHERE clause and a HAVING clause — criteria for fields that are not used in an aggregate function go in the WHERE clause, and criteria for fields that are used with aggregate functions go in the HAVING clause.

For more information about the HAVING clause, see the topic HAVING Clause.

Top of Page

Combining query results: UNION

When you want to review all the data that is returned by several similar select queries together, as a combined set, you use the UNION operator.

The UNION operator lets you combine two SELECT statements into one. The SELECT statements that you combine must have the same number of output fields, in the same order, and with the same or compatible data types. When you run the query, data from each set of corresponding fields is combined into one output field, so that the query output has the same number of fields as each of the select statements.

Note: For the purposes of a union query, the Number and Text data types are compatible.

When you use the UNION operator, you can also specify whether the query results should include duplicate rows, if any exist, by using the ALL key word.

The basic SQL syntax for a union query that combines two SELECT statements is as follows:

SELECT field_1
FROM table_1
UNION [ALL]
SELECT field_a
FROM table_a
;

For example, suppose that you have a table named Products and another table named Services. Both tables have fields that contain the name of the product or service, the price, warranty or guarantee availability, and whether you offer the product or service exclusively. Although the Products table stores warranty information, and the Services table stores guarantee information, the basic information is the same (whether a particular product or service includes a promise of quality). You can use a union query, such as the following, to combine the four fields from the two tables:

SELECT name, price, warranty_available, exclusive_offer
FROM Products
UNION ALL
SELECT name, price, guarantee_available, exclusive_offer
FROM Services
;

For more information about how to combine SELECT statements by using the UNION operator, see Combine the results of several select queries by using a union query.

Top of Page

Remove a profile

Remove a profile

A profile consists of accounts, data files, and settings that specify where your email messages are saved. If you no longer need an Outlook profile, you can delete it. Deleting a profile deletes all email accounts stored in that profile. Any Personal Folders Files (.pst) associated with that profile will remain on your computer, but in order to access that data, you'll have to open the Personal Folders File from within another profile. .

  1. In Outlook, click File > Account Settings > Manage Profiles

  2. Select Show Profiles.

  3. Select a profile, then select Remove.

Note: Outlook may warn you that deleting your profile will remove offline data. You won't lose any information stored in your Outlook Data Files (.pst) or any information stored in your online accounts, for example Outlook.com, Exchange, or Office 365 accounts.

 If you can't start Outlook, you can also access the Show Profiles dialog by typing "outlook.exe /manageprofiles" into the windows 10 search box and pressing Enter.

Ways to format a worksheet

Ways to format a worksheet

In Excel, formatting worksheet (or sheet) data is easier than ever. You can use several fast and simple ways to create professional-looking worksheets that display your data effectively. For example, you can use document themes for a uniform look throughout all of your Excel spreadsheets, styles to apply predefined formats, and other manual formatting features to highlight important data.

Formatted worksheet

A document theme is a predefined set of colors, fonts, and effects (such as line styles and fill effects) that will be available when you format your worksheet data or other items, such as tables, PivotTables, or charts. For a uniform and professional look, a document theme can be applied to all of your Excel workbooks and other Office release documents.

Your company may provide a corporate document theme that you can use, or you can choose from a variety of predefined document themes that are available in Excel. If needed, you can also create your own document theme by changing any or all of the theme colors, fonts, or effects that a document theme is based on.

Before you format the data on your worksheet, you may want to apply the document theme that you want to use, so that the formatting that you apply to your worksheet data can use the colors, fonts, and effects that are determined by that document theme.

For information on how to work with document themes, see Apply or customize a document theme.

A style is a predefined, often theme-based format that you can apply to change the look of data, tables, charts, PivotTables, shapes, or diagrams. If predefined styles don't meet your needs, you can customize a style. For charts, you can customize a chart style and save it as a chart template that you can use again.

Depending on the data that you want to format, you can use the following styles in Excel:

  • Cell styles    To apply several formats in one step, and to ensure that cells have consistent formatting, you can use a cell style. A cell style is a defined set of formatting characteristics, such as fonts and font sizes, number formats, cell borders, and cell shading. To prevent anyone from making changes to specific cells, you can also use a cell style that locks cells.

    Excel has several predefined cell styles that you can apply. If needed, you can modify a predefined cell style to create a custom cell style.

    Some cell styles are based on the document theme that is applied to the entire workbook. When you switch to another document theme, these cell styles are updated to match the new document theme.

    For information on how to work with cell styles, see Apply, create, or remove a cell style.

  • Table styles    To quickly add designer-quality, professional formatting to an Excel table, you can apply a predefined or custom table style. When you choose one of the predefined alternate-row styles, Excel maintains the alternating row pattern when you filter, hide, or rearrange rows.

    For information on how to work with table styles, see Format an Excel table.

  • PivotTable styles    To format a PivotTable, you can quickly apply a predefined or custom PivotTable style. Just like with Excel tables, you can choose a predefined alternate-row style that retains the alternate row pattern when you filter, hide, or rearrange rows.

    For information on how to work with PivotTable styles, see Design the layout and format of a PivotTable report.

  • Chart styles    You apply a predefined style to your chart. Excel provides a variety of useful predefined chart styles that you can choose from, and you can customize a style further if needed by manually changing the style of individual chart elements. You cannot save a custom chart style, but you can save the entire chart as a chart template that you can use to create a similar chart.

    For information on how to work with chart styles, see Change the layout or style of a chart.

To make specific data (such as text or numbers) stand out, you can format the data manually. Manual formatting is not based on the document theme of your workbook unless you choose a theme font or use theme colors — manual formatting stays the same when you change the document theme. You can manually format all of the data in a cell or range at the same time, but you can also use this method to format individual characters.

For information on how to format data manually, see Format text in cells.

To distinguish between different types of information on a worksheet and to make a worksheet easier to scan, you can add borders around cells or ranges. For enhanced visibility and to draw attention to specific data, you can also shade the cells with a solid background color or a specific color pattern.

Text with borders and a background color

If you want to add a colorful background to all of your worksheet data, you can also use a picture as a sheet background. However, a sheet background cannot be printed — a background only enhances the onscreen display of your worksheet.

For information on how to use borders and colors, see:

Apply or remove cell borders on a worksheet

Apply or remove cell shading

Add or remove a sheet background

For the optimal display of the data on your worksheet, you may want to reposition the text within a cell. You can change the alignment of the cell contents, use indentation for better spacing, or display the data at a different angle by rotating it.

Rotating data is especially useful when column headings are wider than the data in the column. Instead of creating unnecessarily wide columns or abbreviated labels, you can rotate the column heading text.

For information on how to change the alignment or orientation of data, see Reposition the data in a cell.

If you have already formatted some cells on a worksheet the way that you want, you can simply copy the formatting to other cells or ranges. By using the Paste Special command (Home tab, Clipboard group, Paste button), you can paste only the formats of the copied data, but you can also use the Format Painter Button image (Home tab, Clipboard group) to copy and paste formats to other cells or ranges.

Also, data range formats are automatically extended to additional rows when you enter rows at the end of a data range that you have already formatted, and the formats appear in at least three of five preceding rows. The option to extend data range formats and formulas is on by default, but you can turn it on or off as needed (click File > Options > Advanced > Extend date range and formulas (under Editing options); or in case of Excel 2007, click Microsoft Office Button Office button image > Excel Options > Advanced > Extend date range and formulas (under Editing options)).

OneNote: Search notes instantly

OneNote: Search notes instantly

Download and install or reinstall Office 365 or Office 2019 on a PC or Mac

Download and install or reinstall Office 365 or Office 2019 on a PC or Mac

Before you begin, make sure your PC or Mac meets the system requirements.

Office for home    Some Office for home products come with a product key. If yours did, before installing Office for the first time, sign in with an existing or new Microsoft account and enter your product key* at office.com/setup. Redeeming your key is what links your account with Office so you only have to do this once. Already did this? Go to Step 1.

Office for business    If your Office for business subscription plan includes the desktop version of the Office apps you won't see an option to install it unless someone in your organization assigned a license to you. Learn how to check this in What Office 365 product or license do I have? Office 365 admins responsible for this, see Assign licenses to users.

Note: *Some versions of Office don't have an associated Microsoft account, or work or school account, or you may need to redeem your product key in a different way. For Office Professional Plus 2019, Office Standard 2019, or a stand-alone app such as Word 2019 or Project 2019 the steps to install Office depend if you got Office through the following:

Microsoft HUP: You bought Office for personal use through your company and have a product key, see Install Office through HUP.
Volume license versions: IT departments might use a different method to install Office for their organization. Talk to your IT department for install help.
Third-party seller: You bought Office from a third-party and you're having problems with the product key.

Step 1: Sign in to download Office

  1. Go to www.office.com and if you're not already signed in, select Sign in.

  2. Sign in with the account you associated with this version of Office. This account can be a Microsoft account, or work or school account.

    Forgot your account details? See I forgot the account I use with Office.

  3. After signing in, follow the steps that match the type of account you signed in with.

    You signed in with a Microsoft account
    Line

    1. From the Office home page select Install Office.

      Screenshot of Office.com home page after signing in
    2. Select Install. (For Office 365 subscribers, you may be on the Overview page and need to select Install Office> first.)

      The 64-bit version is installed by default. However, if Office detects you have a previously installed 32-bit version, this version will be installed instead.

      Note: If you want to install a 32-bit or 64-bit version of Office, but this is different from what you previously installed, you need to uninstall Office first.

      You can then select the version you want. Select Other options, and choose the language and the 64-bit or 32-bit version of Office, and then select Install.

      For more information about which version is right for you see Choose between the 64-bit or 32-bit version of Office.

    You signed in with a work or school account
    Line

    1. From the Office 365 home page select Install Office apps (If you set a different start page, go to aka.ms/office-install.)

      Screenshot of Office.com if signing in with a work or school account
    2. Select Office to begin the installation.

      The 64-bit version is installed by default. However, if Office detects you have a previously installed 32-bit version, this version will be installed instead. (Note: The link may say Office 2016, however Office will install the most up-to-date version of the Office apps as set by your Office 365 admin.)

      Note: If you want to install a 32-bit or 64-bit version of Office, but this is different from what you previously installed, you need to uninstall Office first.

      You can then select the version you want. Select Other install options, your language, and then under Version select Advanced, and choose 64-bit or 32-bit, and then select Install.

      For more information about which version is right for you see Choose between the 64-bit or 32-bit version of Office.

    Office should now begin downloading. Follow the prompts in Step 2 to complete the installation.

    Don't see an install option after signing in? There could be an issue with your account. Select Need help? from above and review the section Account questions.

Step 2: Install Office

  1. Depending on your browser, select Run (in Edge or Internet Explorer), Setup (in Chrome), or Save File (in Firefox).

    If you see the User Account Control prompt that says, Do you want to allow this app to make changes to your device? select Yes.

    The install begins.

    Window showing progression of Office install

  2. Your install is finished when you see the phrase, "You're all set! Office is installed now" and an animation plays to show you where to find Office applications on your computer. Select Close.

    Follow the instructions in the window to find your Office apps. For example depending on your version of Windows, select Start and then scroll to find the app you want to open such as Excel or Word, or type the name of the app in the search box.

    Office is installed now. Select Close

Installation or sign in issues?

If you're having an installation issue such as Office taking long to install, try Need help? for a list of common issues.

Step 3: Activate Office

Start using an Office application right away by opening any app such as Word or Excel. Can't find Office after installing?

In most cases, Office is activated once you start an application and after you click Accept to agree to the License terms.

If you need activation help, see Activate Office.

Step 1: Sign in and install Office

  1. Go to www.office.com and if you're not already signed in, select Sign in.

    Note: If you bought Office for personal use through your company's Microsoft HUP benefit, you may not be able to sign in here. Find installation help at Install Office through HUP.

  2. Sign in with the account you associated with this version of Office.

    Tip: Depending how you got Office, this account can be a Microsoft account or work or school account. If you forgot your account details, see I forgot the account I use with Office.

  3. On the Office home page, do the following depending on your version of Office.

    Select Install Office > Install if you signed in with a Microsoft account.

    Screenshot of Office.com home page after signing in

    Select Install Office Apps > Office 2016 if you signed in with a work or school account. (Note: The link may say Office 2016, however Office will install the most up-to-date version of the Office apps as set by your Office 365 admin.)

    Screenshot of Office.com if signing in with a work or school account

    This begins the download of Office. Follow the prompts on your screen to complete the install.

Don't see an install option after signing in? There could be an issue with your account. Select Need help? from above and review the issues listed in the section Account questions.

Step 2: Install Office

  1. Once the download has completed, open Finder, go to Downloads, and double-click Microsoft Office installer.pkg file (the name might vary slightly).

    The Downloads icon on the Dock shows the Office 365 installer package

    Tip: If you see an error that says the Microsoft Office installer.pkg can't be opened because it is from an unidentified developer, wait 10 seconds and move the downloaded file to your desktop. Hold Control + click the file to launch the installer.

  2. On the first installation screen, select Continue to begin the installation process.

    First Mac 2016 installation screen with "Continue" highlighted
  3. Review the software license agreement, and then click Continue.

  4. Select Agree to agree to the terms of the software license agreement.

  5. Choose how you want to install Office and click Continue.

  6. Review the disk space requirements or change your install location, and then click Install.

    Note: If you want to only install specific Office apps and not the entire suite, click the Customize button and uncheck the programs you don't want.

  7. Enter your Mac login password, if prompted, and then click Install Software. (This is the password that you use to log in to your Mac.)

    Enter your admin password to begin installing
  8. The software begins to install. Click Close when the installation is finished. If Office installation fails, see What to try if you can't install or activate Office for Mac.

    Shows the final page of the installation process, indicating that the installation was successful.

Step 3: Launch an Office for Mac app and start the activation process

  1. Click the Launchpad icon in the Dock to display all of your apps.

    Shows the Launchpad button in the Dock
  2. Click the Microsoft Word icon in the Launchpad.

    Shows the Microsoft Word icon in a partial view of the Launchpad
  3. The What's New window opens automatically when you launch Word. Click Get Started to start activating. If you need help activating Office, see Activate Office for Mac. If Office activation fails, see What to try if you can't install or activate Office for Mac.

    Start activating Word 2016 for Mac

Installation notes

Installation notes

How do I pin the Office app icons to the dock?

  1. Go to Finder > Applications and open the Office app you want.

  2. In the Dock, Control+click or right-click the app icon and choose Options > Keep in Dock.

Can I install Office on my iPhone or iPad?

Yes, see Install and set up Office on an iPhone or iPad and set up email on an iOS device (iPhone or iPad).

Sign in or installation FAQ

The following are a few of the more common questions or issues when trying to install Office.

Tip: Don't see your issue listed? Try Troubleshoot installing Office for additional issues and their possible solutions.

Account questions:

Before you can install Office 365 orOffice 2019 you need to associate it with a Microsoft account, or work or school account.

If you have an Office for home product and bought Office at a retail store or online store, but don't have a Microsoft account, it's possible you haven't redeemed your product key yet (if you got one), or you missed the step for linking your recent purchase with an account. Do the following to link an account with Office.

For an Office for home product, go to office.com/setup and create a new Microsoft account or sign in with an existing one, then follow the remaining steps on that page such as entering your product key (if you have one). Your account is successfully associated with Office when you see the page, My Office Account followed by your Microsoft account email address, and a button to install Office. Select the PC or Mac tabs above to help you with the rest of the install process.

Screenshot of Install page on My Account

If the Microsoft account or work or school account isn't working, see I forgot the username or password for the account I use with Office.

After signing in with your work or school account you don't see an option to install the desktop applications on the Office 365 home page, go directly to the Office 365 Software page instead. Select the language and bit-version you want (PC users can choose between 32-bit and 64-bit), and then click Install. See Step 2 and 3 on the PC or Mac tabs above to help you with the rest of the install process.

Notes: 

If you still don't see an option to install Office on the Office 365 Software page, it's possible your admin hasn't assigned a license to you. Find out if you have a license to install Office.

If you're a student or teacher and your institution didn't give you a license, find out if you're eligible to Get Office 365 for free.

If you're trying to sign in with your work or school account to www.office.com and your sign in is blocked, it likely means your Office 365 administrator set up a security policy that's preventing you from signing in to that location.

To install Office, try signing in directly to the Office 365 Software page instead. Select the language and bit-version you want (PC users can choose between 32-bit and 64-bit), and then click Install. See Steps 2 and 3 on the PC or Mac tabs above to help you with the rest of the install process.

Notes: 

If you're still not able to sign in, contact your administrator.

Product key, purchase, and installing older versions of Office:

Not all versions of Office include a key, but if yours did, you need to redeem it before you can install Office. Go to office.com/setup and sign in with an existing Microsoft account or create a new one, then enter your product key. Follow the remaining prompts to finish linking your Microsoft account with this version of Office.

No product key or not sure if you need one? See Using product keys with Office.

The steps in this topic assume you have Office 365 or Office 2019 and you're ready to install or reinstall it. Don't have the latest version yet?

Link to buy or try Office

Learn more about the differences between Office 365 and non-subscription versions.

Installation help for older versions of Office:

Install questions or errors during install

For Office 365 for home subscribers only: You can install Office on all your devices and be signed in to five at the same time. To learn more, see How sign in works in Office 365.

If you have Office 365 Home, you can share your Office 365 Home subscription with up to five family members or other people. Each person can install Office on all their devices and be signed in to five at the same time.

For a one-time purchase of Office such as Office Home & Student, Office Home & Business, or Office Professional:  You can install these non-subscription versions of Office on only one computer. However, you may transfer Office to another computer that belongs to you if you experience a hardware failure or you buy a new computer. For more information, see the Microsoft License Terms for your product, or see this blog post, Office now transferable.

When installing Office on a PC, you must be an administrator on the PC computer where you want to install Office. If you're not sure, see Check if you have local admin rights to install Office .

If you bought a stand-alone version of an Office app, for example Visio or Word, in most cases you install this app in the same way you install the Office suite, by signing in to www.office.com with your Microsoft account, or work or school account and selecting Install for your stand-alone product.

If you have a subscription to Project Online Professional, Project Online Premium, or Visio Pro for Office 365, see Install Project, or Install Visio for the steps to install the apps that are part of those subscriptions.

The Office apps are available to install on your iPhone and iPad, Android device, or Windows phone and tablet. See Set up Office apps and email on a mobile device.

If Office seems to be taking a very long time to install, this may be caused by problems with your internet connection, firewall, or anti-virus software. For possible solutions, see Office is taking long to install.

Office can also take long to install because of a slow internet connection (such as a dial-up connection). If you don't have a good connection, install Office using the Use the Office offline installer.

Office won't install: Your computer must be running a supported operating system to install Office. You can find a list of which systems are supported on the system requirements page. For example, your install won't be successful if you're trying to install Office on a computer running Windows Vista or Windows XP operating system. If your computer can't install the full desktop version of Office, try the free Office Online apps using your desktop browser.

I received an error message: If you got an error message while trying to install Office and it has a Learn More link, select it to get information for how to troubleshoot that particular error. If there wasn't a link, see Troubleshoot installing Office.

I received an unsupported operating system message: If you got an unsupported operating system error message you may be trying to install Office on an unsupported device such as installing the Mac version of Office on a PC or vice versa, or trying to install Office on a Chromebook or other mobile device. See Unsupported operating system error when installing Office or Set up Office apps and email on a mobile device.

Help with specific applications, and help for Office 365 admins:

OneNote for Windows 10 is the default OneNote experience for Office 365 and Office 2019 customers. For information about how to download the desktop version of OneNote 2016 see OneNote is missing after installing Office 2019 or Office 365.

Learn more about the differences between these two versions in What's the difference between OneNote and OneNote 2016?

If Office is installed, but you need help with Office basics, or learn how to do a specific task such as print a document, set up an account in Outlook, or use VLOOKUP in Excel, go to the top of this page and select Apps or Learn Office.

You can also type what you're looking for using the search bar in the upper-right corner.

If you're the Office 365 admin of an Office for business plan, users in your organization can only install Office using the steps in this topic as long as your plan includes the desktop version of Office, and you've assigned the user a license and given them permission to install Office (Manage user software in Office 365).

For information about how to assign licenses, see Assign licenses to users in Office 365 for business.

If you've run out of licenses and need to purchase more, see Buy licenses for your Office 365 for business subscription.

Contact Microsoft

If you weren't able to resolve your problem, try contacting Microsoft support.