Try It! Customize your Sales workspace
The Business Contact Manager for Outlook workspaces can display gadgets and lists of records on tabs.
Adventure Works customized the Sales workspace by adding a gadget and a tab to allow them to view and access information about potential, current, and past sales.
See the following image to see what has been added.
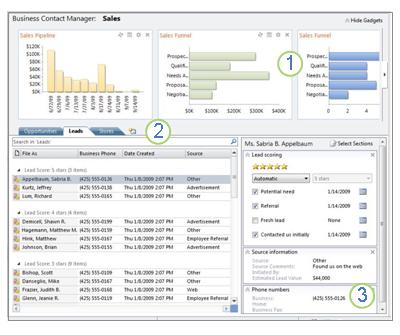
Figure 1: An additional Sales Funnel gadget.
Figure 2: A tab labeled Stores.
Figure 3: Sections have been added to the Reading/Preview Pane.
Add another gadget, create a new tab, and change the sections that are displayed in the Reading/Preview Pane.
Before you try it
If you haven't already, you must first switch to the Sample Business database to use the Adventure Works business data for your practice.
Switch to the sample business database
-
Click the File tab.
-
Click the Business Contact Manager tab.
-
Click Manage Databases, and then click Switch to Sample Business.
-
Follow the instructions on your screen.
Note: Don't worry, the database that you use for your own business is not affected by your temporary use of the sample business database.
Customize the Sales workspace
The Adventure Works Sales workspace displays information about overall sales for the company.
Make a few changes to the Sales workspace to see more of the information about sales.
First, add a gadget to the Sales workspace to keep track of the best-selling products.
Add the Top Products gadget to the Sales workspace
-
In the Navigation Pane, under Business Contact Manager, click Sales.
-
On the Ribbon, click the Gadgets tab.
-
In the Add Gadgets group, click Sales, and then click Top Products.
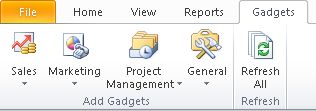
Tip: If the gadgets area is hidden, click Show Gadgets to display it. Adding a gadget also displays the gadgets area.
The Adventure Works tabs have already been customized to include a Stores tab. This tab displays contacts for potential bike outlets for the company. In order to prepare for your sales visits, you can add a new tab, displaying the employees at those stores.
Add a tab
-
In the Sales workspace, click the Create New Tab button (
 ).
). -
In the Create New Tab dialog box, in the Tab name box, type: Store Employees
-
From the Item type list, under Business Contacts, click Store Employees, and then click OK.
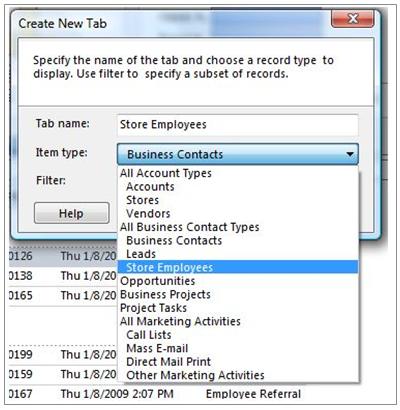
The new tab displays all the Business Contacts designated as Store Employees in the Adventure Works database.
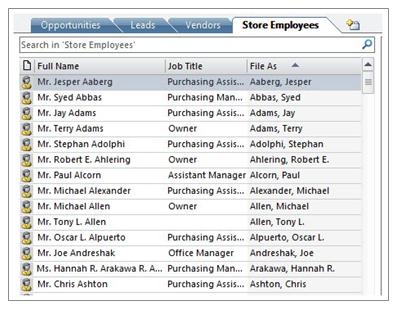
Change the sections that are displayed in the Reading Pane
Tabs display lists of records, and a preview, or details, of a selected record in the Reading/Preview Pane.
Sales people at Adventure Works want to see the birthdays of store employees when viewing records. Add a section to display the birth date listed in each record.
-
On the Store Employees tab, in the Reading Pane, click Select Sections.

-
In the Select Sections for Store Employees dialog box, under General, select the Personal information check box, and then click OK.
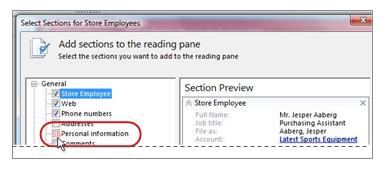
-
On the tab, click Jesper Asberg and then scroll through the Reading Pane to the Personal Information section and see the date of his birthday.
-
In the Reading Pane, click the Personal Information section, and then drag it to the top of the pane.
Mobile Phones
ReplyDeletePhones with best camera
best laptops for Zoom video conferencing in 2021
OPPO Reno4 5G
5G phones 2021
Reno 5G with 5G
Best Travel Bags 2021
ReplyDeleteTop Mirrors In 2021
savingbuyers
Best OPPO Phones In 2021
Bluetooth and Wireless Speakers for 2021
Best Headphones For 2021
Microsoft Office Tutorials: Try It! Customize Your Sales Workspace >>>>> Download Now
ReplyDelete>>>>> Download Full
Microsoft Office Tutorials: Try It! Customize Your Sales Workspace >>>>> Download LINK
>>>>> Download Now
Microsoft Office Tutorials: Try It! Customize Your Sales Workspace >>>>> Download Full
>>>>> Download LINK aO
You just solve my problem of sales funnel. Thank you for saving the day!
ReplyDeleteI also got help from here https://bloggvalley.com/manage-ad-campaigns-and-sales-funnels/ . Click to read more about sales funnel.
This comment has been removed by the author.
ReplyDelete