Wednesday, November 30, 2016

Export Access data to see record updates (Database Compare)

Export Access data to see record updates (Database Compare)

You want to see the changes in values between two versions of an Access database, but how can you do this? You've seen Microsoft Spreadsheet Compare, and you know it can compare values. Maybe you've used Microsoft Database Compare – if you have, you know it's designed to find changes in object design, macros, and VBA code, not value changes. There is a way, however, to use Spreadsheet Compare to spot the changes you're looking for.

By exporting your Access data in both database files – either from a table, if it's exactly what you need, or from query results – to an Excel workbook, you can then run your workbooks through Spreadsheet Compare to see the differences.

Export the Access data to workbooks

  1. In Access, open the database containing the "original" or earlier data, and open either the table or the query results that you want in Datasheet view. The following shows a very simple example.
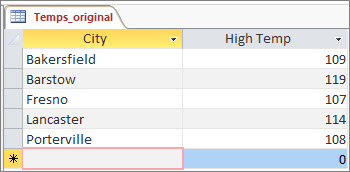
    Original data in Access table

  2. Click External Data > Export > Excel. The Export – Excel Spreadsheet wizard starts.

  3. Choose the name and destination folder for your new Excel file, and click OK. Then, click Close to close the wizard.

  4. Close the database.

  5. Open the database that contains the "updated" or later data, and open the table or query results like you did for the original data. In this updated database, "California City" is a new record, and Fresno's high temperature was changed.
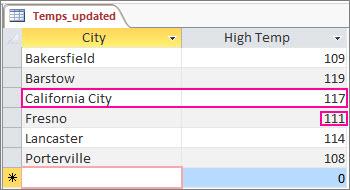
    Updated data in Access table

  6. Run the Export – Excel Spreadsheet wizard in the same way for this database.

Run the comparison in Spreadsheet Compare

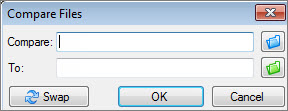
  1. In Spreadsheet Compare, click Compare Files.
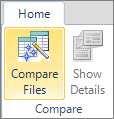
    Compare Files

  2. Browse to the Excel workbook containing the original data by clicking Browse next to the Compare box.
    Compare Files command

  3. Browse to the workbook containing the updated data by clicking Browse next to the To box.

  4. Click OK to run the comparison.

Understanding the results

We'll zoom in on the results of our simple example, where a record for "California City" was added, and Fresno's temperature changed.
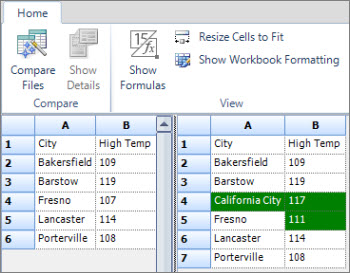
Results of the comparison from exported Access data

In the right pane, which shows the data from the updated database, row 4 now contains California City and its temperature, which was inserted in the Access table. The entire row is highlighted in green. And Fresno's temperature, in row 5, column B, is also highlighted in green, because it was changed from 107 to 111.
Find and Replace dialog box options

Find and Replace dialog box options

Use the options on the following tabs in the Find and Replace dialog box to search for and optionally replace a string of characters with another string of characters.

In this article

Find tab options

Replace tab options

Find tab options

Use the Find tab to search for a string of characters in a worksheet or workbook.

  • Find what    Enter the information that you want to search for. You can use wildcard characters, such as an asterisk (*) or a question mark (?), in your search criteria.

    For example, you can do the following:

    • Use the asterisk to find any string of characters. For example, s*d finds "sad" and "started".

    • Use the question mark to find any single character. For example, s?t finds "sat" and "set".

    • You can find asterisks, question marks, and tilde characters (~) in worksheet data by preceding them with a tilde character (~) in the Find what box. For example, to find data that contains "?", type ~? as your search criteria.

    • To find symbols and special characters that you entered, you can copy them from the worksheet into the Find what box.

      For more information about how to use symbols and special characters in the worksheet, see Insert symbols and special characters on a worksheet.

  • Format     Allows you to search for text or numbers that also have specific formatting. If you want to find cells that just match a specific format, you can delete any criteria in the Find what box and then select a specific cell format as an example. Click the arrow next to Format, click Choose Format From Cell, and then click the cell that has the formatting that you want to search for.

  • Options     Displays advanced search options. This button changes to Options << when the advanced options are displayed. Click Options << to hide the advanced options.

  • Within     Select Sheet to restrict your search to the active worksheet. Select Workbook to search all sheets in the active workbook.

  • Search     Click the direction that you want to search: down through columns by using By columns or to the right across rows by using By rows. To search up in columns or to the left across rows, hold down SHIFT and then click Find Next. In most cases, it is faster to select By columns.

  • Look in     Specifies whether you want to search the value of the cells or their underlying formulas. For instance, a cell could appear on the worksheet as "11" but actually contain a formula ="1"&"1". A search that uses the Look in: Values option finds this cell when you search for "11". A search that uses the Look in: Formulas option does not find the cell. You can also include comments that are attached to cells in the search by using the Look in: Comments option . On the Replace tab, Look in: Formulas is the only option.

  • Match case     Distinguishes between uppercase and lowercase characters.

  • Match entire cell contents     Searches for an exact and complete match of characters that are specified in the Find what box.

  • Find All     Finds all occurrences of the search criteria in your worksheet or workbook. If you want to find and review each occurrence separately, click Find Next instead of Find All.

  • Find Next     Searches for the next occurrence of the characters that are specified in the Find what box. To find the previous occurrence, hold down SHIFT and then click Find Next.

  • Close     Closes the Find and Replace dialog box after you have completed your search.

Tip: Microsoft Office Excel saves the formatting options that you define. If you search the worksheet for data again and cannot find characters that you know to be there, you may need to clear the formatting options from the previous search. On the Find tab, click Options to display the formatting options, click the arrow next to Format, and then click Clear Find Format.

Top of Page

Replace tab options

The Replace tab has the same options as the Find tab, with the following additional options that you can use to replace the data that you search for.

  • Replace with     Type the replacement characters that you want to use to replace the characters in the Find what box. To delete the characters in the Find what box from your document, leave the Replace with box blank.

    Tip: To replace text with symbols and special characters, you can copy them from the worksheet into the Replace with box. For more information about how to use symbols and special characters in the worksheet, see Insert symbols and special characters on a worksheet.

  • Replace All     Replaces all occurrences of the search criteria in your document. If you want to review and selectively replace each occurrence, click Replace instead of Replace All.

  • Replace     Replaces the selected occurrence of the criteria in the Find what box, finds the next occurrence, and then stops. If you want to automatically replace all occurrences of the search criteria in your document, click Replace All.

Top of Page

Find and remove duplicates

Find and remove duplicates

Sometimes duplicate data is useful, sometimes it just makes it harder to understand your data. Use conditional formatting to find and highlight duplicate data. That way you can review the duplicates and decide if you want to remove them.

  1. Select the cells you want to check for duplicates.

    Note: Excel can't highlight duplicates in the Values area of a PivotTable report.

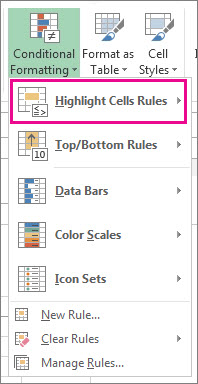
  2. Click Home > Conditional Formatting > Highlight Cells Rules > Duplicate Values.

    Highlight cell rules

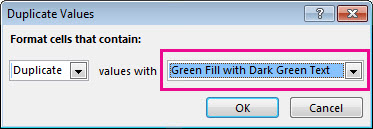
  3. In the box next to values with, pick the formatting you want to apply to the duplicate values, and then click OK.

    Duplicate Values dialog box

Remove duplicate values

When you use the Remove Duplicates feature, the duplicate data will be permanently deleted. Before you delete the duplicates, it's a good idea to copy the original data to another worksheet so you don't accidentally lose any information.

  1. Select the range of cells that has duplicate values you want to remove.

    Tip: Remove any outlines or subtotals from your data before trying to remove duplicates.

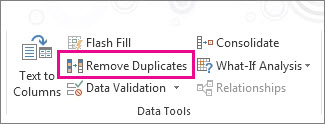
  2. Click Data > Remove Duplicates, and then Under Columns, check or uncheck the columns where you want to remove the duplicates.

    Remove Duplicates

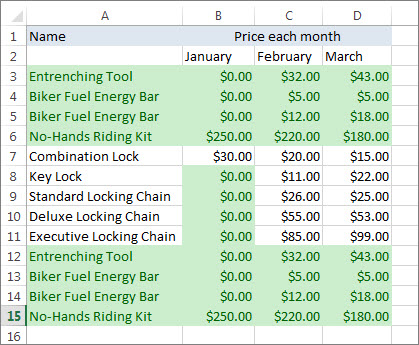
    For example, in this worksheet, the January column has price information I want to keep.

    Duplicate values highlighted

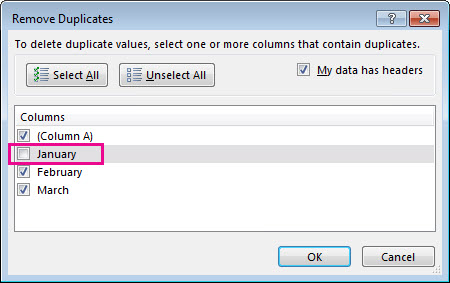
    So, I unchecked January in the Remove Duplicates box.

    Remove duplicates dialog box

  3. Click OK.

Move or copy a folder, file, or link in a document library

Move or copy a folder, file, or link in a document library

In SharePoint Online, you can move or copy one or more folders, files or links in a document library from one location in the library to another location within the same document library. To copy or move files to another library, see Copy or move files to another library, subsite, or site.

Notes: The Move to and Copy to options are only available with SharePoint Online and OneDrive for Business in Office 365. For ways to copy or move files in earlier versions of SharePoint, see Introduction to libraries.

If you're not sure which version of SharePoint you have, see Which version of SharePoint am I using?

Updated October 3, 2016 thanks to customer feedback.

To move folders, files, or links in the same SharePoint Online document library

  1. To select, click to the left of the file, folder, or link name if in list view or the upper right corner of the file, folder, or link if in thumbnail view to select the items that you want to move. You can select one or more files, folders, or links to move.

  2. In the main menu at the top of the page, click Move to. If you don't see Move to, click the ellipses (...) on the main menu, and then click Move to.

    MoveTo button on the main menu

    Notes: Does your screen look different from the examples here? Your administrator may have SharePoint classic mode set on the document library, or you're using an earlier version of SharePoint. If so, see Introduction to libraries.

    If you're not sure which version of SharePoint you have, see Which version of SharePoint am I using?

    If you're a document library owner, site owner, or administrator and want to set the default experience, see Switch the default experience for document libraries from new or classic.

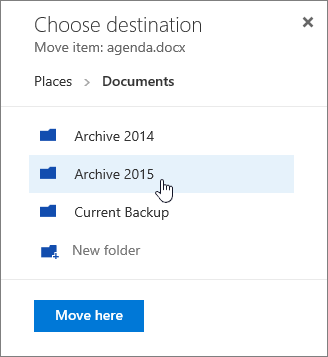
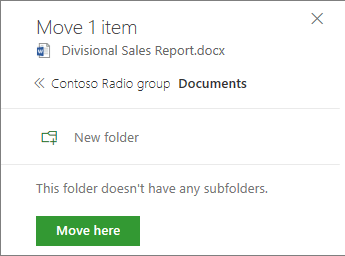
  3. In the Choose destination pane, select the new location in the document library where you want the files to go and click Move here. In the Choose destination pane, you can also click New folder to add a new folder to the document library and move the item to the new folder.

    MoveTo destination pane

    To create a new folder to move the files to, select the location in the folder hierarchy in the Choose destination pane where you want to create the new folder and click New folder. Type the name of the new folder in the text box, click the check mark, and then click Move here.

    Create folder field with checkbox highlighted

To copy files, folders, or links in the same SharePoint Online document library

  1. Click to the left of the file, folder, or link name if in list view or the upper right corner of the file, folder, or link if in thumbnail view to select the items that you want to copy. You can select one or more files, folders, or links to copy.

  2. In the main menu at the top of the page, click Copy to. If you don't see Copy to, click the ellipses (...) on the main menu, and then click Copy to.

    Copy to button on main menu

    Notes: Does your screen look different from the examples here? Your administrator may have SharePoint classic mode set on the document library, or you're using an earlier version of SharePoint. If so, see Introduction to libraries.

    If you're not sure which version of SharePoint you have, see Which version of SharePoint am I using?

    If you're a document library owner, site owner, or administrator, see Switch the default for document libraries from new or classic for the steps to set the default experience.

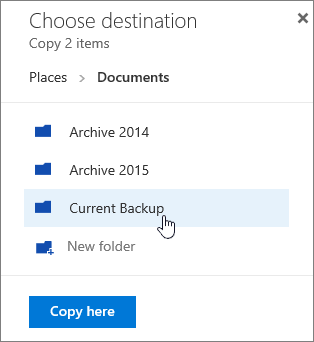
  3. In the Choose destination pane, select the new location in the document library where you want the files to go and click Copy here. In the Choose destination pane, you can also click New folder to add a new folder to the document library and copy the item to the new folder.

    Copyto destination pane with a folder selected

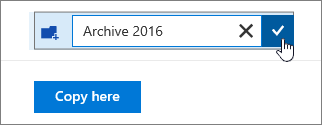
    To create a new folder to copy the files to, select the location in the folder hierarchy in the Choose destination pane where you want to create the new folder and click New folder. Type the name of the new folder in the text box, click the check mark, and then click Copy here.

    Create Folder field for Copy to with check mark highlighted

Copy or move files to another library, subsite, or site

The Copy to and Move to commands only let you stay within the same library. and don't let you send files to another library, subsite, or site.

You can copy or move outside the immediate library, but its more involved. One way is to sync or download the files temporarily and upload them to the new library. For info on sync, see Sync files to your computer from a document library. To learn how to upload files, see Upload a folder or files to a document library.

Another way is to open the library in File Explorer, and then drag and drop the files into the new library. Opening a document library in File Explorer only works in Internet_Explorer_10 or Internet_Explorer_11, and can have some difficulties with some configurations. For more on using document libraries with file explorer, see Ways to work with site library files in File Explorer.

If you have check out required enabled, you may need to disable it temporarily so you can download multiple files. For more info, see Set up a library to require check-out of files and uncheck, rather than selecting the require check out option.

Note:  If you need to upload files and folders, use Microsoft Edge or Google Chrome. Internet_Explorer_10 and Mozilla Firefox don't currently support folders. In addition, don't switch to SharePoint classic mode, as that doesn't support folders either

Need to add more folders, files, or links to a document library?

Leave us a comment

Was this article helpful? If so, please let us know at the bottom of this page. If it wasn't helpful, let us know what was confusing or missing. We'll use your feedback to double-check the facts, add info, and update this article.

See Also

Which version of SharePoint am I using?

Video: Design considerations for orientation

Video: Design considerations for orientation

Your browser does not support video. Install Microsoft Silverlight, Adobe Flash Player, or Internet Explorer 9.

See how landscape and portrait orientation affect headers and footers, page numbers, and margins, dealing with text in landscape view, and other design considerations.

Other videos in this course

This video is part of a training course called Use landscape and portrait orientation.

Use and configure a Summary Link Web Part or a Summary Link field control

Use and configure a Summary Link Web Part or a Summary Link field control

A Summary Link Web Part and a Summary Link field control both provide an easy way to build a page of links to various resources, both inside and outside of your site. You can control the appearance, organization, and presentation of the links that you add to a Summary Link Web Part or field control.

What do you want to do?

Create a Web page that has a Summary Link Web Part or field control

Configure a Summary Link Web Part or field control

Use a Summary Link Web Part or field control

Create a Web page that has a Summary Link Web Part or field control

When you create a page, you can choose for that page to have summary links by selecting the appropriate page layout.

Two page layouts already contain a Summary Link field control when you use them to create a page:

  • Article page with summary links

  • Welcome page with summary links

  • Welcome splash page

You can use the Summary Link field control just as you would use a Summary Link Web Part, except that you cannot add a field control to a page. Field controls must be added to a page layout before the layout is used to create a Web page.

Add a Summary Link Web Part to a page

Summary Link Web Parts can be added to a page only if the page layout supports Web Parts. You can add a Summary Link Web Part to a page that uses any of the following Welcome page layouts:

  • Advanced Search

  • Intranet Home

  • News Home

  • People Search Results Page

  • Search Page

  • Search Results

  • Site Directory Home

  • Welcome page with table of contents

  • Browse to the page to which you want to add a Summary Link Web Part.

  • On the Site Actions menu Button image , click Edit Page.

  • Choose a zone for the Web Part, and then click Add a Web Part in that zone. The Add Web Parts Web Page dialog box opens.

  • In the Add Web Parts dialog box, under All Web Parts, in the Default section, select the Summary Link Web Part check box, and then click Add.

Top of Page

Configure a Summary Link Web Part or field control

There are two sets of configuration options for a Summary Link Web Part: the standard Web Part configuration options and the Summary Link configuration options. The Summary Link configuration options are also available for Summary Link field controls.

To choose the standard Web Part configuration options, click the arrow at the top-right corner of the Web Part, and then click Modify Shared Web Part. For more information about these configurations options, see the article Customize Web Parts.

If you are already editing the page, the arrow at the top-right corner of the Web Part is labeled edit.

To choose the Summary Link configuration options, do the following:

  1. On the Site Actions menu Button image , click Edit Page.

    Note: This step is not necessary if you are already editing the page.

  2. In the Summary Link Web Part or field control, click Configure Styles and Layout. The Configure Styles and Layout Web Page dialog box appears.

  3. You can choose the following options:

    • Default style for new links      Choose a display style for new links. The style that you choose is applied to each link that you add to the Summary Link Web Part.

    • Change existing links to use this style      Select the check box and then choose a display style to apply that style to all existing links in the Summary Link Web Part.

    • Set group headers to use this style      If you separate your links into groups, you can use this option to set the display style for group headers.

    • Number of columns for groups      If you separate your links into groups, you can use this setting to specify the number of columns that will be displayed. A Summary Link Web Part or field control can have up to five columns. If you use five or fewer groups, you can make each group appear in its own column by using the Number of columns for groups option to specify a number that matches the number of groups that you have. If you specify a number of columns that is less than the number of groups, the groups are evenly distributed across the available columns, and a new row containing the additional groups is added to the bottom of the Web Part.

Top of Page

Use a Summary Link Web Part or field control

You can use a Summary Link Web Part or field control to create groups that you can use to organize links, to add new links, and to sort the links and group headers that are in the Web Part.

If you plan to organize the links by using groups, it is a good idea to create the groups before you add new links. This allows you to place each new link in a group when you add the link. If you choose not to create groups first but then later decide that you want to use groups, you can edit each link to add it to a group, or you can drag each link into the group to which you want the link to belong.

What do you want to do?

Add a group to a Summary Link Web Part or field control

Add a link to a Summary Link Web Part or field control

Sort the summary links and group headers in a Summary Link Web Part or field control

Edit an existing link or group header

Add a group to a Summary Link Web Part or field control

  1. On the Site Actions menu Button image , click Edit Page.

    Note: This step is not necessary if you are already editing the page.

  2. In the Summary Link Web Part or field control, click New Group. The New Group Web Page dialog box appears.

  3. In the Group Header Name box, type a name for the group. This name appears at the top of the list of links that you add to the group.

    Note: When you create the first group for a particular Summary Link Web Part or field control, any existing links in the Web Part or field control are added to that group. Additional groups that you create are initially empty.

Remove a group

You can also remove a group from a Summary Link Web Part or field control.

  1. On the Site Actions menu Button image , click Edit Page.

    Note: This step is not necessary if you are already editing the page.

  2. In the Summary Link Web Part or field control, click the menu next to the group that you want to remove, and then click Delete.

    Note: When you remove a group that contains links, those links are moved to the first group that remains. If you remove the only group, the links remain, and are no longer in a group.

Add a link to a Summary Link Web Part or field control

  1. On the Site Actions menu Button image , click Edit Page.

    Note: This step is not necessary if you are already editing the page.

  2. In the Summary Link Web Part or field control, click New Link. The New Link Web Page dialog box appears.

  3. In the New Link dialog box, choose whether the link points to a person or to an item.

    Note: A Summary Link to a person is available only for sites that have a Shared Services Provider (SSP) configured. If your site does not have an SSP configured, the Person option is not available.

    If you choose to link to a person, a new option, Person, appears in the New Link dialog box. You can specify which person the link points to by typing in the Person box or by clicking Browse and then selecting a person from the Add Person Web Page dialog box. The Person option does not appear if you choose to link to an item.

  4. Add a title and a description for the link by typing in the Title and Description boxes. You must supply a title, but a description is optional. If you add a description, you can check the spelling of the description text by clicking the Check Spelling button next to the Description box.

  5. You can specify the address (URL) of the link by typing it in the Link URL box. If the link points to a person, the address will already be filled in. If the link points to an item that is in your site, you can click the Browse button to locate the item and automatically fill in the Link URL box. To test your link address, click Click here to test.

  6. Select the Open link in a new window option to make the link open in a new browser window.

  7. You can add a ToolTip to the link by typing in the ToolTip box. The ToolTip appears over the link when a page viewer rests the mouse pointer on the link.

  8. You can associate an image with the link by typing the address for the image in the Image URL box. If the image is in your site, you can click the Browse button to locate the image and automatically fill in the Image URL box. If you associate an image with the link, the image appears beside the link, and page viewers can click either the image or the link to navigate to the link's target. To test your image address, click Click here to test.

  9. If you specify an image to associate with the link, you can also specify alternative text for the image by typing the text in the Image description box. Alternative text is read aloud by page reading software when a page viewer who is using page reading software visits the page. This text is also displayed in lieu of the image if, for any reason, a page viewer's browser does not display the image.

  10. If you have already added groups to the Summary Link Web Part or field control, you can specify which group the link belongs to by using the Group drop-down list. When you edit a link, you can use the Group drop-down list to add the link to a group or to change which group the link belongs to.

  11. You can set the display style for the link by selecting an option in the Style box. Note that some styles do not display images, so if you have associated an image with your link, be careful to choose a style that displays images.

Remove a link

You can also remove a link from a Summary Link Web Part or field control.

  1. On the Site Actions menu Button image , click Edit Page.

    Note: This step is not necessary if you are already editing the page.

  2. In the Summary Link Web Part or field control, click the menu next to the link that you want to remove, and then click Delete.

Sort the summary links and group headers in a Summary Link Web Part or field control

  1. On the Site Actions menu Button image , click Edit Page.

    Note: This step is not necessary if you are already editing the page.

  2. Do one of the following:

    • In the Summary Link Web Part or field control, drag a link or a group header to change its position relative to the other links and group headers. A horizontal red bar appears where the link or group header will move.

    • Use the Move Up and Move Down buttons:

      1. In the Summary Link Web Part or field control, click Reorder. The Reorder Links Web Page dialog box appears.

      2. Click a group header or link that you want to move, and then click Move Up or Move Down.

        Note: If you move a link up or down, the link may be moved to a different group. If the link is at the top of a group and there is another group above it, when you click Move Up, the link is moved into the group above it. If the link is at the bottom of a group and there is another group below it, when you select the link and click Move Down, the link is moved into the group below it.

Edit an existing link or group header

  1. On the Site Actions menu Button image , click Edit Page.

    Note: This step is not necessary if you are already editing the page.

  2. In editing mode, each summary link and group header has a menu, located to the left of the link or header. Click the menu, and then click Edit. Depending on whether you clicked the menu for a link or for a group header, the Edit Link Web Page or Edit Group dialog box appears.

  3. The same options that are available when you add a link or add a group are also available when you edit a group or a link.

Top of Page

Use the XML Viewer Web Part to display structured data and XML-based documents and forms

Use the XML Viewer Web Part to display structured data and XML-based documents and forms

You can use the XML Viewer Web Part to display Extensible Markup Language (XML) and apply Extensible Stylesheet Language Transformations (XSLT) to the XML before the content is displayed.

Important:  The content that is displayed in the XML Web Part cannot contain an HTML FORM element. If you need to use the HTML FORM element, consider using the Page Viewer Web Part or the Form Web Part.

In this article

Ways you can use the Web Part

Ways to add content to the Web Part

Combine edited and linked XML content

Add a Web Part to a page

Edit the properties of a Web Part

Configure the common properties of a Web Part

Ways you can use the Web Part

You can use the XML Web Part to display:

  • Structured data from database tables or queries.

  • XML-based documents.

  • XML forms that combine structured and unstructured data, such as weekly status reports or travel expense reports.

Top of Page

Ways to add content to the Web Part

There are two ways you can add content to the XML Viewer Web Part:

  • XML and XSL Editors    You can use these editors to enter or modify XML and XSLT source code. The XML and XSL source editors are plain text editors that are intended for users who have knowledge of XML and XSLT syntax.

  • XML and XSL Links    Instead of editing the XML and XSLT, you can enter a hyperlink to a text file that contains XML and XSLT source code. The two valid hyperlink protocols that you can use are:

    • Hypertext Transfer Protocol (http://)

    • Hypertext Transfer Protocol with privacy, which uses Secure Sockets Layer (SSL) encryption (https://)

      You can use an absolute URL or a relative URL. However, you cannot use a file path.

Top of Page

Combine edited and linked XML content

You can combine edited and linked XML content to provide both primary and secondary information. For example, you can provide an error message as secondary information in the edited XML content, in case the linked XML content, or primary information, is not available. When you provide both edited and linked XML content, the linked XML content is always used first. If the linked XML content cannot be accessed, the edited XML content is used.

Note:  Combining edited and linked XSL content in this manner is not supported.

Top of Page

Add a Web Part to a page

To edit a page you must have at least the permissions obtained by being added to the default <Site Name> Members SharePoint group for the site.

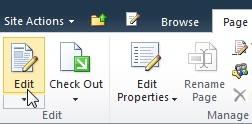
  • From a page, in the ribbon, click the Page tab, and then click the Edit command.

    Edit command of the Page tab

    Note:  If the Edit command is disabled, you may not have the permissions to edit the page. Contact your administrator.

  • Click on the page where you want to add a Web Part, click the Insert tab, and then click Web Part.

    Web Part command

  • Under Categories, select a category, such as Lists and Libraries, select the Web Part that you want to add to the page, such as Announcements, and then click Add.

    Web Part picker

    When you select a Web Part, information about the Web Part is displayed in About the Web Part.

  • When you have finished editing the page, click the Page tab, and then click Save.

Note:  The XML Viewer Web Part is in the Content Rollup category.

The XML Viewer Web Part is added to your page where you chose to position it.

Edit the properties of a Web Part

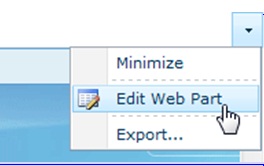
  1. To edit the properties of the Web Part, point to the Web Part, and then click the down arrow.
    Point to the Web Part

  2. Click Edit Web Part.
    Click Edit Web Part

The Web Part properties display in the tool pane.

Top of Page

Configure the custom properties of the Web Part

Following are the properties that are unique to the XML Web Part:

Property

Description

XML Editor

Use to enter XML source code into a plain text editor. Knowledge of XML syntax is required to use this editor.

XML Link

Use to enter a hyperlink to a text file that contains XML source code. The two valid hyperlink protocols that you can use are as follows:

  • Hypertext Transfer Protocol (http://)

  • Hypertext Transfer Protocol with privacy, which uses Secure Sockets Layer (SSL) encryption (https://)

You can use an absolute URL or a relative URL. However, you cannot use a file path.

XSL Editor

Use to enter XSLT source code into a plain text editor. Knowledge of XSLT syntax is required to use this editor.

XSL Link

Use to enter a hyperlink to a text file that contains XSLT source code. The two valid hyperlink protocols that you can use are as follows:

  • Hypertext Transfer Protocol (http://)

  • Hypertext Transfer Protocol with privacy, which uses Secure Sockets Layer (SSL) encryption (https://)

You can use an absolute URL or a relative URL. However, you cannot use a file path.

Top of Page

Configure the common properties of a Web Part

Web parts share a common set of properties that control their appearance, layout, and advanced characteristics. You change Web Part properties in the tool pane.

Note:  The common Web Part properties that you see in the tool pane may be different from what is documented in this section for several reasons:

  • To see the Advanced section in the tool pane, you must have appropriate permission.

  • For a specific Web Part, a Web Part developer may have chosen not to display one or more of these common properties or may have chosen to create and display additional properties that are not listed below in the Appearance, Layout, and Advanced sections of the tool pane.

  • Some permission and property settings may disable or hide Web Part properties.

Appearance

Property

Description

Title

Specifies the title of the Web Part that appears in the Web Part title bar.

Height

Specifies the height of the Web Part.

Width

Specifies the width of the Web Part.

Chrome State

Specifies whether the entire Web Part appears on the page when a user opens the page. By default, the chrome state is set to Normal and the entire Web Part appears. Only the title bar appears when the state is set to Minimized.

Chrome Type

Specifies whether the title bar and border of the Web Part frame are displayed.

Layout

Property

Description

Hidden

Specifies whether the Web Part is visible when a user opens the page. If the check box is selected, the Web Part is visible only when you are designing the page and has the suffix (Hidden) appended to the title.

You can hide a Web Part if you want to use it to provide data to another Web Part through a Web Part connection, but you do not want to display the Web Part.

Direction

Specifies the direction of the text in the Web Part content. For example, Arabic is a right-to-left language; English and most other European languages are left-to-right languages. This setting may not be available for all types of Web Parts.

Zone

Specifies the zone on the page where the Web Part is located.

Note:  Zones on the page are not listed in the list box when you do not have permission to modify the zone.

Zone Index

Specifies the position of the Web Part in a zone when the zone contains more than one Web Part.

To specify the order, type a positive integer in the text box.

If the Web Parts in the zone are ordered from top to bottom, a value of 1 means that the Web Part appears at the top of the zone. If the Web Parts in the zone are ordered from left to right, a value of 1 means that the Web Part appears on the left of the zone.

For example, when you add a Web Part to an empty zone that is ordered from top to bottom, the Zone Index is 0. When you add a second Web Part to the bottom of the zone, its Zone Index is 1. To move the second Web Part to the top of the zone, type 0, and then type 1 for the first Web Part.

Note:  Each Web Part in the zone must have a unique Zone Index value. Therefore, changing the Zone Index value for the current Web Part can also change the Zone Index value for other Web Parts in the zone.

Advanced

Property

Description

Allow Minimize

Specifies whether the Web Part can be minimized.

Allow Close

Specifies whether the Web Part can be removed from the page.

Allow Hide

Specifies whether the Web Part can be hidden.

Allow Zone Change

Specifies whether the Web Part can be moved to a different zone.

Allow Connections

Specifies whether the Web Part can participate in connections with other Web Parts.

Allow Editing in Personal View

Specifies whether the Web Part properties can be modified in a personal view.

Export Mode

Specifies the level of data that is permitted to be exported for this Web Part. Depending on your configuration, this setting may not be available.

Title URL

Specifies the URL of a file containing additional information about the Web Part. The file is displayed in a separate browser window when you click the Web Part title.

Description

Specifies the ScreenTip that appears when you rest the mouse pointer on the Web Part title or Web Part icon. The value of this property is used when you search for Web Parts by using the Search command on the Find Web Parts menu of the tool pane.

Help URL

Specifies the location of a file containing Help information about the Web Part. The Help information is displayed in a separate browser window when you click the Help command on the Web Part menu.

Help Mode

Specifies how a browser will display Help content for a Web Part.

Select one of the following:

Modal Opens a separate browser window, if the browser has this capability. A user must close the window before returning to the Web page.

Modeless Opens a separate browser window, if the browser has this capability. A user does not have to close the window before returning to the Web page. This is the default value.

Navigate Opens the Web page in the current browser window.

Note:  Even though custom Microsoft ASP.NET Web Parts support this property, default SharePoint Help topics open only in a separate browser window.

Catalog Icon Image URL

Specifies the location of a file containing an image to be used as the Web Part icon in the Web Part List. The image size must be 16 by 16 pixels.

Title Icon Image URL

Specifies the location of a file containing an image to be used in the Web Part title bar. The image size must be 16 by 16 pixels.

Import Error Message

Specifies a message that appears if there is a problem importing the Web Part.

Adding a column header in Management Reporter

Adding a column header in Management Reporter

Create a column header

  1. Double-click a header cell.

  2. In the Column Header dialog box, specify the column header text and appearance.

  3. Optionally, select a font from the style list. For more information, see Using Font Styles.

Add a column header row

  1. Select a cell in the header row below the location for the new row.

  2. On the Edit menu, click Insert Row.

Delete a column header row

  1. Click a cell in the header row.

  2. On the Edit menu, click Delete Row.

Top of Page

KPI configuration overview

KPI configuration overview

When you create a new Key Performance Indicator (KPI) or open an existing KPI, PerformancePoint Dashboard Designer automatically displays an Editor tab and a Properties tab in the workspace.

  • Use the Editor tab to configure values for the KPI. For example, you can configure how you want to display numbers, create or modify KPI data source mappings, or specify threshold values for KPI indicators. You can also specify how PerformancePoint Monitoring Server calculates KPI scores and summary values.

  • Use the Properties tab to configure general properties for the KPI. For example, you can specify its name and owner, or specify custom properties for it such as a link to additional information. You can also specify who can access the KPI and under what conditions.

For information about how to create a new KPI, see Create a KPI.

What do you want to do?

Open the Dashboard Designer workspace to configure properties or settings

Configure KPI properties and settings

Next steps

Open the Dashboard Designer workspace to configure properties or settings

When you create a KPI, Dashboard Designer automatically opens a workspace for the KPI and displays the Editor tab and the Properties tab in the center pane of that workspace.

However, if you want to configure a published KPI, you must do the following to open a workspace for that KPI:

  1. Click KPIs in the Workspace Browser to display a list of KPIs in the workspace.

    The center pane of the workspace displays two tabs: Server and Workspace. The Server tab lists all the KPIs that are published to Monitoring Server, and that you have permission to view. The Workspace tab lists all the KPIs that you have created or opened in your workspace.

  2. Click the Workspace tab to view the list of KPIs that are available in your workspace. If the KPI that you want to configure is not listed, click the Server tab, and then double-click the KPI that you want to configure.

  3. The Editor tab and the Properties tab appear in the center workspace. Click the Editor tab to configure KPI values. Click the Properties tab to configure properties or permissions.

Top of Page

Configure KPI properties and settings

To use a KPI in a scorecard, you must configure all the settings listed in the following table. You can configure the settings in any order.

Some important considerations to remember as you configure KPI settings include the following:

  • Each KPI represents a specific set of metrics, and each set of metrics connects to a data source that contains that data. Thus, the designer must explicitly map the KPI to the pertinent subset of data in the data source.

  • Each KPI can represent a different kind of performance metric. For example, the value of one KPI might be a simple count of employees, and another KPI might represent the percentage of employees who were promoted. Thus, the designer must specify how to format and display each numeric value.

  • If the KPI uses a series of graphic indicators to reflect performance, the designer must specify which indicator to use for each set of values. For example, a designer might specify that the average waiting time for customer service must be less than 12 minutes, and choose a down arrow to indicate wait times that are more than 12 minutes.

To learn more about a particular setting, click the appropriate link.

Configuration setting or property

Description

Configure KPI number formats

Describes the different ways you can format numeric KPI values.

Configure KPI properties and permissions

Describes the different ways you can format numeric KPI values.

Set indicator thresholds for KPI target values

Describes how to set the threshold values that Monitoring Server uses to determine when to change the indicator that represents the state of the KPI.

Specify the calculation setting for a KPI

Describes how to configure the method that Monitoring Server uses to calculate a KPI score.

Top of Page

Next steps

After you configure a KPI, you can use it in a scorecard. Click the link that best matches your next task or your overall task.

See how to add, delete, or rearrange scorecard rows and columns

See how to create a scorecard hierarchy, or change a KPI position in the hierarchy

See all steps that are required to build a scorecard

Top of Page

Set the field size

Set the field size

You can adjust the amount of space that each record in a table uses by changing the field size property of number fields in the table. You can also change the field size of a field that stores text data, although this action has a smaller effect on the amount of space that is used.

Note: The functionality explained in this article does not apply to "Access apps." For more information about working with Access apps, please see <insert link to placeholder topic>

.

In this article

What happens when I change the field size?

Change the field size of a number field

Change the field size of a text field

What happens when I change the field size?

You can change the field size of a field that is empty or that already contains data. The effect of changing the field size depends on whether the field already contains data.

  • If the field does not contain data    When you change the field size, the size of new data values is limited for the field. For number fields, the field size determines exactly how much disk space Access uses for each value of the field. For text fields, the field size determines the maximum amount of disk space that Access will allow for each value of the field.

  • If the field contains data    When you change the field size, Access truncates all the values in the field that exceed the specified field size, and also limits the size of new data values for the field, as described above.

Top of Page

Change the field size of a number field

Tip: If the field for which you want to change the field size already contains data, consider making a backup of your database before you proceed. For more information, see the See Also section.

  1. In the Navigation Pane, right-click the table that contains the field that you want to change, and then click Design View.

  2. In the table design grid, select the field for which you want to change the field size.

  3. In the Field Properties pane, on the General tab, enter the new field size in the Field Size property. You can choose from the following values:

    • Byte — For integers that range from 0 to 255. Storage requirement is a single byte.

    • Integer — For integers that range from -32,768 to +32,767. Storage requirement is two bytes.

    • Long Integer — For integers that range from -2,147,483,648 to +2,147,483,647. Storage requirement is four bytes.

      Tip: Use the Long Integer data type when you create a foreign key to relate a field to another table's AutoNumber primary key field.

    • Single — For numeric floating point values that range from -3.4 x 1038 to +3.4 x 1038 and up to seven significant digits. Storage requirement is four bytes.

    • Double — For numeric floating point values that range from -1.797 x 10308 to +1.797 x 10308 and up to 15 significant digits. Storage requirement is eight bytes.

    • Replication ID — For storing a GUID that is required for replication. Storage requirement is 16 bytes.

      Note: Replication is not supported using an .accdb file format.

    • Decimal — For numeric values that range from -9.999... x 1027 to +9.999... x 1027. Storage requirement is 12 bytes.

Top of Page

Change the field size of a text field

Tip: If the field for which you want to change the field size already contains data, consider making a backup of your database before you continue. For more information, see the See Also section.

  1. Open the table that contains the field that you want to change.

  2. Select the field for which you want to change the field size, and then on the ribbon click the Modify Fields tab.

  3. In the Properties group, click More, and then click Field Size.

  4. Enter the new field size in the Field Size box. You can enter a value from 1 to 255. This number specifies the maximum number of characters that each value can have. If you need more than 255 characters, use the Memo data type instead.

    Note: For data in a Text field, Access does not reserve space beyond what is necessary to hold actual values. The Field Size property is the maximum field value size.

Top of Page