Find a message or item with Instant Search
Need to find an important message in your crowded Inbox or folder? Instant Search helps you to quickly find items in Outlook. The Instant Search pane is always available in all of your Outlook folders, such as Mail, Calendar, and Tasks.
For tips on getting even better search results with Instant Search, see the article Learn to narrow your search criteria.
What do you want to do?
Find a message
-
In the navigation bar, near the bottom of the screen, click Mail.
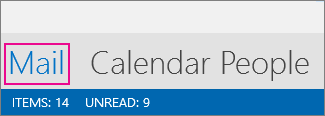
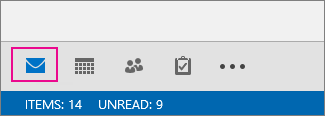
If you don't see this, "Compact Navigation" might be turned on, so you'll see icons instead, like this:
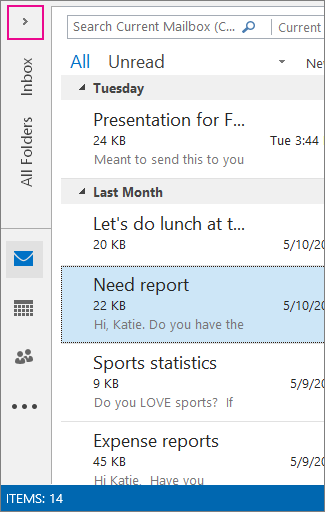
Or, in addition to "Compact Navigation" being on, the folder pane might be minimized, so the icons are arranged vertically. You can expand the folder pane by clicking the Minimize/Expand button, as shown here:
-
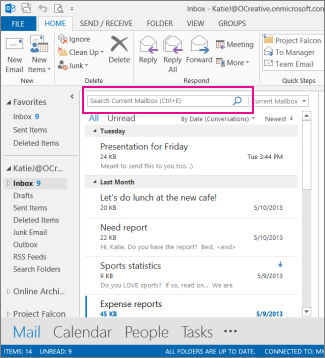
Find the search box. It's at the top of your messages, as shown here:
-
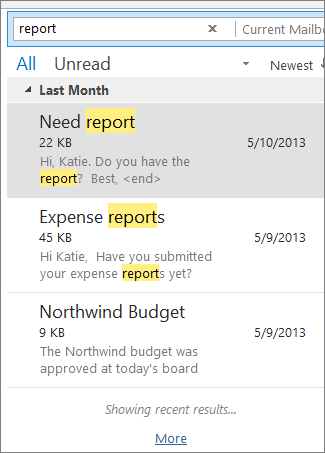
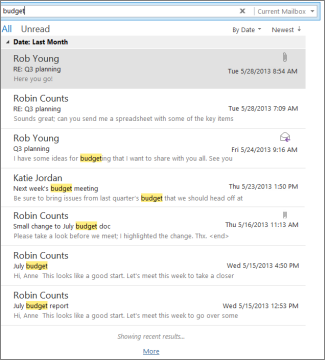
To find a word that you know is in a message, or a message from a particular person, type the word or person's name (you can use first, last, and partial names) in the search box. Messages that contain the word or name you specified appear with the search text highlighted in the results.
-
You can narrow your results even further by changing your search. Here are some common examples:
-
Type "expense reports" (including the quotes) to find messages containing the exact phrase "expense reports."
-
Type expense AND report ("AND" needs to be in all caps) to find messages containing both the word expense and the word report, but not necessarily in that order. You can also use "OR."
-
Type expense NOT report ("NOT" needs to be in all caps) to find messages containing the word expense but not the word report.
-
-
When you're finished, you can clear the search by clicking the
 in the search box.
Narrow your search results
If you can't find what you're looking for, use the search tools on the ribbon to narrow down your search. When you click the search box, you can select a scope option on the left side of the ribbon. Once you decide your scope, you can then refine your search further by selecting an option such as the subject line or the sender.
Scope (where to search): Here you can choose to search in specific folders, such as all your mailboxes, or just the current folder you've selected, which is your Inbox most of the time.
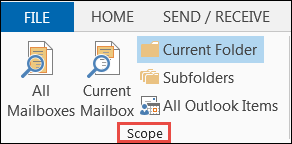
Refine (what to search for): When you've selected your scope, you can add other criteria in the Refine group. When you select an option, Outlook adds a special script to the search box to limit its search.

Let's take a look at the options.
-
From: filters your search results to only show messages sent by a specific person. For example, you can search for all the messages sent by Sara.
-
Subject: filters your search results based on the subject line of the email. For example, you can search for all the messages that have the keyword "report" in the subject line.
-
Has Attachments: gives you all the messages that contain an attachment.
-
Categorized: choose a category to see all the messages that you've flagged with a specific category.
-
This Week: on the drop-down menu, choose a time frame to narrow your search results based on the time you received a message.
-
Sent To: on the drop-down menu, choose an option to filter the results based on the email recipients. For example the messages that you were CCed on, or the ones that were sent to a specific person.
-
Unread: brings up all the unread messages in the folder that you've selected.
-
Flagged: brings up messages that you flagged to follow up.
-
Important: shows all the messages that were marked with high importance.
-
More: choose an option on the menu to further narrow down your search results. For example you can filter by sensitivity or message size.
Remember that you can mix and match these options.
Here's an example: You can search for all the messages from Sara that you received last month, with the keyword "report" in the subject line.
To set up a search for this example:
-
Make sure Inbox is selected, then click in the Search box.
-
Select Subfolders in the Scope group.
-
Click From and type Sara to replace the highlighted text in the search box.
-
Click Subject and type report to replace the highlighted text in the search box.
-
From the drop-down menu next to This Week, select Last Month.

Use Advanced Find
Getting too many results? Or are you just not finding what you want?
-
Click in the search box.
-
On the Search tab, click Search Tools > Advanced Find.
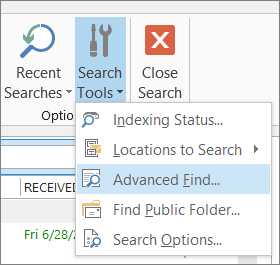
In the Advanced Find box, you can specify much more complex criteria and even search in your calendar, contacts list, notes, and tasks.
-
Click the Advanced tab.
-
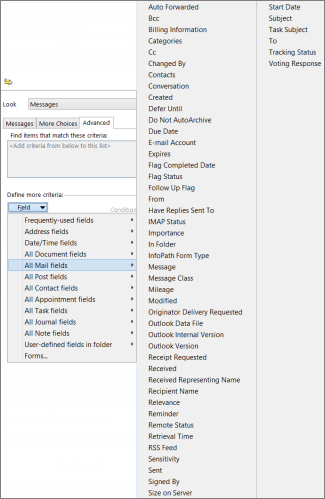
Under Define more criteria, click the Field button and then click All Mail Fields. You'll see a menu of fields you can search on, such as From, To, Received, Subject, and dozens more.
-
Start by choosing a field, then choose a condition and a value to test. For example:
From/ Contains/ Katie will search for messages from someone whose name includes "Katie." Notice we're using contains as the condition instead of is (exactly) so that we don't have to find an exact match. So if Katie's email name is "Katie Jordan," From/is (exactly)/Katie won't work because we'd need to specify Katie's full name, Katie Jordan, to get an exact match. That's where contains comes in handy as a condition.
-
Add as many additional conditions as you need or want to test. We'll add three more:
From | Contains | Katie will search for messages from someone whose name includes "Katie." Notice we're using contains as the condition instead of is (exactly) so that we don't have to find an exact match. So if Katie's email name is "Katie Jordan," From | is (exactly) |Katie won't work because we'd need to specify Katie's full name, Katie Jordan, to get an exact match. That's where contains comes in handy as a condition.
Then, let's say you add these as well:
-
Received | between | 5/01/13 and 5/31/13
-
Message | contains | budget
-
To | contains | Rob
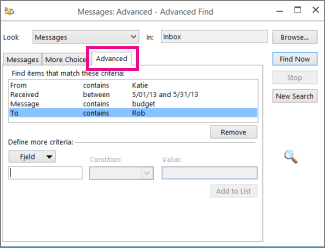
Now, Outlook searches for messages from someone with "Katie" in her name that arrived in the inbox in May, 2013, with "budget" in the message body, and (in addition to you) were also sent to someone with "Rob" in his name. Here's a zoomed look at the list of the four criteria we added.

Finally, click Find Now to run the search.
Remove the limit on the number of search results
If the thought of more than 250 results doesn't scare you off, you can bypass that limit:
-
Click File > Options > Search.
-
Under Results, clear the Improve search speed by limiting the number of results shown check box.
What do you want to do?
Find an Outlook item
-
In the Navigation Pane, click the folder that you want to search.
-
In the Instant Search box, type your search text.

-
Items that contain the text that you typed appear with the search text highlighted.
-
To narrow your search, type more characters.
-
-
To widen your search to include all folders, at the end of the search results, click Try searching again.
Notes:
-
To return the insertion point to the Instant Search box, press CTRL+E.
-
When you are finished with the search, you can clear the search by clicking Close Search
 next to the Instant Search box.
 -
Attachments are searched, but search results from attachments are not highlighted.
-
Add more search criteria
You can narrow your search by adding criteria. When you click or type in the Instant Search box, the Search Tools tab is created. In the Refine group, a number of criteria options help to make the search more specific.

Note: Search fields that you add are specific to where you are within Outlook, such as Mail, Calendar, Contacts, Tasks, Notes, Folder List, or Journal. The search fields are also specific to the Outlook e-mail profile that you are currently using. The search fields persist after you exit and restart Outlook. The search query does not persist.
Reuse a recent search
Your 10 most recent searches are saved and can be reused.
-
Click in the Instant Search box, and on the Search Tools tab, in the Options group, click Recent Searches, and then click the search word or phrase that you want to use again.

See also
Enable or disable the Instant Search feature
Learn to narrow your search criteria for better searches in Outlook
What do you want to do?
Find a message
-
In Mail, click the folder that you want to search.
-
In the Instant Search box, type your search text.
-
Messages that contain the text that you typed are displayed in the Instant Search Results pane with the search text highlighted.
Note: By default, it is not necessary to click the Search button
 to start the search. The Search button is enabled only if you have cleared the Display search results as I type when possible check box in the Search Options dialog box. For details, see the section in this article, called "Change the Instant Search options," below.
 -
To narrow your search, type more characters.
-
-
To widen your search to include all folders in Mail, at the end of the search results, click Try searching again in All Mail Items.
Alternatively, in the Navigation Pane under Mail Folders, click All Mail Items or press CTRL+ALT+A.
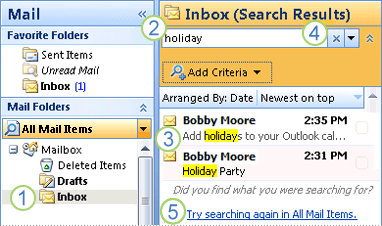
1. Click the folder to search in.
2. Type your search text in the Instant Search box.
3. Messages that contain the text that you type appear in the results with search text highlighted.
4. Click to clear the Instant Search box, and then start a new search.
5. Click to widen your search to all folders in Mail.
For examples of how to find exactly what you are looking for, see Learn to narrow your search criteria for better searches in Outlook.
Notes:
-
To return the insertion point to the Instant Search box, press CTRL+E.
-
After you have performed a search and located your item in the results list, you can clear the search. Outlook keeps you on the last item you clicked.
-
Attachments are searched but search results from attachments are not highlighted.
Add more search criteria
You can narrow your search by adding criteria.
-
In the Instant Search pane, click Expand the Query Builder.

-
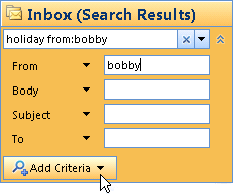
To add more search criteria, type your search text in the From, Body, Subject, or To lines.
-
To display more search fields in the Query Builder, click Add Criteria, and then select the search fields you want in the list.
Tip: You can also delete search fields in the Query Builder by clicking Remove in the list of search fields.
-
Enter your search criteria in the new search fields.
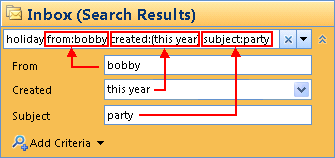
While you enter criteria for the search fields, the Instant Search box displays your criteria as search query syntax. The syntax includes the search criteria followed by a colon, and then the criteria value that you entered, as shown in the illustration below. As you become more familiar with the search query syntax, you can type your query in the Instant Search box instead of using the search fields.
-
View the search results in the list below the Instant Search pane.
Notes:
-
Search fields that you add are specific to where you are within Outlook, such as Mail, Calendar, Contacts, Tasks, Notes, Folder List, or Journal. The search fields are also specific to the Outlook e-mail profile that you are currently using. The search fields persist after you exit and restart Outlook. The search query does not persist.
-
Reuse a recent search
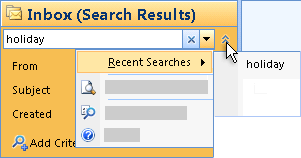
Outlook displays up to 10 of your most recent searches.
-
In the Instant Search pane, click Show Instant Search Pane Menu, point to Recent Searches, and then click the search that you want in the list.
Make changes to a search
Include subfolders in Instant Search
Instant Search can search every folder, including subfolders, in the Outlook Folder List, but the option to search all folders is not selected by default. You must turn on this search option.
-
On the Tools menu, point to Instant Search, and then click Search Options.
You can also click the arrow in the Instant Search pane, and then click Search Options.
-
Under Instant Search Pane, select All folders.
Include the Deleted Items folder in Instant Search
By default, the Deleted Items folder is not included when searching All Mail Items. To include the Deleted Items folder, do the following:
-
On the Tools menu, point to Instant Search, and then click Search Options.
You can also click the arrow in the Instant Search pane, and then click Search Options.
-
Under Deleted Items, select the Include messages from the Deleted Items folder in each data file when searching in All Items check box.
Include data files in searches
By default, Outlook includes the following data files in a search of All Mail Items:
-
All indexed data files. These include Personal Folders files (.pst) and Offline Folder files (.ost). Indexing ensures that Instant Search is fast.
-
Outlook data file for your default e-mail account, regardless of whether it is indexed or not.
However, you can select any data file to be included in searches.
Important: Choosing which data files to include in searches applies only to a search of All Mail Items that searches across one or more data files.
Choose which data files to include in searches
-
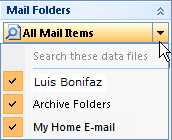
In Mail, in the Navigation Pane, click the arrow in All Mail Items.
-
Select the name of the data file that you want to include or exclude in your searches.
For example:
-
Your POP3 account might be for home and personal e-mail messages only, so at work, you want to search only your work e-mail account. In that case, clear the My Home E-mail check box to exclude it from being searched.
-
A data file that you might want to exclude from a search is a large archive folder.
-
You might work at a legal firm and keep information about each of your cases in different .pst data files that you keep open. If you are working on a specific case, you might not want .pst files for the other cases to be included in searches related to the specific case.
-
Change the Instant Search options
-
On the Tools menu, click Instant Search, and then click Search Options.
Alternatively, click the arrow in the Instant Search pane, and then click Search Options.
-
Choose the options that you want:
Indexing
-
Index messages in these data files Select the data files that you want Outlook to index for searches.
-
Prompt me when search results may be incomplete because messages are still being indexed This option is selected by default. Outlook displays a message in the Instant Search pane when showing all search results is delayed because Outlook is not finished indexing all messages in the data files selected. Clicking the message opens a dialog box that shows how many items remain to be indexed. Clear the check box if you don't want to see those messages.
Search
-
Display search results as I type when possible This option is selected by default. Clear this check box if you don't want the search results to be displayed as you type. For example, you might not want to see any search results until you press ENTER or click the Search button. The Search button
 is enabled only if you clear this option. You might also want to clear this check box because the search results are not displayed as fast as you want.
 -
Make searches faster by limiting the number of results shown This option is selected by default. When your search returns an extremely large number of results, Outlook limits the number shown to speed up search and shows you the most recent items. Outlook displays a message in the Instant Search pane alerting you to this limitation. You can click the message to open a dialog box and see all of the results.
-
Highlight the words that I search for This option is selected by default. Clear this check box if you don't want your search results to be highlighted. If you want to change the color of the highlight, click Change, and then select a color in the Color dialog box.
Deleted Items
-
Include messages from the Deleted Items folder in each data file when searching All Items This option is not selected by default. Select this check box if you want to include deleted items in your searches when doing a search in All Mail Items.
Instant Search Pane
-
When searching, show results from The option for Only the currently selected folder is selected by default. Select the All folders check box if you want all searches to include every folder in the Outlook Folder List.
-
See also
Enable or disable the Instant Search feature
Turn off the prompt for installing Windows Desktop Search
Learn to narrow your search criteria for better searches in Outlook
No comments:
Post a Comment