Friday, December 31, 2021

Shrink text to fit

If you have a short document that only has a small amount of text on the last page, you might be able to shrink it just enough to print on one page, and avoid printing the extra page.

Two page document with only one sentence on second page

To do this, use the Shrink One Page command. Word will attempt to shrink the document by one page by reducing the size and spacing of the text. For example, it will shrink the document above to 1 page, or it might shrink a 3-page document down to 2.

Tip: Save a copy of your document before using this command. In order to shrink the document, Word decreases the font size of each font used in the document. You can undo the command by pressing Ctrl + Z. However, after you save the document and close it, there is no quick way to restore the original font size.

Shrink One Page isn't a commonly used command, so the button isn't shown by default. You can, however, quickly add it. The quickest way to add the button is to add it to the Quick Access Toolbar.

  1. In the Quick Access toolbar at the top of the Word window, click Customize Quick Access Toolbar (the small down arrow) and choose More Commands.

    Quick Access Toolbars menu

  2. Under Choose commands from, click All Commands.

    Customize Quick Access Toolbar Choose commands menu

  3. Scroll down through the list of commands until you find Shrink One Page.

  4. Click Shrink One Page to select it, and then click the Add button.

    Shrink One Page command

  5. Click OK.

Once the button is available, just click it to shrink the text.

Shrink One Page button in the Quick Access Toolbar

  1. Click Edit Document > Edit in Word for the web if you haven't done so already.

  2. Press Ctrl+A to select all the text in your document.

  3. Click Home > Shrink Font one or more times.

    Shrink Font button

    As you click Shrink Font, Word decreases the size of every font in your document.

  4. Click View > Reading View to see if you shrank the text enough.

Tip: If this doesn't work and you have the Word desktop program, click the Open in Word button to open your document in Word and shrink text to fit there.

Remove the onenote badge from the android homescreen

After you install OneNote on your Android phone, you'll see the OneNote badge appear on the Home screen. It's a great way to take a note quickly without opening OneNote. Simply tap the badge and add a note to one of your OneNote pages.

The badge appears in two locations:

  • On the right edge of your phone that stays partially hidden and on top of all apps. Simply tap the badge while working in any app to write a quick note.

  • On the Home screens like other apps and widgets. From a Home screen, tap the badge and write a note.

Screenshot of the Android homescreen with OneNote badge.

Remove the badge from the right edge

You can prevent the badge from appearing on the right edge of your phone screen so that it doesn't appear on top of other apps.

  1. Press and hold the badge until the Remove icon ( X ) appears on the bottom of the phone's screen.

  2. While still pressing the badge, drag it over the Remove icon. When you release your finger, the badge will be gone.

    Note: Keep in mind that removing the badge on the right edge doesn't remove any other badges that have been added to the Home screens, which can be removed in the next section.

Remove the badge from the Home screens

For those badges that appear on the Home screens but don't appear on the right edge of your phone, these can be removed the same way as other apps or widgets are removed.

  1. Press and hold the badge until a short menu appears.

  2. Tap Remove.

Add the badge

You can add the badge back to your Home screens at any time.

  1. Open OneNote, and then on the bottom left, tap Notebooks.

  2. Tap the ellipsis icon ( ... ) located in the upper right.

  3. Tap Settings.

  4. Do one of the following:

    • To add the badge so that it appears on the right edge of your phone and on top of other apps, tap OneNote badge. The badge will appear on the right edge, and a notification will also be added to your phone's notification area to remind you that the badge is currently available.

    • To add a badge to the Home screens so that it doesn't appear over other apps, tap Add OneNote badge to the Home screen.

Get started with Sticky Notes

Database functions reference

Important: The calculated results of formulas and some Excel worksheet functions may differ slightly between a Windows PC using x86 or x86-64 architecture and a Windows RT PC using ARM architecture. Learn more about the differences.

Click one of the links in the following list to see detailed help about the function.

Function

Description

DAVERAGE function

Returns the average of selected database entries

DCOUNT function

Counts the cells that contain numbers in a database

DCOUNTA function

Counts nonblank cells in a database

DGET function

Extracts from a database a single record that matches the specified criteria

DMAX function

Returns the maximum value from selected database entries

DMIN function

Returns the minimum value from selected database entries

DPRODUCT function

Multiplies the values in a particular field of records that match the criteria in a database

DSTDEV function

Estimates the standard deviation based on a sample of selected database entries

DSTDEVP function

Calculates the standard deviation based on the entire population of selected database entries

DSUM function

Adds the numbers in the field column of records in the database that match the criteria

DVAR function

Estimates variance based on a sample from selected database entries

DVARP function

Calculates variance based on the entire population of selected database entries

Excel functions (by category)

Excel functions (alphabetical)

Open an existing onenote for windows 8 notebook from your computer or a network file share

OneNote for Windows 8 is optimized for working on the go. That's why notebooks you create or open in this version need to be stored in the cloud. Opening notebooks locally from your computer or device isn't an option.

If you want to use the Windows 8 version of OneNote to work in notebooks stored on your computer, you can move the notebooks to OneDrive or SharePoint first. After the notebooks are in the cloud, switch back to OneNote for Windows 8 and open the newly uploaded notebook from its new location.

Top of Page

Create a company wide email signature

Create a plc team in microsoft teams

Connect regularly with other educators and continue personal career development through professional learning communities (PLCs) in Microsoft Teams.

Form PLC teams around interest areas, grade levels, or across subjects. New educators can be added at any time, and team members can share files and collaborate in channels, even when they're not at school. Each PLC team is linked to its own OneNote notebook for further collaboration.

Benefits of using PLC teams

  • Save time by organizing all work in one hub

  • Collaborate in conversation stream posts

  • Communicate via chat, audio, or video calls

  • Make announcements using @mention to the team's General channel

  • Organize virtual or face-to-face meetings

  • Work in smaller groups

  • Share and organize content

  • Use OneNote PLC notebook with pre-loaded templates for professional inquiry and development

  • Add tabs such as Planner to create task organization

  • Add tabs such as Power BI to visualize student data

  • Add tabs such as Twitter to follow PLC-specific tweets

Create a PLC team

  1. Select the Teams icon in your left rail to view your teams.

  2. Select Join or create team  > Create a new team.

    Join or create team

  3. Select Professional Learning Community (PLC).

    Choose a team type
  4. Enter a name for your team and optional description for your team, then select Next.
     

    Tip: During this step, you can also create a new team using an existing team as a template.

  5. Once you've created a PLC team, follow the steps to add other educators as team members.

Learn more

Choose which team to create

Create a team for classes

Create a team for staff

Additional resources for educators

Transfer a lync call

With LyncMicrosoft Store app, you can transfer a call to another person or number. For example, if you need someone else to handle the call, you can transfer to them. Or if you need to leave your office, but want to continue your conversation, you can transfer the call to your cell phone.

Note:  For Microsoft 365, transferring a call is available to another person only, and not to a number.

  1. When in a call, open the app commands by swiping in from the bottom of the call window, or with a right-click from a mouse.

  2. Select Call > Transfer Call > Transfer to another person.

    Screen shot of Lync Transfer menu

  3. Type the name of your contact, or a phone number in the search box.

    Screen shot of search for contact

  4. Select or click your contact's name in the search options and then select the transfer button.

    Screen shot of transfer button in search

  5. If the call transfers successfully, you'll see a Call ended message.

Unified get transform experience

Note: This article has done its job, and will be retiring soon. To prevent "Page not found" woes, we're removing links we know about. If you've created links to this page, please remove them, and together we'll keep the web connected.

Excel 2016 introduced a powerful set of tools called Get & Transform. These tools, based on Power Query technology, enable you to easily connect, combine, and shape data coming from a variety of sources. The following Get & Transform tutorial will guide you through the basics.

We are pleased to announce the next major update to data import and shaping functionality in Excel – the unified Get & Transform experience. With the March, 2017 Microsoft 365 update, we enhanced Excel's data import functionality and rearranged the buttons on the Data tab, so that it's easier than ever to take full advantage of Get & Transform capabilities.

Get & Transform options on the Data tab

With the unified Get & Transform experience, you benefit from the well-integrated and modern set of data import and shaping capabilities in Excel. You can easily connect and get data from a variety of popular data sources such as files, databases, Azure and Online services, and more. And, you can shape that data in powerful ways by sorting, changing data types, splitting columns, aggregating the data, and so on. The constantly growing offering of new connectors, and easy-to-perform transformations are what make Get & Transform an invaluable and time-saving tool in your day-to-day work.

Please note that the new experience replaces the older, legacy data import wizards, which were available under Data > Get External Data. However, they can still be accessed if you want. See: How do I restore the legacy Get External Data experience?

Note: This feature is only available in Excel if you have a Microsoft 365 subscription. If you are a Microsoft 365 subscriber, make sure you have the latest version of Office.

How do I get data from popular sources like CSV files or the Web?

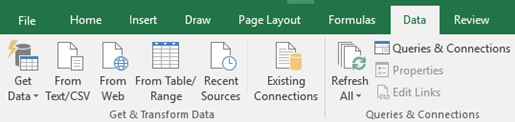
We know that users who import data like to have the most popular connectors easily accessible for them on the ribbon. In this update, we tried to follow this principle and kept the experience consistent with what you are used to. You can now find the following top three connectors available under the Get & Transform Data section of the Data tab: From Text/CSV, From Web, and From Table/Range.

From Text/CSV

With this connector you can easily import data from your text (*.txt), comma-separated values (*.csv) or formatted text (*.prn) files. This modern connector is based on Power Query technology, and replaces the legacy From Text wizard.

To start importing data with the new connector, click Data > From Text/CSV, choose the source file, and then click OK. The new and enhanced From Text/CSV connector then analyzes the structure of your input file, and automatically applies the relevant import settings. It can split the columns by delimiter, promote the first row to be used as column headers, and more.

Get & Transform From Text options

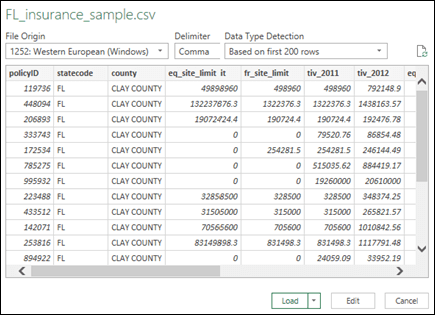
If the preview isn't the way you want, you can configure the basic import settings such as File Origin, Delimiter, or Data Type detection logic right there. Based on your choices, the preview of the data is automatically updated.

You can then click Load to directly load the data into your worksheet, or click the arrow next to Load to load the data into your Data Model. If you want to apply additional data transformations in the Query Editor, click Edit.

From Web

With this connector you can "scrape" data from HTML pages. This is another modern connector that is also based on Power Query technology, and replaces the legacy From Web wizard.

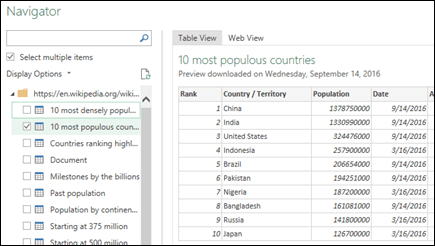
To start using it, click Data > From Web, specify the target page URL, and then click OK. A list of all the tables on the page is shown in the Navigator dialog. You have the option of interacting with the web page in either Table View or Web View. With Table View, first click a table name on the left, and data from that table will display on the right. With Web View you can either click a table from the Navigator list, or from the Web View preview pane. You can select multiple tables in either view.

Get & Transform From Web options

From Table/Range

With this connector, you can create a new query that is linked to a table or named range in your Excel worksheet. You can then refine your data, and apply additional transformations to it in the Query Editor window.

Get & Transform From Table options

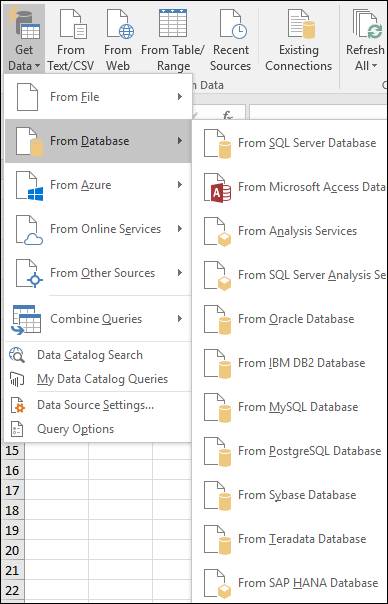
How do I get data from additional sources like XML file or Microsoft SQL Server?

You can create a new query to import data from a single data source, such as a Microsoft Access database or OData feed, or you can import data from multiple text files in a folder at once.

When you click on Data > Get Data, the available data sources are presented to you in a drop-down menu. The source options are organized in categories, including files like Excel workbooks, XML files or the entire folder, databases such as SQL Server or Oracle, Azure services such as HDInsight or Blob Storage, Online services like SharePoint Online List or Salesforce, and a variety of other sources like OData or ODBC.

The list of available connectors is constantly growing.

Get & Transform From Database options

With this update, we have also removed the following legacy wizards that were previously available under the Get External Data section of the Data tab: From Access, From Web, From Text, From SQL Server, From OData Data Feed, From XML Data Import and From Data Connection Wizard. If for any reason, you require using one of the removed legacy wizards, see: How do I restore the legacy Get External Data experience?

However, there are two popular and quite unique wizards that are part of the old Get External Data feature set and will remain in the new experience: From Analysis Services and From Microsoft Query. They can be found under Data > From Database and Data > From Other Sources categories in the new experience respectively.

How do I leverage Get & Transform capabilities to clean and shape my data?

Get & Transform lets you clean and shape your data as an essential step for robust data analysis. You can remove columns, filter rows, change column data types, replace values and more. This is done through the dedicated Query Editor window that facilitates and displays all your data transformations.

Switch to the Data tab on the ribbon, click Get Data, connect to the desired data source (such as file or database) using one of the available connectors, and preview your data in the Navigator window.

Gent & Transform Navigator

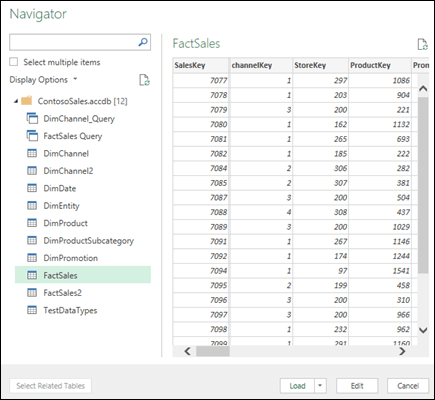
Next, select the tables that you would like to import and click Edit to launch the Query Editor window.

Get & Transform Query Editor

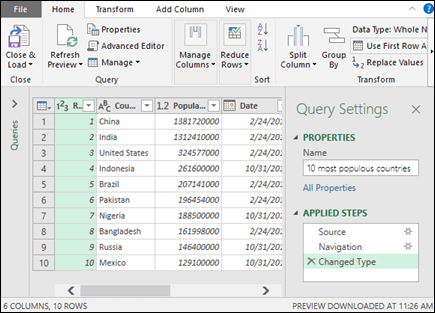
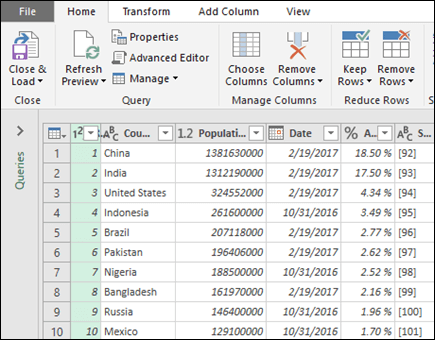
Use the wide collection of commands available from the ribbon inside the Query Editor window. You can apply powerful transformations by sorting and filtering data, converting data types, splitting or merging columns, aggregating your data and more.

All the transformation steps that you apply on your data are recorded and are saved as a part of your query. The recorded transformations can be observed and managed via the APPLIED STEPS section inside the Query Editor window, and will be re-applied to your data every time your query is being refreshed.

How do I get data from recently used sources, Office Database Connection (ODC) files, other workbook connections, or tables?

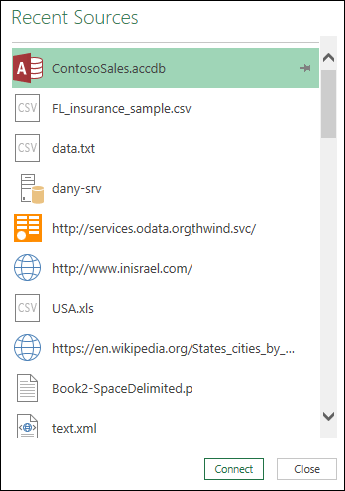
One of the most popular scenarios in the data import area is connecting and getting data from your recent sources. Users often establish a set of frequently used sources they connect to for importing data.

To connect and create a query from one of your recent data sources, click Data > Recent Sources. You can then browse through your recently connected sources, select one, and then click Connect to continue with the import flow.

Get & Transform Recent Sources pane

Another popular scenario is importing data from existing connections or tables in your workbook. For example, you might want to create a new PivotTable based on a previously created workbook connection. Or, you might want to link and import from a data source using an Office Database Connection (ODC) file that was defined by someone within your organization.

With this update, you will be able to export any of your queries' definitions into an ODC file, then share it across your workbooks or with your co-workers. To export a query definition into an ODC file, right-click on a query in the Queries & Connections side pane, and choose Export Connection File. The created ODC file will contain the definition of your query with all dependencies, including the connectivity instructions to the data source, and the transformation steps being applied on your data. Another way to export a query definition is through the Query Properties dialog that can be opened by choosing Properties from the query's context menu.

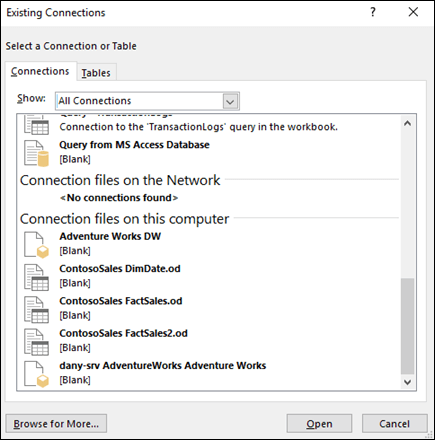
Once you receive an ODC file, you will be able to consume it, and import the query definition into your workbook. To import data via the ODC mechanism, click Data > Existing Connections. The Existing Connections dialog will appear and you can then import from the available ODC files, existing workbook connections or tables.

Select from existing connections or queries

If you need to create an ODC file that will be consumed by another application, like Visio or Excel 2013 and earlier, you can do that using the following connectors: From SQL Server Database, From Microsoft Access Database, From OData Feed, From Analysis Services, From Microsoft Query or the legacy From Data Connection Wizard. It's important to know that when consuming the ODC files from another application, that application will only reuse the connectivity instructions from the ODC, and will not contain any transformation steps that your original query might have contained. If you need to restore the legacy From Access, From SQL Server, From OData Data Feed connectors, see: How do I restore the legacy Get External Data experience?

How do I manage existing workbook queries and connections?

When we introduced Get & Transform into Excel 2016, we introduced two data import methodologies: The first was the new Get & Transform experience which makes use of queries (and also relies on workbook connections behind the scenes for refresh and load to workbook elements). The second was an older, legacy experience which makes use of workbook connections. Managing workbook queries and connections was also done separately. Workbook queries were managed through the dedicated Queries pane, while connections were managed through the Workbook Connections dialog. This caused confusion among our users.

With this update, we addressed this issue. You can now access and manage your workbook queries and connection from the dedicated Queries & Connection side pane. To open the side pane, click the Data > Queries & Connections button.

Get & Transform Queries & Connections pane

Clicking on the Queries tab at the top of the pane allows you to browse and manage the available queries in your workbook. Right-click on a query to access the query's context menu, which allows you to perform additional actions. For example, you can refresh query data from the underlying source, copy/paste the query, edit query transformations with Query Editor, and more.

We have also simplified the management of the query and its underlying connection through the new Query Properties dialog. Today, whenever you create a new query in the workbook, a new underlying connection entity is automatically created behind the scenes, and is associated with this query. While the query's role is to connect to the data source and apply the required data transformations on top of it, the underlying connection controls where the data is being loaded (e.g., worksheet or Data Model), as well as the refresh settings for query data, like the refresh frequency. With the new Query Properties dialog, you can easily control all the query properties, such as its name or transformation instructions, and the underlying connection properties, such as refresh settings, in a centralized way. To open the new Query Properties dialog, click on the Properties command from the query's context menu on the Queries & Connection side pane.

Clicking on the Connections tab at the top of the side pane allows you to browse and manage the available legacy connections in your workbook that are associated with one of the legacy wizards such as From Text, From Analysis Services, or From Microsoft Query. Right-click a connection to access the context menu. There you'll be able to perform additional actions, such as refresh connection data from source, delete connection, or manage connection properties through the well familiar Connection Properties dialog.

How do I restore the legacy Get External Data experience?

The new Get & Transform experience is superior in terms of connectors offering and transformation capabilities compared to legacy wizards. However, there are still times when you may want to use one of the old wizards to import your data. For example, when you want to save the data source login credentials as part of your workbook. (Please note that this method does not comply with the modern security standards, and as such is not supported in the new Get & Transform experience).

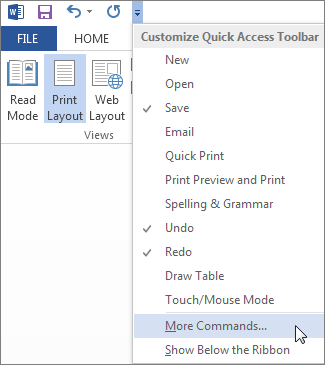
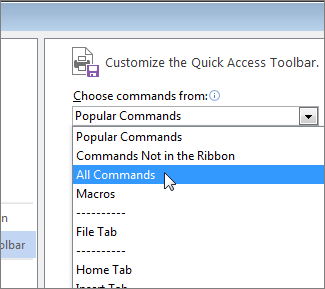
You can access the legacy connectors by customizing the ribbon, or you can bring back and show your legacy data import wizards directly under the Data > Get Data drop-down menu via the new and easy configuration settings from the Excel Options dialog.

Go to File > Options > Data > Show legacy data import wizards, and select the legacy wizards you want to use:

Image of the Get & Transform Legacy Wizard options from File > Options > Data.

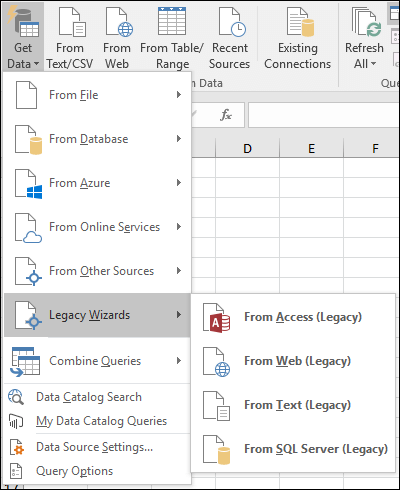
Open the Data > Get Data drop-down menu and launch one of the previously selected legacy data import wizards from the dedicated Legacy Wizards category:

Get & Transform Legacy Menu options

Additional information about Get & Transform

If you want to learn more about the Get & Transform capabilities, a good place to start is the Microsoft Power Query for Excel Help.

Need more help?

You can always ask an expert in the Excel Tech Community or get support in the Answers community.

Find data in an access app

Important    Access Services 2010 and Access Services 2013 are being removed from the next release of SharePoint. We recommend you do not create new web apps, and migrate your existing apps to an alternative platform, such as Microsoft Power Apps.

Data is useless if you can't find it when you need it, so Access apps provide several ways to zoom in on the data you need. These finding and filtering tools are included automatically when you create an Access app.

Note: This article doesn't apply to Access desktop databases. For more information about creating forms in desktop databases, see create an Access form.

Finding data in a List view

A List view gets created automatically when you add any table to an app. To open this view, navigate to your app with your browser and click List in the View Selector (unless you have renamed the view caption). For more about adding tables to apps, see create an Access app. For more about working with List views, see using a list view in an Access app.

In List views that display a large number of records, locating a specific record can be difficult, so the search box feature makes this task easier. Each List view includes a search box by default, as shown here:

The default search box on a List Details form.

Enter a few characters in this box, press Enter, and the app immediately filters the list down to items that contain those search characters.

An example search on the characters "ad"

In this example, entering the characters "ad" finds "Adina", Traders", and "Mahadevan". Access searches across multiple fields. In this example, Access found the search value in the First Name, Company, and Last Name fields of 3 different items.

To return to the unfiltered view, click the "x" in the search box. When you are viewing records in a List view, type the forward slash character / as a keyboard shortcut to move focus to the search box.

Note: If you have lookup fields in your List view that look up their values in other tables, Access searches across the display values of the lookup fields instead of the stored related ID values when you use the search box.

Tip: If you have any controls bound to fields on the List view with the Visible control property set to Hidden, Access doesn't use the values within those controls during its search. Access searches only for values displayed in the List Control and visible controls within the view. If you want to exclude fields from being in the search, hide those controls using the Visible property.

By default, Access searches across all fields visible in the List view when you enter a search criterion into the search box. You can refine your search in the search box to search only one field instead of all visible fields by entering the field name followed by a colon and then your search criteria. For example, in the previous example if you wanted to only search for the characters "ad" in the Company field, enter Company:ad into the search box and press Enter. In this case, Access searches across data in the Company field only and returns one record whose company name matches the search—the Northwind Traders record.

Tip: If your field name contains spaces, enclose the field name in quotation marks in the search box. For example, if your field name is Company Name, enter "Company Name":northwind into the search box to search across that one field.

Access does not display the search box on the design grid when you're designing your List view; you'll see the search box only in runtime in your web browser. You cannot remove or hide the search box; it is part of the List Control in List and Summary views. The search box maintains the same width as the List Control, so if you reduce or increase the width of the List Control in the view, Access reduces or increases the width of the search box to match.

Finding data in a Summary view

A Summary view groups items by a value, such as task status:

A search box on a summary view.

Summary views include the same kind of search box as List views, but its filtering powers are limited to the list just below it, and do not extend to the detail information on the right. Still, it is a great way to find the group you need if you have a lot of groups displayed in your Summary view.

Finding data in a Datasheet view

Like the List view, a Datasheet view is created automatically for any table you add to an app, and is available by clicking Datasheet in the view selector (unless you have renamed the view caption) within your browser. Datasheet views don't include a search box like the ones in the views above, but they do provide filtering features like those you would find in a spreadsheet program or an Access desktop database datasheet form. For more about datasheet views in Access apps, see use a web datasheet view in an Access app.

Hover over a column header, click the drop-down arrow, and click an option to sort or filter the list.

Applying a filter to the Due Date field of a datasheet.

Select more options from the list to add more values to a column's filter. Check marks appear next to the values you've selected.

Filter drop-down in a datasheet with multiple values selected.

To remove a filter on a column, click Clear Filter from the list of options.

Tip:  Use your browser's "find on page" feature to quickly find data in a datasheet view. For example, in Internet Explorer, press Ctrl+F, enter the text or number you're looking for, and then click Previous or Next to advance through the found values.

Pool front end properties general

Use the General tab to specify the back-end database for this Office Communications Server pool and the number of contacts to which each user may subscribe.

Display name

This is the display name for this pool or server. This value is specified when the pool is created and cannot be modified.

Back end server address

This is the address of the Office Communications Server back-end database server, which consists of the name of the server and database instance in the format servername\instancename. This value is specified when the pool is created and cannot be modified.

Automatic database maintenance time

This is the hour when database cleanup starts each day. The possible values are 0 (midnight) to 23 (11 P.M.). The default is 2 (2 A.M.).

Maximum contacts per user

This is the maximum number of contacts to which a single user may subscribe.

Learn More Online

Click to expand or collapse

The Office Communications Server back-end database stores user and configuration information. When you specify the maximum number of contacts per user, consider the storage and performance impacts to your back-end database server.

For details, see the Operations section of the Office Communications Server Technical Library.

Insert move or delete page breaks in a worksheet

Page breaks are dividers that break a worksheet into separate pages for printing. Microsoft Excel inserts automatic page breaks based on the paper size, margin settings, scale options, and the positions of any manual page breaks that you insert. To print a worksheet with the exact number of pages that you want, you can adjust the page breaks in the worksheet before you print it.

Tips: 

  • Although you can work with page breaks in Normal view, we recommend that you use Page Break Preview view to adjust page breaks so that you can see how other changes that you make (such as page orientation and formatting changes) affect the automatic page breaks. For example, you can see how a change that you make to the row height and column width affects the placement of the automatic page breaks.

  • To override the automatic page breaks that Excel inserts, you can insert your own manual page breaks, move existing manual page breaks, or delete any manually-inserted page breaks. You can also quickly remove all the manually-inserted page breaks. After you finish working with page breaks, you can return to Normal view.

In Page Break Preview, dashed lines are page breaks Excel automatically added. Solid lines are page breaks that were added manually.

Manual and automatic page breaks

Insert a page break

  1. Click the worksheet that you want to print.

  2. On the View tab, in the Workbook Views group, click Page Break Preview.

    Click Page Break Preview on the View tab

    You can also click Page Break Preview Button image on the status bar.

  3. Do one of the following:

    • To insert a vertical page break, select the row below where you want to insert the page break.

    • To insert a horizontal page break, select the column to the right of where you want to insert the page break.

  4. On the Page Layout tab, in the Page Setup group, click Breaks.

    Click Breaks on the Page Layout tab
  5. Click Insert Page Break.

You can also right-click the row or column below or to the right of where you want to insert the page break, and then click Insert Page Break.

If manual page breaks that you insert do not take effect, it may be that the Fit To scaling option has been selected on the Page tab of the Page Setup dialog box (Page Layout tab, Page Setup group, Dialog Box Launcher Button image). To use the manual page breaks, change the scaling to Adjust to instead.

Move a page break

Important: To enable dragging of page breaks to another location in a worksheet, make sure that the cell drag-and-drop feature is enabled. If this feature is not enabled, you may not be able to move any page breaks.

  1. To verify that drag-and-drop is enabled, do the following:

    1. Click the File tab > Options. In Excel 2007, click Microsoft Office Button Office button image, and then click Excel Options.

    2. In the Advanced category, under Editing options, select the Enable fill handle and cell drag-and-drop check box, and then click OK.

  2. Click the worksheet that you want to modify.

  3. On the View tab, in the Workbook Views group, click Page Break Preview.

    Click Page Break Preview on the View tab

    You can also click Page Break Preview Button image on the status bar.

  4. To move a page break, drag the page break to a new location.

    Note: Moving an automatic page break changes it to a manual page break.

Delete a page break

  1. Select the worksheet that you want to modify.

  2. On the View tab, in the Workbook Views group, click Page Break Preview.

    Click Page Break Preview on the View tab

    You can also click Page Break Preview Button image on the status bar.

  3. Do one of the following:

    • To delete a vertical page break, select the column to the right of the page break that you want to delete.

    • To delete a horizontal page break, select the row below the page break that you want to delete.

      Note: You cannot delete an automatic page break.

  4. On the Page Layout tab, in the Page Setup group, click Breaks.

    Click Breaks on the Page Layout tab
  5. Click Remove Page Break.

    Cell below or to the right of a manual page break

You can also remove a page break by dragging it outside of the page break preview area (to the left past the row headers, or up past the column headers). If you cannot drag page breaks, make sure that the drag-and-drop feature is enabled. For more information, see Move an existing page break.

Remove all manually-inserted page breaks

Note: This procedure resets the worksheet to display only the automatic page breaks.

  1. Click the worksheet that you want to modify.

  2. On the View tab, in the Workbook Views group, click Page Break Preview.

    Click Page Break Preview on the View tab

    You can also click Page Break Preview Button image on the status bar.

  3. On the Page Layout tab, in the Page Setup group, click Breaks.

    Click Breaks on the Page Layout tab
  4. Click Reset All Page Breaks.

Tip: You can also right-click any cell on the worksheet, and then click Reset All Page Breaks.

Return to Normal view

  • To return to Normal view after you finish working with the page breaks, on the View tab, in the Workbook Views group, click Normal.

    You can also click Normal Button image on the status bar.

    • After working with page breaks in Page Break Preview view, you may still see the page breaks in Normal view because page breaks have been turned on automatically. To hide the page breaks, close and reopen the workbook without saving it.

    • Page breaks remain visible when you close and reopen the workbook after saving it. To turn them off, click the File tab, click Options, click the Advanced category, scroll down to the Display options for this worksheet section, and clear the Show page breaks check box. For more information, see Display or hide page breaks in Normal view.

Display or hide page breaks in Normal view

  1. Click the File tab > Options. In Excel 2007, click the Microsoft Office Button Office button image, and then click Excel Options.

  2. In the Advanced category, under Display options for this worksheet, select or clear the Show page breaks check box to turn page breaks on or off in Normal view.

You cannot add page breaks to a workbook in Excel for the web.

However, you can open the spreadsheet on Excel desktop and add page breaks.

Need more help?

You can always ask an expert in the Excel Tech Community or get support in the Answers community.

Microsoft office and the mac app store

This article covers frequently asked questions about the availability of Office from the Mac App Store, and the differences between downloading Office apps directly from Microsoft.

Starting in January 2019, the following Office applications are available for download from the Mac App Store: Word, Excel, PowerPoint, OneNote*, and OneDrive*.

* These apps were also available from the Mac App Store in previous years.

  1. What version of Office is available from the Mac App Store?

    The Office apps available from the Mac App Store provide the very latest version of Office on the Mac. Word, Excel, PowerPoint, and Outlook require a Microsoft 365 subscription to activate. OneNote and OneDrive do not require a Microsoft 365 subscription, but some premium features may require a Microsoft 365 subscription.

  2. Is this the same as Office 2019?

    No. Office 2019 is the one-time purchase, non-subscription product (also known as perpetual). A Microsoft 365 subscription provides always up-to-date versions of Office apps and access to additional premium features and services. The apps available in the Mac App Store are not compatible with Office 2019 licenses.

  3. I currently own Office 2016 for Mac and want to upgrade my version of Office. Should I download Office from the Mac App Store?

    If you own the older perpetual release of Office, you can download the new version of the apps from the Mac App Store, and purchase a new Microsoft 365 subscription using the in-app purchase option. In-app purchase offers include Microsoft 365 Family, and Microsoft 365 Personal.  Your license from the perpetual release of Office will not work with the app versions from the App Store. Click here to learn about Microsoft 365 subscriptions and pricing.

  4. I already have a Microsoft 365 subscription, and the Office apps are already installed on my Mac. Do I need to do anything?

    No. It's likely that you installed Office directly from Microsoft. The Microsoft AutoUpdate app will keep your existing apps up-to-date. The apps in the Mac App Store do not provide functionality beyond what you have today.

  5. If I download Office from the Mac App Store, do I still use Microsoft AutoUpdate to get updates?

    Microsoft AutoUpdate is only used to get updates for apps that you download directly from Microsoft. If you download Office from the Mac App Store, then the App Store will provide you with future updates of Office. You may have other Microsoft apps installed on your Mac, and AutoUpdate will continue providing updates just for those apps.

  6. Can I have multiple versions and builds of Office installed on my Mac?

    No. Microsoft 365, Office 2019, and Office 2016 use the same application and file names. To see which version of Office you have installed on your Mac, open one of the apps, and look at the License text in the About dialog.

  7. Can I get Office Insider builds from the Mac App Store?

    No. The Office apps in the Mac App Store are production releases. Insider builds must be downloaded directly from Microsoft.

  8.  How do I cancel my Microsoft 365 free trial that I purchased through the Mac App Store? 

    To cancel your Microsoft 365 free trial that you purchased through the Mac or iOS App Store, follow the instructions on this page: View, change, or cancel your subscriptions

    This link redirects to the App Store, so please open this link on a Mac, iPad or iPhone. 

Thursday, December 30, 2021

Video change grid spacing size

Your browser does not support video.

Try it!

Use the Grid to place shapes precisely on a page.

Show or hide the grid

  • Go to View, and select the Grid check box to show the grid.

  • Go to View, and clear the Grid check box to hide the grid.

Work with a variable grid

A variable grid, which shows more precise gridlines at higher magnifications, is helpful in most drawings.

  1. Select View > More.

    Screenshot of the Ruler, Grid, Guides toolbar with the options icon emphasized

  2. In the Ruler & Grid box, select Fine, Normal, or Coarse for Grid spacing Horizontal and Grid spacing Vertical.

    Note:  Fine is the smallest grid spacing, and Coarse is the largest.

  3. Select OK.

Work with a fixed grid

A fixed grid shows the same spacing regardless of the magnification.

  1. Select View > More.

  2. In the Ruler & Grid box, select Fixed for Grid spacing Horizontal and Grid spacing Vertical.

  3. Type the spacing you want between gridlines in Minimum spacing.

  4. Select OK.

Want more?

Change grid spacing and size

Show, hide, or change the grid in Visio

Which browsers work with office for the web

Note:  Microsoft 365 apps and services will not support Internet Explorer 11 starting August 17, 2021. Learn more. Internet Explorer 11 is a component of the Windows operating system and Microsoft is committed to following the Lifecycle Policy for the product on which it is installed. For customers who are using Internet Explorer we recommend switching to the new Microsoft Edge.

For the best security and functionality, keep your web browser up to date. All modern browsers should update automatically, including the new Microsoft Edge, but please make sure your browser has auto-updates enabled. Microsoft Edge and Internet Explorer will get their updates through Windows Update; it's important that you install those updates as they become available.

For more information see: Frequently Asked Questions about Windows Update.

Desktop and laptop computers

Use the most recent versions of the following browsers for the best experience with Office for the web.

  • Windows 10: The new Microsoft Edge, Microsoft Edge Legacy, Mozilla Firefox, or Google Chrome

  • Windows 8.1 or 7 (SP1): The new Microsoft Edge, Firefox or Chrome

  • Mac OS X (10.10 and later): The new Microsoft Edge, Apple Safari 10+ or Chrome

  • Linux: Office for the web works in the new Microsoft Edge, Firefox or Chrome on Linux, but some features may not be available.

If your organization is dependent upon Internet Explorer 8 or Internet Explorer 9 to access older web apps and services, you may want to consider evaluating IE Mode for the new Microsoft Edge

iOS Devices

We recommend using the Office mobile apps instead. You can also find them in the Apple App Store.

If you're using an older version of iOS that no longer supports the Office mobile apps, then Safari is the best browser for Office for the web on iOS but some features may not be available. 

Note:  Office for the web is no longer supported on Safari 9 or older.

Android

There are currently no browsers on Android that are officially supported with Office for the web. We recommend using the Office for Android apps instead. You can also find them in the Google Play store.

Other devices

Most Office for the web features will work in the Microsoft Edge browser on Hololens or XBox One.

Office Add-ins

The following table shows which browser is used for the various platforms and operating systems with Office Add-ins.

Warning: Disabling Internet Explorer in the environments listed in the table below will cause Office Add-ins to stop working. Microsoft recommends upgrading to a newer version of Microsoft 365 to stop using Internet Explorer 11. 

OS

Office version

Browser

any

Office for the web

The browser in which Office is opened.

macOS

any

Safari

iOS

any

Safari

Android

any

Chrome

Windows 7, 8.1, 10

Non-subscription Office 2013 or later

Internet Explorer 11

Windows 7

Microsoft 365

Internet Explorer 11

Windows 8.1, Windows 10 ver. < 1903

Microsoft 365

Internet Explorer 11

Windows 10 ver. <1903

Microsoft 365 ver. < 16.0.11629

Internet Explorer 11

Windows 10 ver. >=1903

Microsoft 365 ver. >= 16.0.11629 AND <16.0.13530.20424

Microsoft Edge Legacy

Windows 8.1, Windows 10 ver. >=1903

Microsoft 365 ver. >=16.0.13530.20424

Microsoft Edge *

* Requires Microsoft Edge WebView2

For more information about browsers and Office Add-ins, see Browsers used by Office Add-in.

See Also

System Requirements for Office

Office for the web Extension in Chrome

Get started with Office for the web in Microsoft 365

Use a screen reader to edit information about a file or folder in a document library in sharepoint online

Decorative icon. Screen reader content

This article is for people with visual impairments who use a screen reader program with the Office products and is part of the Office Accessibility content set. For more general help, see Microsoft Support home.

Use SharePoint in Microsoft 365 with your keyboard and a screen reader to edit information, such as its name or title, about a file or folder in a document library. We have tested it with Narrator and JAWS, but it might work with other screen readers as long as they follow common accessibility standards and techniques.

Notes: 

  • New Microsoft 365 features are released gradually to Microsoft 365 subscribers, so your app might not have these features yet. To learn how you can get new features faster, join the Office Insider program.

  • To learn more about screen readers, go to How screen readers work with Microsoft Office.

  • When you use SharePoint in Microsoft 365, we recommend that you use Microsoft Edge as your web browser. Because SharePoint in Microsoft 365 runs in your web browser, the keyboard shortcuts are different from those in the desktop program. For example, you'll use Ctrl+F6 instead of F6 for jumping in and out of the commands. Also, common shortcuts like F1 (Help) and Ctrl+O (Open) apply to the web browser – not SharePoint in Microsoft 365.

Edit information about a file or folder

  1. Sign in to your organization's Microsoft 365 account, start the SharePoint app, and then open your document library.

    Tip: Document libraries in SharePoint Online have two different views: classic and SharePoint in Microsoft 365 experience. For most people, SharePoint in Microsoft 365 experience is the default. However, if you hear "Check it out button" when navigating your document library, you're using the classic experience. To view SharePoint in Microsoft 365 document libraries, when you hear "Check it out button," press Enter. After the view of your document library changes to the SharePoint in Microsoft 365 experience and the focus moves from the Check it out button to the New link, you hear the name of your document library, followed by "New."

  2. To move to the list of folders and files, press the Tab key until you hear: "Table, list of folders, files, or items."

  3. To move through the list and select the file or folder you want to edit, use the Up and Down arrow keys. If it's in a subfolder, select the folder, and then press Enter. Press the Tab key until you hear "Table, list of folders, files, or items," and then, to select the file or folder, use the Up and Down arrow keys.

  4. To open the context menu for the file or folder, press Shift + F10.

    • With Narrator, you hear: "Open."

    • With JAWS, you hear: "Context menu."

  5. To open the Details pane, press the Up or Down arrow key until you hear "Details," and then press Enter.

    Tip: The Details pane stays open until you close it, so you can easily navigate to the properties for an item without having to open the Details pane for every item.

  6. To move to the Details pane, press the Tab key until you hear: "Item details."

  7. To edit the file property fields, such as Name, Title, and KeyPoints, press the Tab key until you hear the field you want to edit, press Enter, type your text, and then press Enter to save your changes.

See also

Use a screen reader to create a folder in a document library in SharePoint Online

Use a screen reader to move or copy a folder or file in a document library in SharePoint Online

Keyboard shortcuts in SharePoint Online

Basic tasks using a screen reader with SharePoint Online

Use a screen reader to explore and navigate SharePoint Online

Use SharePoint in Microsoft 365 with your keyboard and a screen reader to edit information, such as its name or title, about a file or folder in a document library. We have tested it with Narrator and JAWS, but it might work with other screen readers as long as they follow common accessibility standards and techniques.

Notes: 

  • New Microsoft 365 features are released gradually to Microsoft 365 subscribers, so your app might not have these features yet. To learn how you can get new features faster, join the Office Insider program.

  • To learn more about screen readers, go to How screen readers work with Microsoft Office.

  • When you use SharePoint in Microsoft 365, we recommend that you use Microsoft Edge as your web browser. Because SharePoint in Microsoft 365 runs in your web browser, the keyboard shortcuts are different from those in the desktop program. For example, you'll use Ctrl+F6 instead of F6 for jumping in and out of the commands. Also, common shortcuts like F1 (Help) and Ctrl+O (Open) apply to the web browser – not SharePoint in Microsoft 365.

Edit information about a file or folder

  1. Open the SharePoint in Microsoft 365 document library where the file or folder whose information you want to edit is located.

  2. To move to the list of folders and files, press the Tab key until you hear: "Toggle selection for all items."

  3. Press the Up or Down arrow key until you find the file or folder you want.

  4. To open the context menu for the file or folder, press Shift+F10.

  5. To open the Details pane, press the Tab key until you hear "Open the Details pane," and then press Enter.

    Tip: The Details pane stays open until you close it, so you can easily navigate to the properties for an item without having to open the Details pane for every item.

  6. To move to the Details pane, with Narrator, press the Tab key until you hear: "Complementary, group." With JAWS, press the Tab key until you hear: "Exiting main, leaving table."

  7. To edit the property fields, such as Name and Title, press the Tab key until you hear the field you want to edit, press Enter, type your text, and then press Enter to save your changes.

See also

Use a screen reader to create a folder in a document library in SharePoint Online

Use a screen reader to move or copy a folder or file in a document library in SharePoint Online

Keyboard shortcuts in SharePoint Online

Basic tasks using a screen reader with SharePoint Online

Use a screen reader to explore and navigate SharePoint Online

Technical support for customers with disabilities

Microsoft wants to provide the best possible experience for all our customers. If you have a disability or questions related to accessibility, please contact the Microsoft Disability Answer Desk for technical assistance. The Disability Answer Desk support team is trained in using many popular assistive technologies and can offer assistance in English, Spanish, French, and American Sign Language. Please go to the Microsoft Disability Answer Desk site to find out the contact details for your region.

If you are a government, commercial, or enterprise user, please contact the enterprise Disability Answer Desk.

Newer Posts Older Posts Home