Sunday, November 21, 2021

Reapply a filter and sort or clear a filter

After you have filtered or sorted data in a range of cells or table column, you can either reapply a filter or perform a sort operation to get up-to-date results, or you can clear a filter to redisplay all the data.

Note: When you sort, there is no way to clear the sort order and restore the order that was in place before. However, before you sort you can add a column to contain arbitrary values to preserve the initial sort order, for example, incrementing numbers. Then you can sort on that column to restore the original sort order.

What do you want to do?

Learn more about reapplying a filter and sort

To determine if a filter is applied, note the icon in the column heading:

  • A drop-down arrow Filter drop-down arrow means that filtering is enabled but no filter is applied.

    Tip: When you hover over the heading of a column with filtering enabled but not applied, a screen tip displays "(Showing All)."

  • A Filter button Applied filter icon means that a filter is applied.

    Tip: When you hover over the heading of a filtered column, a screen tip displays a description of the filter applied to that column, such as "Equals a red cell color" or "Larger than 150."

When you reapply a filter or sort operation, different results appear for the following reasons:

  • Data has been added to, modified, or deleted from the range of cells or table column.

  • The filter is a dynamic date and time filter, such as Today, This Week, or Year to Date.

  • Values returned by a formula have changed and the worksheet has been recalculated.

Note: When you use the Find dialog box to search filtered data, only the data that is displayed is searched; data that is not displayed is not searched. To search all the data, clear all filters.

Top of Page

Reapply a filter or sort

Note: For a table, filter and sort criteria are saved with the workbook so that you can reapply both the filter and sort each time that you open the workbook. However, for a range of cells, only filter criteria are saved with a workbook, not sort criteria. If you want to save sort criteria so that you can periodically reapply a sort when you open a workbook, it's a good idea to use a table. This is especially important for multicolumn sorts or for sorts that take a long time to create.

  • To reapply a filter or sort, on the Home tab, in the Editing group, click Sort & Filter, and then click Reapply.

Top of Page

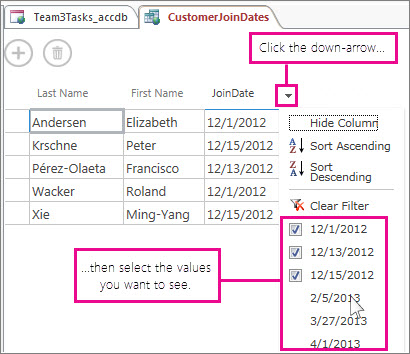
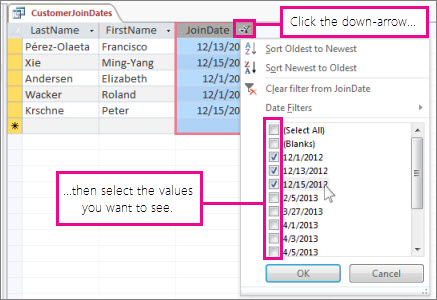
Clear a filter for a column

  • To clear a filter for one column in a multicolumn range of cells or table, click the Filter button Applied filter icon on the heading, and then click Clear Filter from <Column Name>.

    Note: If no filter is currently applied, this command is unavailable.

Top of Page

Clear all filters in a worksheet and redisplay all rows

  • On the Home tab, in the Editing group, click Sort & Filter, and then click Clear.

    Excel Ribbon Image

Top of Page

See Also

Change a user s email address

Filter data in a query

Queries retrieve rows and columns from tables. After you run a query, you can further limit the number of items shown in the datasheet by applying filters. Filters are a good choice when you want to temporarily limit the query results without going into Design View to edit your query. For more information about creating queries, see Introduction to queries.

To filter data in a query, open it in Datasheet View, click the down-arrow at the top of a column, and select a filter option.

Here's how it looks in an Access app:

Filtering a column in a query in an Access app.

You can select multiple values from the list, but in an app, the filter list closes each time you select an option. You can keep building the filter by reopening the list and selecting new items. For more information about Access apps, see Create an Access app.

And here's how it looks in a desktop database:

Filtering a query column in a desktop database.

Note the Date Filters option in the list—in a desktop database, you can choose more specialized filters depending on the data type of the column. For example, in a text field, you'll see a Text Filters option, and in a numeric field, you'll see a Number Filters option. These filters make it easier to filter for a range of values, rather than selecting all the values individually.

All filters are automatically cleared when you close the query. Or, you can clear a filter from a column by clicking clicking Clear Filter in the list.

For more information about creating queries, see Introduction to queries, and for more detailed information about filtering, see Apply a filter to view select records in an Access database.

Build your project

Sort your tasks into buckets

  1. At the top of your project, choose Board, and choose Group by Progress, and choose Bucket.

  2. Select Add bucket, type your bucket name, then press Enter.

  3. Repeat this until you have all the buckets you need. You can also rename the default To-do bucket.

  4. Drag-and-drop tasks to the bucket they belong in. 

alternate text

alternate text

You can also see and change which task is in which bucket in Grid view by choosing Add column, and then choosing Bucket.

Add dependencies

Use dependencies to link together tasks in your schedule that must finish or start after or before one another. The tasks will be connected in your Timeline, helping you plan out dates for your project.

  1. At the top of your project, choose Timeline.

  2. To connect individual tasks with dependencies:

    • Choose a dot at the end of a task's bar and drag it to the beginning of the following task's bar. This indicates that the first task must be completed before the second task can start.

  3. To connect multiple tasks with dependencies:

    1. Select the first task and drag the mouse to the last task you want to connect.

    2. Choose the vertical dots beside any of the task names, and choose Add dependency.

  4. To remove dependencies, choose the vertical dots beside a task name and choose Remove dependencies.

alternate text

Add finish and start dates

When you build a project using durations and dependencies, Project creates your start and finish dates automatically. If you need to adjust these:

  1. Open task details:

    • In GridTimeline view by choosing the "i" next to the task.

    • In Board view by selecting the task name.

  2. Enter your new dates in the Start and Finish boxes.

    Be sure to note how this change affects tasks that are dependent on the task you changed.

alternate text

Add notes

  1. Open task details, and then select Add a note.

  2. Type a description or important information to remember about this task.

alternate text

Compress your media files

You can improve playback performance and save disk space by compressing your media files.

(This feature is available in PowerPoint for Windows, but not on PowerPoint for Mac or PowerPoint for the web.)

  1. Open the presentation that contains the audio or video files.

  2. On the File tab, select Info, and then in the Multimedia section, select Compress Media*.

    * Embedded subtitles and alternate audio tracks are lost in this compression process.

    alternate text

  3. To specify the quality of the video, which in turn, determines the size of the video, select one of the following:

    • Full HD (1080p)     Save space while maintaining overall audio and video quality.

    • HD (720p)     Quality will be comparable to media which is streamed over the Internet.

    • Standard (480p)     Use when space is limited, such as when you are sending presentations via e-mail.

      Media compression is in progress

      Figure: Media compression in progress

  1. Open the presentation that contains the audio or video files.

  2. On the File tab, select Info, and then in the Media Size and Performance section, select Compress Media*.

    * Embedded subtitles and alternate audio tracks are lost in this compression process.

    Click Compress Media

  3. To specify the quality of the video, which in turn, determines the size of the video, select one of the following:

    • Presentation Quality     Save space while maintaining overall audio and video quality.

    • Internet Quality     Quality will be comparable to media which is streamed over the Internet.

    • Low Quality     Use when space is limited, such as when you are sending presentations via e-mail.

      Media compression is in progress

      Figure: Media compression in progress

Important: Certain older video file formats may not compress or export properly in Office on a Windows RT PC. Instead, use modern media formats such as H.264 and Advanced Audio Coding (AAC), which PowerPoint 2013 RT supports. Want to know what version of Office you're using?

The following are article that you might also find helpful:

Insert a label into an office document

If you are working with a docuement that is saved to a library on a SharePoint site where a policy requiring the insertion of a label is in effect as part of an information management policy, you may need to insert a label into your Office file when you save or print it.

Important: Labels have been discontinued in SharePoint 2013 and later versions. For more information, see Discontinued features and modified functionality in Microsoft SharePoint 2013.

In this article

Overview

A label provides a way for your organization to include a document's properties (or metadata about the document) in the document itself. For example, a law firm may require that notes from meetings with clients be labeled as covered by attorney-client privilege.

You cannot insert a label in a document until the site administrator or list manager configures the appropriate policy for the library or list. If such a policy exists, the Label command appears on the Insert tab so that you can insert labels.

Any document that already exists in the list or library when the policy is established is not assigned a label (which therefore can't be inserted) until the document is checked out and checked back in. Documents that are uploaded to a list or library with a label policy already in effect are automatically assigned labels that can be inserted immediately.

Insert a label manually

Depending upon how a label policy is configured, you can be required to insert labels into documents that reside in libraries on an Office SharePoint Server 2007 site.

Note: You cannot change the formatting of a label, such as font or text size. The formatting is determined by the site administrator or list manager when he or she creates the label policy.

  1. If the library is not already open, click its name on the Quick Launch.

    If the name of your library does not appear on the Quick Launch, click View All Site Content, and then click the name of your library.

  2. Point to the document that you want, click the arrow that appears, and then click Edit in Microsoft Office program name — for example, Edit in Microsoft Office Word.

  3. Place your cursor in the location in the document where you want to insert the label.

  4. On the Insert tab, in the Barcode group, click Label.

    Barcode and Label commands on the Ribbon

    Note: The Label command appears on the Insert tab only if a label policy is in effect for a server document.

  5. Click Save to save your changes.

Insert a label when you save or print

A library on an SharePoint site can have a label policy that requires you to insert a label when you save or print a document.

If the document does not already contain a label when you save or print, you are prompted to insert one. If you click Yes when prompted, the label is inserted in a default location.

  • If the file is read-only, the label is inserted at the cursor's current location.

  • If the file is in Edit mode, the label is inserted in a default location.

    • In Word    The label is inserted in the header of the first page of the document.

    • In Excel    The label is inserted in the first cell on the first worksheet in the workbook.

    • In PowerPoint    The label is inserted in the center of the first slide in the presentation.

Enter hours on your timesheet in project online

The time you spend on tasks and other non-project work is captured on your timesheet.

  1. On the Quick Launch, click Timesheet.

    Timesheet on the Quick Launch

  2. Find the task that you worked on in the list on the left side, and then follow the row across to the right side of the view.

    Main Display Area

  3. Fill in your hours across the top row of the grid, next to Actual.

    Timesheet row

    The bottom row of the grid shows the Planned hours, from when the task was initially scheduled in the project.

    Tip:  Slide the splitter in the middle over to see more of either side of the view.

    Splitter between two sides of a timesheet

Understand customer preferences and predict requests

To improve offerings and predict preferences, you need to know as much about your customers as possible. Direct customer input should be obtained and quantified. The compiled information needs to be relevant, shareable and interactive for decision makers to act on.

Your browser does not support video.

Details  

With Power BI, you can gather historical sales data and turn it into meaningful information to make better decisions. Interactive dashboards let you visualize data and share your analytics with stakeholders.

Use Yammer to get feedback and data directly from your customers by adding them to an external group. Once you have insights, you can start or join relevant internal conversations to share what you've learned. It's easy to differentiate between internal and external Yammer groups, so you always know where information is coming from and who is providing it.

Highlights

  • Share customer feedback across the company.

  • Make customer sales data interactive.

  • Talk directly to customers.

Learn More

BI capabilities in Excel and Microsoft 365

Call a contact on their phone or mobile number

To call someone, do one of the following:

  • From the left, tap the forth icon, enter the person's phone number, and then tap Call.

  • To call someone on their work or mobile number, from the left, tap the second icon to get to the Contacts screen. Find the person in your Contacts list or type their name in the search box. When you find the contact, tap their name, and then either their work or mobile number. This will call the person on their work line or mobile phone.

Apply shading to alternate rows or columns in a worksheet

This article shows you how to automatically apply shading to every other row or column in a worksheet.

There are two ways to apply shading to alternate rows or columns —you can apply the shading by using a simple conditional formatting formula, or, you can apply a predefined Excel table style to your data.

One way to apply shading to alternate rows or columns in your worksheet is by creating a conditional formatting rule. This rule uses a formula to determine whether a row is even or odd numbered, and then applies the shading accordingly. The formula is shown here:

=MOD(ROW(),2)=0

Note: If you want to apply shading to alternate columns instead of alternate rows, enter =MOD(COLUMN(),2)=0 instead.

  1. On the worksheet, do one of the following:

    • To apply the shading to a specific range of cells, select the cells you want to format.

    • To apply the shading to the entire worksheet, click the Select All button.

      Select All button

  2. On the Home tab, in the Styles group, click the arrow next to Conditional Formatting, and then click New Rule.

    Excel Ribbon Image

  3. In the New Formatting Rule dialog box, under Select a Rule Type, click Use a formula to determine which cells to format.

  4. In the Format values where this formula is true box, enter =MOD(ROW(),2)=0, as shown in the following illustration.

    Formula in New Formatting Rule dialog box

  5. Click Format.

  6. In the Format Cells dialog box, click the Fill tab.

  7. Select the background or pattern color that you want to use for the shaded rows, and then click OK.

    At this point, the color you just selected should appear in the Preview window in the New Formatting Rule dialog box.

  8. To apply the formatting to the cells on your worksheet, click OK

Note: To view or edit the conditional formatting rule, on the Home tab, in the Styles group, click the arrow next to Conditional Formatting, and then click Manage Rules.

Another way to quickly add shading or banding to alternate rows is by applying a predefined Excel table style. This is useful when you want to format a specific range of cells, and you want the additional benefits that you get with a table, such the ability to quickly display total rows or header rows in which filter drop-down lists automatically appear.

By default, banding is applied to the rows in a table to make the data easier to read. The automatic banding continues if you add or delete rows in the table.

Banded rows in an Excel table

If you find you want the table style without the table functionality, you can convert the table to a regular range of data. If you do this, however, you won't get the automatic banding as you add more data to your range.

  1. On the worksheet, select the range of cells that you want to format.

  2. On the Home tab, in the Styles group, click Format as Table.

    Excel Ribbon Image

  3. Under Light, Medium, or Dark, click the table style that you want to use.

    Tip: Custom table styles are available under Custom after you create one or more of them. For information about how to create a custom table style, see Format an Excel table.

  4. In the Format as Table dialog box, click OK.

    Notice that the Banded Rows check box is selected by default in the Table Style Options group.

    Outlook Ribbon Image

    If you want to apply shading to alternate columns instead of alternate rows, you can clear this check box and select Banded Columns instead.

  5. If you want to convert the Excel table back to a regular range of cells, click anywhere in the table to display the tools necessary for converting the table back to a range of data.

  6. On the Design tab, in the Tools group, click Convert to Range.

    Excel Ribbon Image

    Tip: You can also right-click the table, click Table, and then click Convert to Range.

Note: You cannot create custom conditional formatting rules to apply shading to alternate rows or columns in Excel for the web.

When you create a table in Excel for the web, by default, every other row in the table is shaded. The automatic banding continues if you add or delete rows in the table. However, you can apply shading to alternate columns. To do that:

  1. Select any cell in the table.

  2. Click the Table Design tab, and under Style Options, select the Banded Columns checkbox.

To remove shading from rows or columns, under Style Options, remove the checkbox next to Banded Rows or Banded Columns.

Need more help?

You can always ask an expert in the Excel Tech Community or get support in the Answers community.

Create a bulleted or numbered list

You can create a bulleted or numbered list in Publisher inside a text box.

Create a text box

  • On the ribbon, select the Insert tab, then click Draw Text Box.

  • In the document, click where you want to create your text, draw the text box to the size you want, and then release.

Create a bulleted list

  1. On the Home tab, select Bullets to create a bulleted list.

  2. Select the bullet style that you want.

  3. Type the first item in your list, and then do one of the following:

    To start a new line with a bullet, press ENTER.

    To start a new line without a bullet, press SHIFT+ENTER.

    To end a bulleted list, press ENTER twice.

    To create sub-bullets, select the bulleted text and then press TAB.

Create a numbered list

  1. On the Home tab, select Numbering to create a numbered list.

  2. Select the numbering format that you want.

  3. Type the first item in your list, and then do one of the following:

    To start a new line with a number, press ENTER.

    Note:  Publisher will automatically number the paragraphs in your list. If you add or delete paragraphs, Publisher will update the numbers.

    To start a new line without a number, press SHIFT+ENTER.

    To end a numbered list, press ENTER twice.

    To create a multilevel numbered list, start a new numbered list, select the numbering style, and then indent the new list.

Note: Office 2007 has reached the end of its support lifecycle, meaning there are no new security updates, non-security updates, free or paid assisted support options, or online technical content updates. Customers who are using Office 2007 products and services should move to Office 365 or upgrade to supported versions of Office products and services, such as Office 2016.

Create a text box

On the Objects toolbar, click the Text Box tool Button image
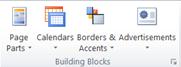
, and then click inside your publication.

Create a bulleted list

  1. On the Format menu, click Bullets and Numbering, and then click the Bullets tab.

  2. Select the options you want, and then click OK.

  3. Type the first item in your list, and then do one of the following:

    To start a new line with a bullet, press ENTER.

    To start a new line without a bullet, press SHIFT+ENTER.

    To create a sub-bullet, select the bulleted text and press TAB.

  4. To end a bulleted list, press ENTER twice.

Create a numbered list

  1. On the Format menu, click Bullets and Numbering, and then click the Numbering tab.

  2. Select the formatting options you want, and then click OK.

    Note: Publisher will automatically number the paragraphs in your list. If you add or delete paragraphs, Publisher will update the numbers.

  3. Type the first item in your list, and then do one of the following:

    To start a new line with a number, press ENTER.

    To start a new line without a number, press SHIFT+ENTER.

    To end a numbered list, press ENTER twice.

    To create a

Report abuse in onedrive

If you've received a link to an offensive or illegal file or folder stored in OneDrive, you can report it for us to review.

If you're part of an organization that has its own procedures for reporting abuse, please follow your organization's procedures or start by contacting your Office 365 administrator.

  1. On the OneDrive website, sign in with your Microsoft account, and then check your Shared view.

    If you don't want to sign in or you want to report the file anonymously, use the anonymous Report Abuse form.

  2. Right-click the offensive or illegal file and select Report abuse.

    Screenshot of how to report abuse in OneDrive

  3. Select the reason you're reporting the content, such as Harassment or threatening, type any details you want to share in the comment box, and then select Report abuse.

    Screenshot of the Report abuse dialog box in OneDrive

Note: If the offensive content was posted on a work or school account associated with a paid Office 365 subscription, you will be directed to contact the organization responsible for the content directly.

Between and operator

Determines whether the value of an expression falls within a specified range of values. You can use this operator within SQL statements.

Syntax

expr [Not] Betweenvalue1Andvalue2

The Between...And operator syntax has these parts:

Part

Description

expr

Expression identifying the field that contains the data you want to evaluate.

value1, value2

Expressions against which you want to evaluate expr.


Remarks

If the value of expr is between value1 and value2 (inclusive), the Between...And operator returns True; otherwise, it returns False. You can include the Not logical operator to evaluate the opposite condition (that is, whether expr lies outside the range defined by value1 and value2).

You might use Between...And to determine whether the value of a field falls within a specified numeric range. The following example determines whether an order was shipped to a location within a range of postal codes. If the postal code is between 98101 and 98199, the IIf function returns "Local". Otherwise, it returns "Nonlocal".

SELECT IIf(PostalCode Between 98101 And 98199, "Local", "Nonlocal") FROM Publishers

If expr, value1, or value2 is Null, Between...And returns a Null value.

Because wildcard characters , such as *, are treated as literals, you cannot use them with the Between...And operator. For example, you cannot use 980* and 989* to find all postal codes that start with 980 to 989. Instead, you have two alternatives for accomplishing this. You can add an expression to the query that takes the left three characters of the text field and use Between...And on those characters. Or you can pad the high and low values with extra characters — in this case, 98000 to 98999, or 98000 to 98999 – 9999 if using extended postal codes. (You must omit the – 0000 from the low values because otherwise 98000 is dropped if some postal codes have extended sections and others do not.)


Customize your lists

Customize each list by choosing a different background. Just select the three dots in the top right and then select a color or image as your list's background.  

Groceries list with the more menu open and a theme selected

You can also add an emoji to the beginning of your list's name and the emoji will be displayed as the list's icon in the sidebar.   

Use immersive reader in microsoft teams

Your browser does not support video.

Use keyboard shortcuts to find help for office products

Office 2016 and Microsoft 365 offer a host of keyboard shortcuts that let users create, communicate, and express themselves. Here is a partial list of resources geared toward users who rely on screen readers and other assistive technologies.

Note: This topic assumes that JAWS users have turned off the Virtual Ribbon Menu feature.

In this topic

Tell Me feature

Word, Excel, PowerPoint, OneNote, and Outlook all include Tell Me: a quick, easy way to access features and functions in one or two steps.

  1. Press Alt+Q from any Office product to go to the Tell Me box.

    You'll hear, "Tell me." Focus changes to the text field in the Tell Me box.

  2. Type your question or search string, and then press Enter.

  3. To move through the list of results, use the Up or Down Arrow key. You'll hear each result as focus moves to it.

  4. To select one of the result commands, press Enter. Focus returns to the editing area.

Office support website

The Office support website, https://support.office.com, and the Office Accessibility Center - Resources for people with disabilities are huge repositories of information. This includes step-by-step instructions for using all current Office products.

Search tips for support.office.com

  1. Use quotation marks around a word or phrase to search for that exact phrase, including case and spacing:

    • For example, "Excel for the web" finds documents that contain the exact phrase "Excel for the web," but documents about Excel 2016 or Word for the web will not be listed.

      Excel for the web (without the quotes) searches for documents that contain any of these words:

      • excel, Excel, and Excel for the web

      • excellent

      • Excel or Online somewhere in the document

    • "screen reader" finds documents that contain the exact phrase "screen reader," but documents about Excel 2016 that mention the screen or refer to a "reader," as in "the reader of the document," will not be listed.

  2. Use AND (all capital letters) to find documents that contain all listed words or phrases:

    For example, "Excel for the web" AND "screen reader" finds documents that contain the exact phrase "Excel for the web" and the exact phrase "screen reader." Documents that only contain one of those phrases aren't in the search results.

  3. Use OR (all capital letters) to find documents that contain any one of the listed words or phrases (but not all listed phrases):

    For example, "Excel for the web" OR "screen reader" finds documents that contain the exact phrase "Excel for the web", or the exact phrase "screen reader." Documents that contain both "Excel for the web" and "screen reader" aren't in the search results. .

Technical support for customers with disabilities

Microsoft wants to provide the best possible experience for all our customers. If you have a disability or questions related to accessibility, please contact the Microsoft Disability Answer Desk for technical assistance. The Disability Answer Desk support team is trained in using many popular assistive technologies and can offer assistance in English, Spanish, French, and American Sign Language. Please go to the Microsoft Disability Answer Desk site to find out the contact details for your region.

If you are a government, commercial, or enterprise user, please contact the enterprise Disability Answer Desk.

Dbcs function

This article describes the formula syntax and usage of the DBCS  function in Microsoft Excel.

Description

The function described in this Help topic converts half-width (single-byte) letters within a character string to full-width (double-byte) characters. The name of the function (and the characters that it converts) depends upon your language settings.

For Japanese, this function changes half-width (single-byte) English letters or katakana within a character string to full-width (double-byte) characters.

Syntax

DBCS(text)

The DBCS function syntax has the following argument:

  • Text    Required. The text or a reference to a cell that contains the text you want to change. If text does not contain any half-width English letters or katakana, text is not changed.

Example

=DBCS("EXCEL") equals "EXCEL"

=DBCS(" excel excel excel excel") equals " excel excel excel excel"

Saturday, November 20, 2021

Code resource field

Data Type    Text

Entry Type    Entered

Description    The Code field contains any code, abbreviation, or number you want to enter as part of a resource's information.

Best Uses    Use the Code field in a resource view when you want to display, filter, sort, or edit any special code you might be using to identify resource information.

Example    Your company uses cost center codes for resources in projects. In the Resource Sheet, add the Code field and enter the cost center codes for each of your resources. You can then filter the resources to show only those resources assigned to a certain cost center.

Use building blocks to quickly create a publication in publisher

Building blocks are reusable pieces of content like business information, headings, calendars, borders, and advertisements that are stored in galleries. You can access and reuse the building blocks at any time. You can also create and save your own building blocks, categorize, write a description, and tag them with keywords to make them easy to find. These custom building blocks can be a combination of graphics, text, and even other building blocks.

Building block galleries

Four of the five building block galleries are found on the Insert tab, in the Building Blocks group and the fifth, Business Information, is found in the Text group.

Building Blocks group in Publisher 2010

The five galleries contain:

  • Page Parts: Pre-formatted structural elements for your publication such as headings, sidebars, and stories.

  • Calendars: Pre-formatted monthly calendars. You can select the current or next month from the gallery, or select the month and year from the gallery from the Building Block Library.

  • Borders & Accents: Graphic elements such as borders, emphasis, and frames.

  • Advertisements: This gallery is for pre-formatted advertisement elements, including coupons.

  • Business Information: Business Information sets.

Insert a building block from a gallery

  1. In the Page Navigation pane, select the page in your publication where you want to insert the building block.

  2. Click Insert, and click the building block gallery you'd like to use.

  3. Scroll to find a building block, or click More <gallery name> to open the Building Block Library.

  4. Click to insert the building block and then move and resize it to fit your need.

Create a building block

You can create your own building blocks, such as an image or a border.

  1. Right-click in the element you'd like to save as a building block and select Save as Building Block.

  2. In the Create New Building Block dialog, enter the information about the building block:

    • Title: Create a name for your building block.

    • Description: Add an optional description of the building block's purpose.

    • Gallery: Decide which of the five galleries your building block will live.

    • Show in Gallery: Check this box to make the building block available in the gallery.

    • Category: Select a pre-built category for the gallery, or type in a new category name.

    • Keywords: Enter your own keywords to make searching for building blocks easier.

Tip:  Custom building blocks are saved as a PBB file in \Users\<username>\AppData\Roaming\Microsoft\Publisher Building Blocks. The AppData folder is hidden by default.

Top of Page

Create a quick poll in microsoft teams

Tip:  Learn more about Microsoft Forms or get started right away and create a survey, quiz, or poll. Want more advanced branding, question types, and data analysis? Try Dynamics 365 Customer Voice.

With Microsoft Forms, you can create an instant, real time poll in seconds in Microsoft Teams. Post a poll in your Teams channel or quickly gather feedback in a chat pane.

Note: This feature is not available for GCC, GCC High, and DoD environments.

Add a poll to a Teams channel or chat

  1. Go to the channel or chat in which you want to include a poll. At the bottom of your Teams window, select Forms.

    Forms icon in Microsoft Teams

    Note: If you don't see the Forms icon, click Messaging extensions More options button, and then select Forms.
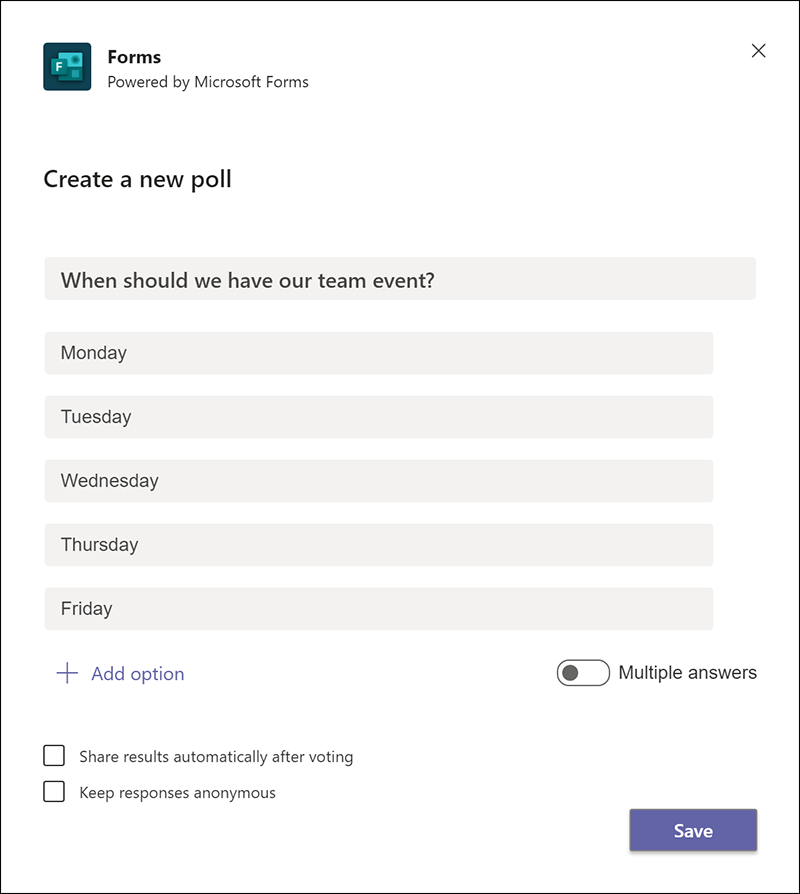
  2. Add your question and answer options.

    Create a new poll in Microsoft Teams.

  3. If you want to allow multiple answers, click or tap the toggle next to Multiple answers. Also select whether you want to Share results automatically after voting and/or Keep responses anonymous.

  4. Select Save.

  5. Preview your poll, and then click Edit if you want to make changes, or click Send if you're ready to post it.

As people in your group take the poll, you'll see real time results in your group conversation.

Feedback for Microsoft Forms

We want to hear from you! To send feedback about Microsoft Forms, go to the upper right corner of your form and select More form settings  More options button > Feedback.

See Also

Delete a group form created in Teams

Survey your team to check in and stay connected

Work with colleagues to create, edit, and review forms in Microsoft Teams

Check for macros that might contain viruses

A macro virus is a type of computer virus that could be stored in macros within an Microsoft Office file (such as a document, presentation, workbook, or template), or within any ActiveX control, COM add-in, or Office add-in. We refer to macros, ActiveX controls, and add-ins as "Active content".

Microsoft Office files that have a macro in them have a different file extension to indicate that they have an embedded macro. For example, a normal modern Word document is a .DOCX file, but if a macro added to the file it's saved as a .DOCM file. Likewise, a modern Excel workbook is a .XLSX file, and a modern PowerPoint presentation is a PPTX file, but if there are macros in them the Excel file becomes a .XLSM file and the PowerPoint presentation becomes a .PPTM file.

For your protection, Office doesn't run active content automatically unless the file has been marked as a trusted document or opened from a trusted location.

Notes: 

For all other files containing a macro or other active content you'll usually see a message that looks like this:

The Message Bar

Do not select Enable Content unless you're certain that you know exactly what that active content does, even if the file appears to come from a person or organization that you trust.

Note: Opening a file with macros disabled might limit the file's expected functionality.

Office can't scan files or locations to find and delete macro viruses, however all modern anti-malware software - like Microsoft Defender Antivirus - should be able to detect, and block, known macro viruses.

See Also

Enable or disable macros in Office files

Change macro security settings in Excel

Block senders or mark email as junk in outlook com

Blocking someone will stop their email coming to your Inbox. 

Block someone in Outlook.com

  1. To block someone in Outlook.com, select the messages or senders you want to block.

  2. From the top toolbar, select Junk > Block (or Spam > Block).

  3. Select OK. The messages you select will be deleted and all future messages will be blocked from your mailbox.

Notes: 

Mark email as junk or spam in Outlook.com

  1. Select the messages you want to mark as junk.

  2. At the top of the screen, select Junk > Junk (or Spam > Spam) to move the message to your Junk or Spam folder.

Notes: 

  • If email is being sent to your Junk folder in error, read Mail goes to the Junk folder by mistake.

  • Messages in your Junk folder are automatically deleted between 10 and 30 days after they arrive.

Other options to help keep junk or spam out of your inbox

Select the arrow to see more.

This will block everyone except those in your Safe senders list. Remember to include everyone you want to hear from.

  1. Open your Safe senders and domains and select Add.

  2. Type the email addresses or domains of your contacts and other people you want to add, and press Enter.

  3. Under Filters, select from:

    • Only trust email from addresses in my Safe senders and domains list and Safe mailing lists

    • Block attachments, pictures, and links from anyone not in my Safe senders and domains list

  4. Select Save.

Use this feature to block individuals or organizations.

  1. Open Blocked senders and domains and select Add.

  2. Type the email address or domain that you want to block, and press Enter.

  3. Select Save.

    Notes: 

    • To remove someone from a list, select Remove next to the email address or domain.

    • You can have up to 1,024 addresses or domains in the Blocked senders and Safe senders lists. If you want to add more than that, try blocking domains instead of individual email addresses.

Rules can help filter out specific words that repeatedly come from different or hidden email addresses.

  1. Open your Outlook.com Rules and select + Add new rule.

  2. Every rule needs at least three things: a name, a condition, and an action.

    Rules can also contain exceptions to conditions. You can add multiple conditions, actions, and exceptions at each step by choosing Add a conditionAdd an action, and Add an exception. 

    For example, to create a rule that deletes all email with the word "weather" in the subject:
    Name = "Weather"; Condition = Subject includes "Weather"; Action = Delete

    Tips: 

    • Rules only work on email in your Inbox.

    • If you don't want any more rules to run after this one does, select the Stop processing more rules check box. For more information, see Stop processing more rules in Outlook.com.

  3. Press Save to create your rule.

When you post to a message board, newsgroup, chat room, or other public website, spell out your entire email address, for example, chesterbeane AT outlook DOT com. This way, a person can interpret your address, but the automated programs that spammers use often can't.

Spammers get rich when people buy their "products." Don't reply to spam (even to unsubscribe), buy anything from an unfamiliar business, or agree to hold or transfer money for anyone. Beware of messages that appear to come from Microsoft and that ask for your password or threaten to close your account or expire your password. They're false.

You can greatly reduce your risk from hackers, viruses, and worms if you have a firewall, keep your Windows and Microsoft Office software up to date, and install antivirus and anti-spyware software (and update all routinely).

If you want to stop receiving newsletters or promotions, you can unsubscribe from your inbox.

  1. In your inbox, select a newsletter or promotional email.

  2. At the top of the reading pane, select Unsubscribe.

    A screenshot of the Unsubscribe button

When you shop online, companies sometimes pre-select check boxes that indicate you agree that it's fine to sell or give your email address to responsible parties. If you don't want to receive email from those companies, make sure you clear the check boxes.

Avoid posting your email address on social networking sites, large Internet directories, or job-posting sites. Don't even post it on your own website, unless you disguise it as described in "Disguise your email address", below.

When you sign up for web-based services such as banking, shopping, or newsletters, carefully read the privacy policy before you reveal your email address so you don't unwittingly agree to share confidential information.

The privacy policy should outline the terms and circumstances regarding if or how the site will share your information. If a website doesn't post a privacy statement, consider taking your business elsewhere.

Still need help?

Note: You will need to sign in first to get support. If you can't sign in, go to Account support.

Community Forum button Contact Support button

Related Topics

Safe Senders in Outlook.com

Receiving email from blocked senders in Outlook.com

How to deal with phishing in Outlook.com

Newer Posts Older Posts Home