Add, move, or delete connection points
A connection point is a special point on a shape that you can "glue" connectors and other shapes to. When you glue a connector or shape to a connection point, they stay connected, even if one of the shapes is moved. Use connection points when you want connectors or shapes to stay connected to specific points on a shape.
Note: Connection points are not the only places you can glue connectors and lines. You can also glue connectors and lines to shape vertices, shape handles, and shape geometry.
In Visio, connection points become visible when you try to connect one shape to another. You see a shape's connection points when you hover near the shape with the Connector Tool or drag the endpoint of any connector or line near a shape that has connection points.
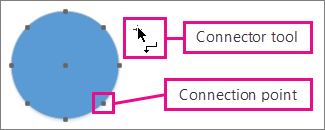
Add connection points
If the shape you want to glue a connector or shape to does not have a connection point where you want it, add one.
To add a connection point to a shape
-
If connection points are not visible, on the View tab, in the Visual Aids group, select the Connection Points check box.
-
Select the shape.
You must select the shape that you want to add a connection point to.
-
On the Home tab, in the Tools group, click the Connection Point tool
 .
. -
Press Ctrl and click where you want to add a connection point.
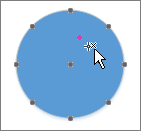
The new connection point is automatically selected after you place it.
-
If you want an outward or inward & outward connection point, right-click the connection point and click Inward, Outward, or Inward & Outward.
-
Most of the time, you want an inward connection point. An inward connection point attracts the endpoints on connectors and the outward connection points and inward & outward connection points on two-dimensional (2-D) shapes.
-
If you have a 2-D shape that you want to glue to another shape, you want an outward connection point. An outward connection point is attracted to inward connection points.
-
If you have a shape and you don't know how you want it to be glued to other shapes, you want an inward & outward connection point.
-
-
On the Home tab, in the Tools group, click Pointer Tool
 to return to normal editing.
Move connection points
If you're not happy with where a connection point is located, you can move it.
To move a connection point on a shape
-
Select the shape.
-
On the Home tab, in the Tools group, click the Connection Point tool
 .
. -
Drag the connection point you want to move.
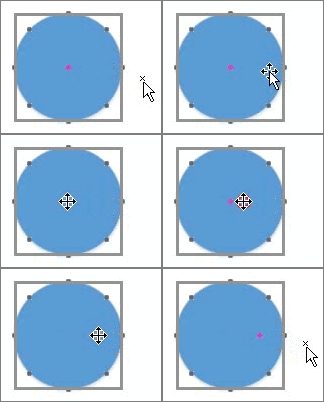
If you don't see any connection points, select Connection Points in the Visual Aids group on the View tab.
-
On the Home tab, in the Tools group, click Pointer Tool
 to return to normal editing.
If you're having a hard time moving the connection point to exactly where you want it, try different snap settings.
To change the snap settings for a drawing
-
On the View tab, in the Visual Aids group, click the Snap & Glue dialog box launcher

-
On the General tab, under Snap to, select the options you want.
For more information about changing snap settings, see Adjust snap strength or turn snap off.
Delete or hide connection points
Sometimes connection points can get in the way. When they do, you have two choices: delete them or hide them.
To delete a connection point on shape
-
Select the shape with a connection point that you want to delete.
-
On the Home tab, in the Tools group, click the Connection Point tool
 .
. -
Click the connection point you want to delete.
If you don't see any connection points, on the View tab, in the Visual Aids group, select the Connection Points check box.
-
Press Delete.
-
On the Home tab, in the Tools group, click the Pointer Tool
 to return to normal editing.
To hide connection points
-
On the View tab, in the Visual Aids group, clear the Connection Points check box.
Add text next to a connection point
You can't add text directly to a connection point. You can, however, add text to the shape, and then move the text next to the connection point.
To add text and move it near a connection point
-
Select the shape where you want to add text, and start typing.
The text you type appears in the shape.
-
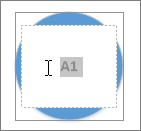
Select the text that you want to move.
-
Pointing the mouse at the selected text, click and drag the text.
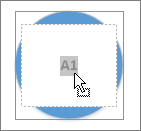
Visio automatically switches to the Pointer Tool when you hover the mouse over the selected text.
In Microsoft Visio 2010, connection points fade in and become visible when you are attempting to connect a shape to another. You see a shape's connection points when you hover near the shape with the Connector Tool or drag the endpoint of any connector or line near a shape that has connection points.

A shape with four connection points.

Add connection points
If the shape you want to glue a connector or shape to does not have a connection point where you want it, it is easy to add one.
-
If connection points are not visible, on the View tab, in the Visual Aids group, select Connection Points.
-
Select the shape.
Note: If you don't select the shape first, you can't add a connection point to it. The shape is selected if it has a blue, dashed border around it.
-
On the Home tab, in the Tools group, click the Connection Point tool
 .
. -
Press CTRL and click where you want to add a connection point.
-
If you want an outward or inward & outward connection point, right-click the connection point and click Inward, Outward, or Inward & Outward.
-
Most of the time, you want an inward connection point. An inward connection point "attracts" the endpoints on connectors and the outward and inward & outward connection points on two-dimensional (2-D) shapes.
-
If you have a 2-D shape that you want to glue to another shape, you want an outward connection point. An outward connection point is "attracted to" inward connection points.
-
If you have a shape and you don't know how you want it to be glued to other shapes, you want an inward & outward connection point.
-
-
On the Home tab, in the Tools group, click the Pointer tool
 to return to normal editing.
Add text next to a connection point
Unfortunately, you cannot add text directly to a connection point. You can, however, add text to the shape and then move the text next to the connection point.
-
Select the shape.
-
Start typing. The text you type appears in the shape.
-
On the Home tab, in the Tools group, click the Text Block tool
 .
. -
Drag your text.
Tip: If the shape has a control handle  , you might be able drag it to move shape text quickly.
Move connection points
If you're not happy with where a connection point is located, you can move it.
-
Select the shape.
Note: If you don't select the shape first, you can't move the connection point. The shape is selected if it has a blue, dashed border around it.
-
On the Home tab, in the Tools group, click the Connection Point tool
 .
. -
Drag the connection point you want to move.
If you don't see any connection points, on the View tab, in the Visual Aids group, click Connection Points.
-
On the Home tab, in the Tools group, click the Pointer tool
 to return to normal editing.
If you're having a hard time moving the connection point to exactly where you want it, try different snap settings:
-
On the View tab, in the Visual Aids group, click the Snap & Glue dialog box launcher
 , and then on the General tab, under Snap to, select the options you want.
Delete or hide connection points
Sometimes connection points can get in the way. When they do, you have two choices: delete them or hide them.
Delete a connection point
-
Select the shape.
Note: If you don't select the shape first, you can't delete the connection point. The shape is selected if it has a blue, dashed border around it.
-
On the Home tab, in the Tools group, click the Connection Point tool
 .
. -
Click the connection point you want to delete. The connection point turns magenta.
If you don't see any connection points, on the View tab, in the Visual Aids group, click Connection Points.
-
Press DELETE.
-
On the Home tab, in the Tools group, click the Pointer tool
 to return to normal editing.
Hide connection points
-
On the View tab, in the Visual Aids group, clear the Connection Points check box.

A shape with four connection points.
Add connection points
If the shape you want to glue a connector or shape to doesn't have a connection point where you want it, it's easy to add one.
-
If connection points are not visible, on the View menu, click Connection Points.
-
Select the shape.
Note: If you don't select the shape first, you can't add a connection point to it. The shape is selected shape if it has a green, dashed border around it.
-
Click the Connection Point tool
 .
. If you don't see the Connection Point tool, click the down arrow next to the Connector tool
 , and then click the Connection Point tool
  .
. -
Press CTRL and click where you want to add a connection point.
-
If you want an outward or inward & outward connection point, right-click the connection point and click Inward, Outward, or Inward & Outward.
-
Most of the time, you want an inward connection point. An inward connection point "attracts" the endpoints on connectors and the outward and inward & outward connection points on two-dimensional (2-D) shapes.
-
If you have a 2-D shape that you want to glue to another shape, you want an outward connection point. An outward connection point is "attracted to" inward connection points.
-
If you have a shape and you don't know how you want it to be glued to other shapes, you want an inward & outward connection point.
-
-
Click the Pointer tool
 to return to normal editing.
Add text next to a connection point
Unfortunately, you can't add text directly to a connection point. You can, however, add text to the shape and then move the text next to the connection point.
-
Select the shape.
-
Start typing. The text you type appears in the shape.
-
Click the Text Block tool
 .
.If you don't see the Text Block tool, click the down arrow next to the Text tool
 , and then click the Text Block tool
  .
. -
Drag your text.
Tip: If the shape has a control handle  , you might be able drag it to move shape text quickly.
Move connection points
If you're not happy with where a connection point is located, you can move it.
-
Select the shape.
Note: If you don't select the shape first, you can't move the connection point. The shape is selected shape if it has a green, dashed border around it.
-
Click the Connection Point tool
 .
.If you don't see the Connection Point tool, click the down arrow next to the Connector tool
 , and then click the Connection Point tool
  .
. -
Drag the connection point you want to move.
If you don't see any connection points, on the View menu, click Connection Points.
-
Click the Pointer tool
 to return to normal editing.
If you're having a hard time moving the connection point to exactly where you want it, try different snap settings:
-
On the Tools menu, click Snap & Glue, and then on the General tab, under Snap to, select the options you want.
Delete or hide connection points
Sometimes connection points can get in the way. When they do, you have two choices: delete them or hide them.
Delete a connection point
-
Select the shape.
Note: If you don't select the shape first, you can't delete the connection point. The shape is selected shape if it has a green, dashed border around it.
-
Click the Connection Point tool
 .
.If you don't see the Connection Point tool, click the down arrow next to the Connector tool
 , and then click the Connection Point tool
  .
. -
Click the connection point you want to delete. The connection point turns magenta.
If you don't see any connection points, on the View menu, click Connection Points.
-
Press DELETE.
-
Click the Pointer tool
 to return to normal editing.
Hide a connection point
-
On the View menu, click Connection Points.
ReplyDeleteNice Blog, Best Best microsoft office deals for Mac Home and Business edition is a powerful suite which fulfils the productivity applications, written for Mac OS X.