As a workaround, you can link two presentations (one in landscape, and the other in portrait) to display both portrait and landscape slides in what appears to be one presentation. You can go back and forth from one presentation to the other as often as needed by creating action links in the documents.
Tip: Place both presentations in the same folder before you create links. That way, if the folder is copied to a CD or moved, the presentations will still link correctly.
-
Create a link from the first presentation to the second presentation:
-
In the first presentation, select the text or object that you want to link to the second presentation.
-
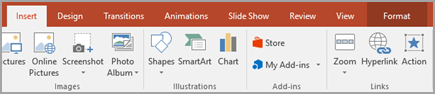
On the Insert tab, in the Links group, click Action.
-
In the Action Settings dialog box, on either the Mouse Click tab or the Mouse Over tab, click Hyperlink to, and then scroll down and select Other PowerPoint Presentation from the list.
-
In the Hyperlink to Other PowerPoint Presentation dialog box, locate and click the second presentation, and then click OK. The Hyperlink to Slide dialog box appears.
-
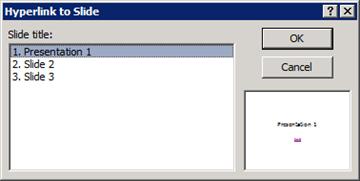
In the Hyperlink to Slide dialog box, under Slide title, click the slide that you want to link to, and then click OK.
-
Click OK in the Action Settings dialog box.
-
Create a link from the second presentation back to the first presentation:
-
In the second presentation, select the text or object that you want to link to the first presentation.
-
On the Insert tab, in the Links group, click Action.
-
In the Action Settings dialog box, on either the Mouse Click tab or the Mouse Over tab, click Hyperlink to, and then select Other PowerPoint Presentation from the list.
-
In the Hyperlink to Other PowerPoint Presentation dialog box, locate and click the first presentation, and then click OK. The Hyperlink to Slide dialog box appears.
-
In the Hyperlink to Slide dialog box, under Slide title, click the slide that you want to link to, and then click OK.
-
Click OK in the Action Settings dialog box.
If this is a feature you'd like to request, please send us your feedback to help us prioritize new features in future updates. See How do I give feedback on Microsoft Office for more information.
As a workaround, you can link two presentations (one in landscape, and the other in portrait) to display both portrait and landscape slides in what appears to be one presentation.
Tip: Place both presentations in the same folder before you create links. That way, if the folder is copied to a CD or moved, the presentations will still link correctly.
-
Create a link from the first presentation to the second presentation:
-
In the first presentation, select the text or object that you want to link to the second presentation.
-
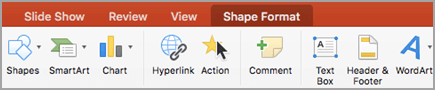
On the Insert tab, click Action.
-
In the Action Settings dialog box, on either the Mouse Click tab or the Mouse Over tab, click Hyperlink to, and then select Other PowerPoint Presentation from the list.
-
In the Hyperlink to Other PowerPoint Presentation dialog box, locate and click the second presentation, and then click OK. The Hyperlink to Slide dialog box appears.
-
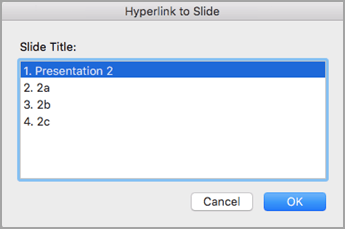
In the Hyperlink to Slide dialog box, under Slide Title, click the slide that you want to link to, and then click OK.
-
Click OK in the Action Settings dialog box.
-
Create a link from the second presentation back to the first presentation:
-
In the second presentation, select the text or object that you want to link to the first presentation.
-
On the Insert tab, click Action.
-
In the Action Settings dialog box, on either the Mouse Click tab or the Mouse Over tab, click Hyperlink to, and then select Other PowerPoint Presentation from the list.
-
In the Hyperlink to Other PowerPoint Presentation dialog box, locate and click the first presentation, and then click OK. The Hyperlink to Slide dialog box appears.
-
In the Hyperlink to Slide dialog box, under Slide title, click the slide that you want to link to, and then click OK.
-
Click OK in the Action Settings dialog box.

 Materials List | Instructions
  Instructions | Microcontroller Code
 Workbook | *Data Streamer
 > Get email address.
 > Open in SharePoint.
 > More details.
 Screen reader content