Familiarize yourself with the ribbon in PowerPoint 2010
When you first start Microsoft PowerPoint 2010, you will notice that the menus and toolbars from PowerPoint 2003 and earlier have been replaced with the ribbon.
In this article
What is the ribbon?
The ribbon contains the commands and other menu items that were on menu and toolbars in PowerPoint 2003 and earlier. The ribbon is designed to help you quickly find the commands that you need to complete a task.
Primary features of the ribbon

1. A tab in the ribbon, in this case the Home tab. Each tab relates to a type of activity, such as inserting media or applying animations to objects.
2. A group on the Home tab, in this case the Font group. Commands are organized into logical groups and collected together under the tabs.
3. An individual button or command in the Slides group, in this case the New Slide button.
Other features of the ribbon

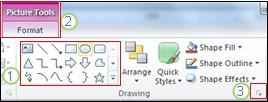
1. A gallery, in this case the shapes gallery in the Drawing group. Galleries are rectangular windows or menus that present an array of related visual choices.
2. A contextual tab, in this case the Picture Tools tab. To reduce clutter, some tabs are shown only when they are needed. For example, the Picture Tools tab is shown only if you insert a picture on a slide, and then select the picture.
3. A Dialog Box Launcher, in this case, one that starts the Format Shape dialog box.
Location of popular commands on the ribbon
To find the location of specific commands on tabs and groups, see the diagrams following.
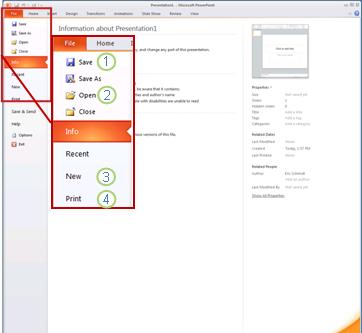
File tab

1. Save as
2. Open
3. New
4. Print
Home tab

1. If you click the arrow next to New Slide, you can choose from several slide layouts.
2. The Font group includes the Font, Bold, Italic, and Font Size buttons.
3. The Paragraph group includes Align Text Right, Align Text Left, Justify, and Center.
4. To find the Group command, click Arrange, and under Group Objects select Group.
Insert tab

1. Table
2. Shapes
3. Chart
4. Header & Footer
Design tab

1. Click Page Setup to launch the Page Setup dialog box.
2. In the Themes group, click a theme to apply it to your presentation.
3. Click Background Styles to select a background color and design for your presentation.
Transitions tab

1. In the Transitions to This Slide group, click a transition to apply it to the current slide.
2. In the Sound list, you can select from several sounds to play during your transition.
3. Under Advance Slide, you can select On Mouse Click to make the transition occur when you click.
Animations tab

1. Click Add Animation, and select an animation to apply to the selected object.
2. Click Animation Pane to launch the Animation Pane task pane.
3. The Timing group includes areas to set the Start and Duration.
Slide Show tab

1. The Start Slide Show group, that includes From Beginning and From Current Slide.
2. Click Set Up Slide Show to launch the Set Up Show dialog box.
3. Hide Slide
Review tab

1. Spelling, to start the spelling checker.
2. The Language group, that includes Editing Language, where you can select the language.
3. Compare, where you can compare changes in the current presentation against another presentation.
View tab

1. Slide Sorter
2. Slide Master
3. The Show group, that includes Ruler and Gridlines.
I do not see the command that I need! Some commands, such as Crop or Compress, are on contextual tabs.
To view a contextual tab, first select the object that you want to work with, and then check whether a contextual tab appears in the ribbon.
No comments:
Post a Comment