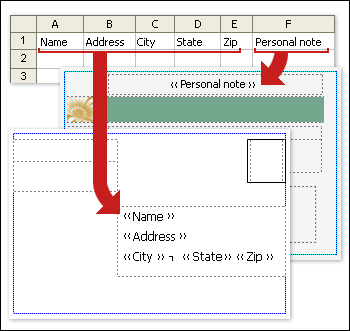
Create a data source for a mail merge
If your information is not already organized into a data source file format that Microsoft Office Publisher can use, you can create a data source to use for your mail merge or e-mail merge. A data source may contain only a list of names and addresses, or it may also include paths to pictures, product part numbers, postal bar codes, customer purchase history, and a variety of additional data that you want to use in a mail merge or an e-mail merge.
In this article
The structure of a data source
Before you create your data source, consider the kinds of information that you want to include in your final merged publication. Be sure to structure your data source file so that it has all of the data that you will need for your merge.
The first row in your data source, the header row in the table below, lists the column names. These column names are the names of the data fields that you insert into your mail merge or e-mail merge publication as placeholders for the text or picture data.
Below the header row, the columns of data, or data fields, contain the specific information that will display in place of the associated merge field. Each row, or record, in your table below the header row lists a complete set of information for each record.

Create an address list data source for a mail merge
You can use Microsoft Office Publisher, Microsoft Office Excel, Microsoft Office Access, Microsoft Office Outlook, or Microsoft Office Outlook with Business Contact Manager to create a data source for your mail merge or e-mail merge. After you create and save an address list, you can use it over again for future mail merge projects.

Use Publisher to create an address list
-
Open a publication.
-
On the Tools menu, point to Mailings and Catalogs, and then click Create Address List.
-
To customize the columns in the New Address List dialog box, click Customize Columns, and then do any of the following:
-
To add a field, click Add. In the Add Field dialog box, type a name for your new field, and then click OK.
-
To remove a field, under Field Names select a field name, and then click Delete.
-
To rename a field name, under Field Names select a field name, and then click Rename. In the Rename Field dialog box, type a new name in the To: box, and then click OK.
After you have customized all of the fields that you want, click OK.
-
-
In the New Address List dialog box, in the first blank row, type the information for the first entry in the relevant fields.
If you plan to merge photos into your final publication, you need to type either the file name or path for each picture file that you want to use in the appropriate column or data field for each record. Do one of the following:
-
If you saved your picture files and your data source in the same folder, type the file name for the relevant picture. For example, type firstphoto.jpg.
-
If you saved your picture files in a different folder from the data source, type the complete path for the relevant picture. For example, type C:\Documents and Settings\Username\My Documents\My Pictures\Catalog Project\firstphoto.jpg.
-
If you have saved the picture files in a subfolder of the folder that contains the data source, type the partial path for the relevant picture. For example, if the data source folder contains a Pictures subfolder, type \Pictures\firstphoto.jpg.
-
-
When you finish entering information for the first entry, click New Entry, or press the TAB key.
-
Repeat steps 4 and 5 until you have finished adding entries.
-
Click OK.
-
In the Save Address List dialog box, type a name for your address list in the File name box, and then click Save.
By default, the address list is saved in the My Data Sources folder. It is best to keep the address list here because this is the default folder in which Publisher looks for data sources. If you save your data source file somewhere other than the My Data Sources folder, you will have to browse to locate it when you connect to a data source during a merge.
Microsoft Office Tutorials: Create A Data Source For A Mail Merge >>>>> Download Now
ReplyDelete>>>>> Download Full
Microsoft Office Tutorials: Create A Data Source For A Mail Merge >>>>> Download LINK
>>>>> Download Now
Microsoft Office Tutorials: Create A Data Source For A Mail Merge >>>>> Download Full
>>>>> Download LINK bh