Repair an Office application
If an Office application such as Word or Excel isn't working correctly, sometimes restarting it will fix the problem. If that doesn't work, you can try repairing it. When you're done, you might need to restart your computer.
Repair Office from the Control Panel
The steps to access the repair tool vary depending on your operating system.
Choose your operating system from the tabs below:
-
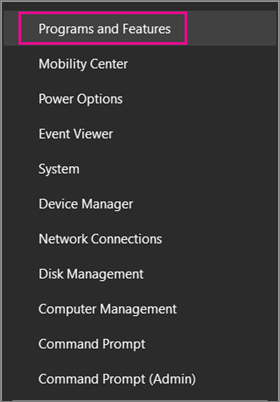
Right-click the Start button
 (lower-left corner), and select Programs and Features on the pop-up menu.
-
Right-click the Microsoft Office product you want to repair, and select Change.
Note: If you have a suite such as Office 365 Home or Office Home and Student 2013 or 2016, search for the suite name, even if it's just a particular application you want to repair such as Word or Excel. If you have a standalone application such as Word or Excel, search for the application name.
-
From the "How would you like to repair your Office Programs" screen, select Online Repair to make sure everything gets fixed, and then select Repair. The Quick Repair option is also available, which runs faster but only detects and then replaces corrupted files.
Note: If your copy of Office is MSI-based, select Repair and then click Continue. If you need help figuring out if your Office is Click-to-Run or MSI-based, see below.
-
Follow the instructions on the screen to complete.
-
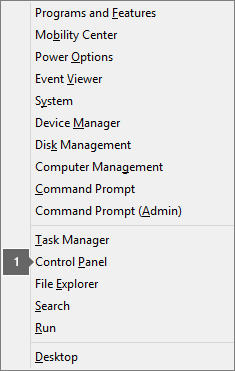
Right-click the Start button
 (lower-left corner), and select Control Panel from the pop-up menu.
-
From Category view, under Programs, select Uninstall a program.
-
Right-click the Microsoft Office product you want to repair, and select the Change button.
Note: If you have a suite such as Office 365 Home or Office Home and Student 2013 or 2016, search for the suite name, even if it's just a particular application you want to repair such as Word or Excel. If you have a standalone application such as Word or Excel, search for the application name.
-
From the How would you like to repair your Office Programs screen, select Online Repair to make sure everything gets fixed, and then select Repair.
Note: If your copy of Office is MSI-based, select Repair and then click Continue. If you need help figuring out if your Office is Click-to-Run or MSI-based, see below.
-
Follow the instructions on the screen to complete.
-
Click the Start button
 > Control Panel > Programs and Features.
 -
From Category view, under Programs, select Uninstall a program.
-
Click the Office product you want to repair, and then click Change.
-
Follow the steps for your Office installation type:
Note: If you need help figuring out if your Office is Click-to-Run or MSI-based, see below.
Click-to-Run installation type
MSI-based installation type
From the How would you like to repair your Office Programs screen, select Online Repair to ensure everything gets fixed, and then select Repair.
Select Repair and then click Continue.
-
Follow the instructions on the screen to complete.
Click here to learn if my Office installation is Click-to-Run or MSI-based.
-
Open an Office application, such as Outlook or Word.
-
Go to File > Account or Office Account.
-
If you see an "Update Options" item, you have a Click-to-Run installation. If you don't see the "Update Options" item, you have an MSI-based install.

Running Repair didn't help. Now what?
Use this easy fix tool to completely uninstall Office.
-
Click this easy fix button to uninstall Office.

-
Select your browser from the drop-down list to see how to save and then launch the file.
-
At the bottom of the browser window, select Save.

-
In the next box that indicates o15-ctrremove.diagcab is finished downloading, click Open.
-
The Uninstall Office wizard launches. Select Next and follow the prompts.
-
When you see the Uninstallation successful screen, follow the prompt to restart your computer for the changes to take effect.
-
After restarting your computer, you can try installing Office again.
-
At the bottom of the browser window, select Open to open the O15CTRRemove.diagcab file.

If the file doesn't open automatically, choose Save > Open Folder, and then double-click the file (it should start with "O15CTRRemove") to run the easy fix tool.
-
The Uninstall Microsoft Office wizard launches. Select Next and follow the prompts.
-
When you see the Uninstallation successful screen, follow the prompt to restart your computer for the changes to take effect. Select Next.
-
After restarting your computer, you can try installing Office again.
-
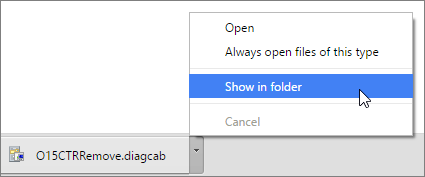
In the lower-lower left corner select the o15CTRRemove file and from the drop down, select Show in folder.

Double-click the download, o15CTRRemove to run the easy fix tool.
-
The Uninstall Microsoft Office wizard launches. Select Next and follow the prompts.
-
When you see the Uninstallation successful screen, follow the prompt to restart your computer for the changes to take effect. Select Next.
-
After restarting your computer, you can try installing Office again.
-
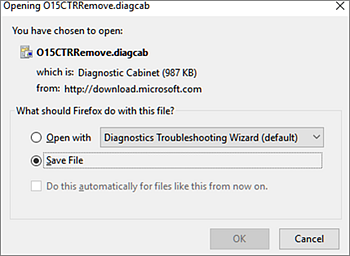
Select Save File, and then OK.

In the upper-right browser window, select Show all downloads. In the Library, select Downloads > O15CTRRemove.diagcab, and then select the folder icon. Double-click the O15CTRRemove.diagcab.
-
The Uninstall Microsoft Office wizard launches. Select Next and follow the prompts.
-
When you see the Uninstallation successful screen, follow the prompt to restart your computer for the changes to take effect. Select Next.
-
After restarting your computer, you can try installing Office again.
-
-
To reinstall Office, see Download and install or reinstall Office on your PC or Mac and follow the steps for your Office plan.
No comments:
Post a Comment