Open and find items in an archive Outlook Data File (.pst)
This article was last updated on February 23, 2016, based on customer feedback.
There may come a time when you need to search for items in an Outlook data file. This article covers how to find items and troubleshoot search issues.
Reviewing your archived items
By default, AutoArchive in Outlook regularly removes old and expired items from folders. It does this to help you manage space in your mailbox or on the mail server you're using.
You can set AutoArchive to move or copy old items to a designated archive folder or to automatically delete items. If you do not delete your archived items, they remain available to you in the archive folder.
Retrieve your archived items
To see what your AutoArchive settings and location are, and instructions to turn off AutoArchive, see Automatically move or delete older items with AutoArchive.
-
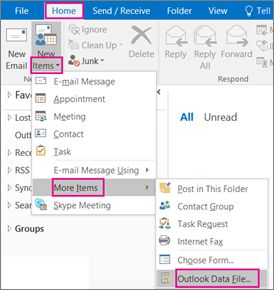
In Outlook on your desktop (Outlook 2016, Outlook 2013, Outlook 2010), choose Home > New Items > More Items > Outlook Data File.
-
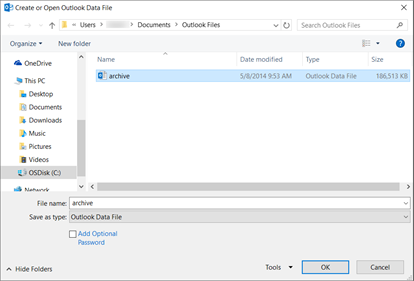
Choose the file named archive (or the name you specified for the archived file).
-
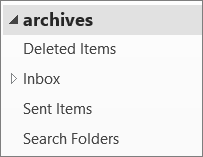
Expand the archive file in the Outlook Navigation pane to see the subfolders in it. Click each subfolder to see the contents.
-
To search for a specific email, use Instant Search in Outlook or Windows Search.
-
If you want to import your archived items back into your Inbox, follow the instructions for importing a .pst file. The name of the file you're going to import is "archive" and you're going to import it into your current email account.
If you can't see your archived emails
Note: The archive Outlook Data File (.pst) displays the same folder structure as the file it archives. If a folder is empty in the archive, it means no items have been archived for that folder.
If you followed the above instructions to retrieve your archived email but still can't see them, check what the settings are for autoarchiving your email.
-
In Outlook on your desktop (Outlook 2016, Outlook 2013, Outlook 2010), choose File.

-
Choose Options.
-
Choose Advanced > AutoArchive Settings.
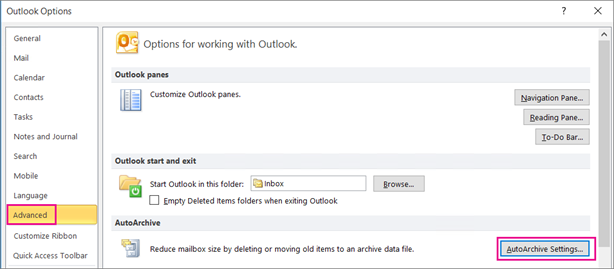
Note: If you don't see AutoArchive Settings, then AutoArchive isn't enabled for your organization.
-
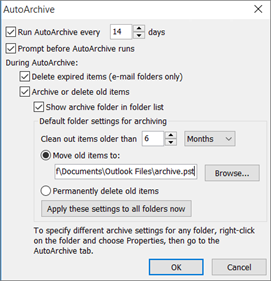
Note how frequently your email is being archived and whether the archive file is being cleaned out after a period of time. Based on these settings, should there be email in your archive folder?
-
Your emails are being archived to the location listed in Move old items to.
Where are my emails archived?
Outlook 2016, Outlook 2013, Outlook 2010: new archive files are saved in the following locations:
-
Windows Vista, Windows 7, 8, and 10 drive:\Users\user\Documents\Outlook Files\archive.pst
-
Windows XP drive:\Documents and Settings\user \Local Settings\Application Data\Microsoft\Outlook\archive.pst
Earlier versions of Outlook: the archive file is saved in the following locations:
-
Windows 7 and Windows Vista drive:\Users\user\AppData\Local\Microsoft\Outlook\archive.pst
-
Windows XP drive:\Documents and Settings\user \Local Settings\Application Data\Microsoft\Outlook\archive.pst
All messages, contact information, calendars, and other data that you create in Microsoft Outlook are kept in your Personal Folders file (.pst) or if you use a Microsoft Exchange Server account, on your organization's Exchange server. Outlook provides an archive function to purge your commonly used folders of older content that you don't need, but don't want to delete. You can have this done automatically with AutoArchive, or you can also archive manually as desired.
While the archived content no longer appears in folders that you commonly use, you can still access and retrieve those items if you want to restore that content.
Notes:
-
Some companies impose size limits on corporate e-mail accounts, which can be alleviated by archiving. By the same token, archived files often must remain accessible, in case compliance requires they be restored.
-
Outlook cannot archive current or active files. For example, a recurring meeting cannot be archived unless all occurrences of the meeting are in the past. Any scheduled occurrences of the meeting in the future would denote it as a current item and so cannot be archived.
Use Instant Search to find items
-
The indexing of your data files might not be complete. Indexing is what enables the Instant Search feature to quickly locate items.
Note: When you first start using Instant Search, Outlook needs to index your data files to provide fast and complete search results. This process might take several minutes.
-
You are searching for messages that are clear-signed (a method of encryption) and you are searching in either a Personal Folders file (.pst) or Offline Folder files (.ost) file for these items.
Note: This might occur if you are using either Windows Desktop Search (WDS) or Outlook (Instant Search or Advanced Find) to search for the messages.
Verify that your Outlook data files can be indexed
Outlook indexes the following data files:
-
Personal Folders files (.pst)
-
Offline Folder files (.ost)
This includes Microsoft Windows Live Mail, IMAP, and POP e-mail accounts. If you use a Microsoft Exchange account (much more common in business e-mail systems than in a home or personal account), you must be connected to the server running Exchange and use Cached Exchange Mode for Instant Search to index your messages. Cached Exchange Mode uses an Offline Folders file (.ost) to save your information on your computer. To verify which data files are being indexed, do the following:
-
On the Tools menu, point to Instant Search, and then click Search Options.
Alternatively, click the arrow in the Instant Search pane, and then click Search Options on the menu.
-
Under Indexing, verify that the data files that you want to include in your search are selected in the Index messages in these data files list.
Verify that indexing is complete
To verify the indexing status, do the following:
-
On the Tools menu, point to Instant Search, and then click Indexing Status.
Alternatively, click the arrow in the Instant Search pane, and then click Indexing Status on the menu.
-
Verify that the dialog box reports 0 items remaining. If not, indexing is not complete and needs to finish before all of your Outlook items can be searched.
Indexing Status reports "0 items remaining," but search results aren't correct
If the Indexing Status reports 0 items remaining and Instant Search is still not returning the correct search results, exit Outlook and restart your computer. When you start Outlook again, verify that Outlook is indexing your items properly by doing the following:
-
On the Tools menu, point to Instant Search, and then click Indexing Status.
Alternatively, click the arrow in the Instant Search pane, and then click Indexing Status on the menu.
-
Verify that the number of items in the Indexing Status dialog box has increased. If the number has not increased, you must wait until indexing is complete for the results.
I restarted my computer, and Instant Search still doesn't return the correct results
If you aren't getting results after restarting, the next step is to rebuild your search catalog. The search catalog is a file where all of your Outlook and Microsoft Windows items are indexed. To rebuild your search catalog, do the following:
-
Exit Outlook.
-
In Microsoft Windows, click the Start button, and then click Control Panel.
-
Do one of the following:
-
Windows Vista Click System Maintenance, and then click Indexing Options.
Note: In Classic view, double-click Indexing Options.
-
Microsoft Windows XP Under See Also, click Other Control Panel Options, and then click Indexing Options.
Note: In Classic view, double-click Indexing Options.
-
-
Click Advanced.
-
Click Rebuild.
-
Restart Outlook.
Resolving clear-signed message issues
If a clear-signed message is stored in a Personal Folders files (.pst) or an Offline Folder files (.ost), Outlook Instant Search (and Windows Desktop Search) will not be able to find it. The way that Outlook encrypts, or "packages," the body text of a message when signed using clear-sign encryption technology renders the message text unsearchable.
For more information on signing and encryption technology, see Understanding Public Key Cryptography.
You can use the following steps however, to find out if the file location is part of the problem.
-
Determine if you are searching a .pst or .ost.
How?
-
In your Inbox, click the single arrow next to the Search All Mail Items box.
-
Click Search Options.
-
In the Indexing section, see if the following check boxes are selected:
-
Personal Folders
-
Mailbox - <your name>
-
-
-
If you think that the messages are stored in other data files besides a .pst or the .ost, clear the check boxes (if necessary) and then try your search again.
If you are searching a data file other than a .pst or an .ost, and Instant Search still isn't finding the messages, see if you have your Outlook e-mail account set to use Cached Exchange Mode. If so, turn off Cached Exchanged Mode and then try your search again.
How?
-
On the Tools menu, click Account Settings.
-
On the E-mail tab, click the Exchange account, and then click Change.
-
Under Microsoft Exchange server, clear the Use Cached Exchange Mode check box.
-
Exit and restart Outlook.
Once Cached Exchange Mode is turned off, if you still aren't getting the search results you expect, try using a different Outlook profile. If you don't have another profile set up, you can create one. In each case, you must turn off Cached Exchange Mode as described in the procedure above.
Copy all items from an archived location
You can copy archived items into their original folders—for example, from the archived Inbox to your current Inbox—or into a new folder you designate.
-
On the File menu, click Import and Export to open the Import and Export Wizard.
-
Click Import from another program or file, and then click Next.
-
Click Personal Folder File (.pst), and then click Next.
Important: If you can't find your .pst file, it may be hidden and you need to display the file location before continuing to the next step.
-
In the File to import box, change the default file name in the highlighted path from backup.pst to the name of the archive file you're importing from. Or, click Browse to locate the file you want to import from.
-
Specify how you want Outlook to handle duplicate items under Options.
-
Click Next.
-
Click the folder to import from. Select the Include subfolders check box if the folder you're importing has subfolders you want to import as well.
-
Select one of the destination options:
-
Import items into the current folder - this imports the data into the folder currently selected.
-
Import items into the same folder in - this imports the data into the destination folder of the same name as the source folder, e.g., from Inbox to Inbox.
-
-
Click Finish.
I can't find my .pst file
The archive file is a special type of data file, a Personal Folders file (.pst). The first time AutoArchive runs, Outlook creates the archive file automatically in the following locations:
-
Windows Vista C:\Users\YourUserName\AppData\Local\Microsoft\Outlook\Archive.pst
-
Microsoft Windows XP C:\Documents and Settings\YourUserName \Local Settings\Application Data\Microsoft\Outlook\Archive.pst
If you don't see the Local Settings or Local folders, they might be hidden. To display a hidden .pst file, complete the steps for the operating system you're using.
Windows 7 and Windows Vista-
Click the Start button, and then click Control Panel.
-
Click Appearance and Personalization.
Note: If you are using Control Panel Classic View, double-click Folder Options, and then go back to step 4 under Copy all items from an archived location.
-
Click Folder Options.
-
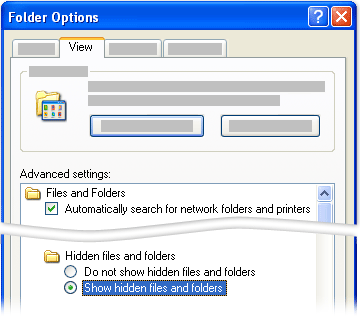
On the View tab, under Advanced settings, under Files and Folders, under Hidden files and folders, select Show hidden files and folders.
-
Click Start, and then click Control Panel.
-
Click Folder Options.
-
On the View tab, click the Show hidden files and folders option.
Move individual items from an archived location
-
On the Go menu, click the Folder List, click Archive Folders (or the name you used for the archive location).
-
Click the folder containing the items you want to move.
-
Select the items you want to move, and then drag them into their original folder in the Folder List, or into another folder.
Note: If you receive an error message that "the .pst is already in use," there may be some size or corruption issues with the .pst file. The Outlook Inbox Repair Tool can fix many of these issues. After running the tool, try restoring your files again.
Amazing article, Thanks for sharing!
ReplyDeleteHow to Fix Outlook is Using an Old Copy of Your Outlook Data File (.OST) Issue?
nice.
ReplyDeleteA useful wording is a great way to highlight the significant aspects of the topic keep it up.
ReplyDeleteAol not working
AOL Mail Not Working
Change att wifi password
Roku Error
Learn How to Convert Offline Folder Files into Outlook?
ReplyDeleteMicrosoft Office Tutorials: Open And Find Items In An Archive Outlook Data File (.Pst) >>>>> Download Now
ReplyDelete>>>>> Download Full
Microsoft Office Tutorials: Open And Find Items In An Archive Outlook Data File (.Pst) >>>>> Download LINK
>>>>> Download Now
Microsoft Office Tutorials: Open And Find Items In An Archive Outlook Data File (.Pst) >>>>> Download Full
>>>>> Download LINK p5
Microsoft Office Tutorials: Open And Find Items In An Archive Outlook Data File (.Pst) >>>>> Download Now
ReplyDelete>>>>> Download Full
Microsoft Office Tutorials: Open And Find Items In An Archive Outlook Data File (.Pst) >>>>> Download LINK
>>>>> Download Now
Microsoft Office Tutorials: Open And Find Items In An Archive Outlook Data File (.Pst) >>>>> Download Full
>>>>> Download LINK 1A