Insert or remove a page break in Word
Word automatically adds a break at the end of each page. You can also insert a manual page break anytime you want to start a new page in your document.
Insert a manual page break
-
Click in the document where you want to insert a page break.
-
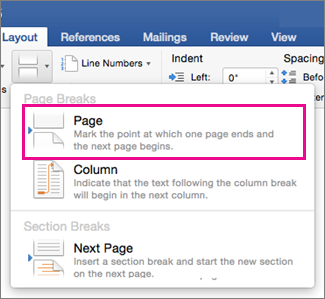
Click Layout > Breaks > Page.

Remove a manual page break
Although you can't remove the page breaks that Word automatically inserts, you can remove manual page breaks from your document.
-
On the Home tab, click Show all nonprinting characters
 .
. -
Click to select the page break you want to remove.

-
Press DELETE.
Insert a manual page break
-
Click in the document where you want to insert a page break.
-
On the Layout tab, under Page Setup, click Break, and then click Page.
Remove a manual page break
Although you can't remove the page breaks that Word automatically inserts, you can remove manual page breaks from your document.
-
If nonprinting characters are not displayed, on the Standard toolbar, click Show all nonprinting characters
 .
. -
Select the page break that you want to remove, and then press DELETE.
No comments:
Post a Comment