Exploring a desktop Access 2007 database
Microsoft Office Access 2007 Inside Out
By John Viescas and Jeff Conrad
John Viescas is the author of numerous books including Microsoft Office Access 2003 Inside Out and Building Microsoft Access Applications. He is also the coauthor of SQL Queries for Mere Mortals. John has written numerous articles for technical publications and has lectured at conferences and user group meetings around the world. He has been recognized as a Most Valuable Professional every year since 1993 by Microsoft Product Support Services for his assistance on public support forums.
Jeff Conrad has written and assisted with technical articles on Access and created several Access add-ins given freely to the Access community. Jeff maintains a Web site with a wealth of information and resource links for those needing guidance with Access. He has been awarded Microsoft's Most Valuable Professional award for his continual involvement with the online Access community. He is very active in the Microsoft-sponsored Access public newsgroups and several other online forums where he is best known as the Access Junkie. In addition to his full time work, Jeff also creates Access database solutions for small businesses.
To learn more about other books on the 2007 Microsoft Office system, visit Microsoft Press.
In this article
Once you are more comfortable with the user interface in Microsoft Office Access 2007, you'll want to dig deeper into exactly what makes up an Access database. This article uses an example to help you understand the relationships among the main components in Access and shows how to move around within the database management system.
Navigating through a desktop database
After you know something about the major objects that make up an Access database, a good next step is to spend some time exploring the desktop database in greater detail.
As you begin to navigate through an existing database, keep in mind that the Navigation Pane is always the same width as it was when you last set it. The title bar of the window normally shows the name of the database that you have open. You can set options in the database to change the title bar of the main Access window to show the name of your application instead of Microsoft Access as shown in Figure 1.
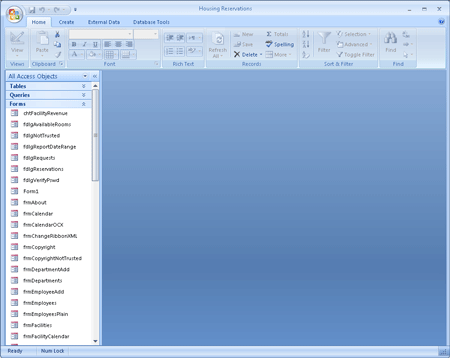
Figure 1 The Navigation Pane displays the objects defined in an existing database.
The Ribbon has four main tabs that are displayed at all times. As you explore Access 2007, you'll see that the Ribbon provides several contextual tabs that appear and disappear as you work with specific database objects and areas of the program. These contextual tabs make available commands that are useful only within the context of the object that has the focus and that object's current view. For example, it wouldn't make sense to show you table design commands when you have a table open to display its data (Datasheet view). Likewise, you don't need datasheet commands when you have a query open in Design view.
Note: You can rest your mouse pointer on any command or option on the various Ribbon tabs for a second (without clicking the button), and Access displays a ScreenTip to help you discover the purpose of the button.
You can change how Access displays the list of objects in the database by using one of the built-in navigation categories (Object Type, Tables And Related Views, Created Date, and Modified Date) or by defining your own custom navigation category. You can filter each navigation category to limit what group Access displays within each category so that you don't have to wade through a long list to find what you want.
You can explore each of the types of database objects by clicking the Navigation Pane menu at the top of the Navigation Pane and then clicking Object Type under Navigate To Category. Next, open the menu again and be sure that you have clicked All Access Objects under Filter By Group, as shown in Figure 2. You can collapse an entire group of objects by clicking on the group's header bar. If you defined names of some custom groups under Navigate To Category, then you will see these names when you open the Navigation Pane.
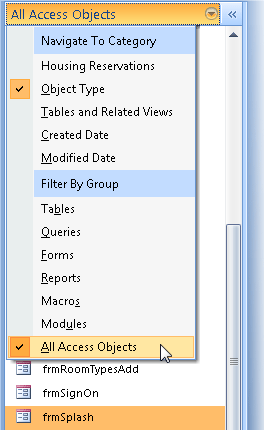
Figure 2 Select Object Type under Navigate To Category and then All Access Objects under Filter By Group to see all objects organized in groups by object type.
Tables
You can open a table in Datasheet view to see the data in the table by double-clicking the table name in the Navigation Pane; or you can open the table in Design view by holding down the CTRL key and double-clicking the table name. If you right-click a table name, Access displays a shortcut menu, as shown in Figure 3, that lets you perform a number of handy operations on the item you selected. Click one of the commands on the shortcut menu, or click anywhere else in the Access window to dismiss the menu.
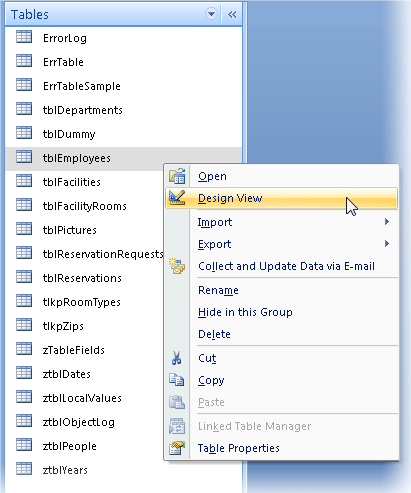
Figure 3 You can access many commands from the shortcut menu for a table in the Navigation Pane.
Queries
At times you might want to view all the fields and records in a table. But what if you want to see only the employee names and addresses? Or maybe you would like to see in one view information about employees and all their confirmed room reservations. To fill these needs, you can create a query by opening the Navigation Pane menu. Click Object Type under Navigate To Category if it isn't already selected, and then click Queries under Filter By Group to display a list of the available queries, as shown in Figure 4.
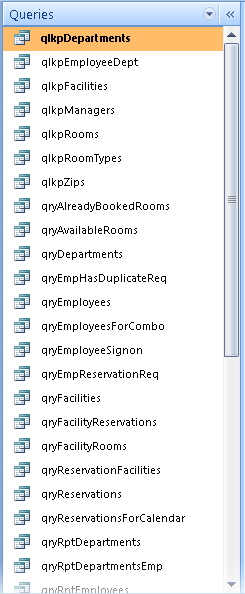
Figure 4 When you filter object types by queries in the Navigation Pane, Access displays a list of only the queries in the database.
You can open a query in Datasheet view by double-clicking the query name, or you can open it in Design view by clicking on the query to select it, and then pressing CTRL+ENTER. You can also right-click a query and click the Open or Design View command on the shortcut menu.
Forms
Datasheets are useful for viewing and changing data in your database, but they're not particularly attractive or simple to use. If you want to format your data in a special way or automate how your data is used and updated, you need to use a form. Forms provide a number of important capabilities.
-
You can control and enhance the way your data looks on the screen. For example, you can add color and shading or add number formats. You can add controls such as list boxes and check boxes. You can display ActiveX objects such as pictures and graphs directly on the form. And you can calculate and display values based on data in a table or a query.
-
You can perform extensive editing of data using macros or Visual Basic procedures.
-
You can link multiple forms or reports by using macros or Visual Basic procedures that are run from buttons on a form.
To display a list of forms available in your database, as shown in Figure 5, click the menu bar at the top of the Navigation Pane, click Object Type under Navigate To Category, and then click Forms under Filter By Group.
You can open a form in Form view by double-clicking the form name in the Navigation Pane. You can also open the form in Design view by clicking the form to highlight it, and then pressing CTRL+ENTER. Finally, you can right-click a form name and click a command on the shortcut menu. To create a new form, use the commands in the Forms group of the Create tab on the Ribbon.
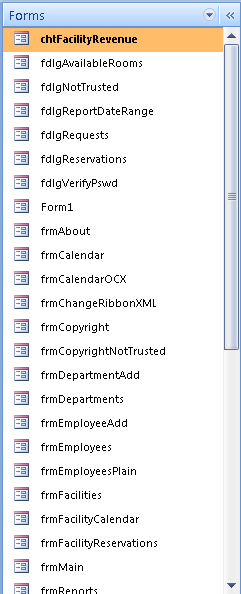
Figure 5 When you filter Object Type by Forms, Access displays a list of only the forms in the Housing Reservations database.
In addition to the new Layout View discussed below, listed below is a brief overview of two views.
Design view - When you want to change the definition of a form (the structure or design, as opposed to the data represented in the form), you generally must open the form in Design view.
Form view - To view, change, insert, or delete data via a form, you can use Form view.
Form window in layout View
Access 2007 introduces a new view for forms called Layout view. When working with a form in Design view, you can switch to Layout view by right-clicking the tab at the top of the object window and clicking Layout View on the shortcut menu. You should now see the form in Layout view (see Figure 6). This unique view for forms gives the developer a fast and easy way to create and modify form designs.
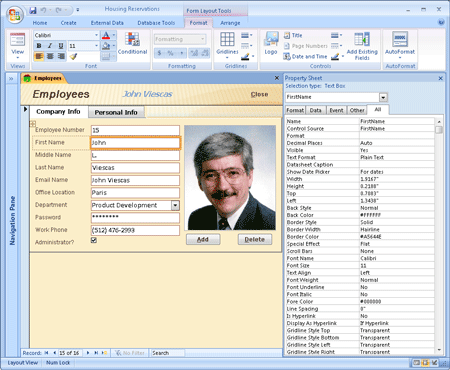
Figure 6 Layout view lets you see your data and also modify the design of the form.
Unlike Design view, Layout view enables you to work with the various control elements and form sections using existing live data. If, for example, you need to resize a text box to fit the available data, you do not have to continually switch back and forth between Form and Design view to see if your size change works effectively. With Layout View you actually see data in the text box while resizing the control. This new What-You-See-Is-What-You-Get (WYSIWYG) form-authoring view provides the best of both worlds by combining the ability to change the structure of the data entry form at the same time you're accessing actual data.
In Layout view, if you have grouped a set of controls you can move them around the form design grid together to maintain their proximity and orientation to one another. In this sample form, we grouped all the controls in the first column in a stacked layout. In Figure 7, you can see that we're dragging the Email Name field down below the Office Location field. A horizontal bar designates where Access will place the control after you release the mouse button. Because these controls are grouped, Access places the Email Name field and its label below the Office Location field and aligns them perfectly.
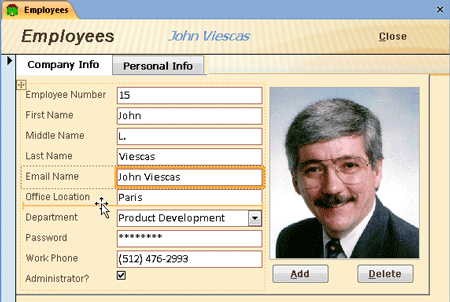
Figure 7 You can move a control within a group in Layout view, and Access keeps them perfectly aligned.
Reports
If your primary need is to print data, you should use a report. To create a report, begin by clicking the menu bar at the top of the Navigation Pane to open the Navigation Pane menu and click Object Type under Navigate To Category. Then open the menu again and click the Reports option under Filter By Group to display a list of reports available in your database, as shown in Figure 8.
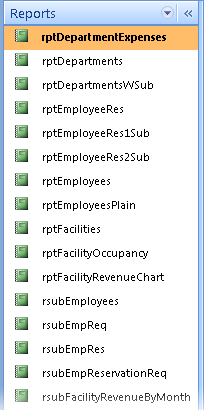
Figure 8 You can filter the Navigation Pane to show only a list of the reports in your database.
Although you can print information in a datasheet or a form, neither of these formats provides the flexibility that reports do when you need to produce complex printed output (such as invoices or summaries) that might include many calculations and subtotals. Formatting in datasheets is limited to sizing the rows and columns, specifying fonts, and setting the colors and gridline effects. You can do a lot of formatting in a form, but because forms are designed primarily for viewing and entering data on the screen, they are not suited for extensive calculations, grouping of data, or multiple totals and subtotals in print.
In addition to the new Layout view and Report view that are discussed below, the following two other options can be used when viewing or working with reports.
Design view - When you want to change the definition of a report, you can open the report in Design view.
Print view - To see what the finished report looks like, click Print Preview when you're in the Report window in Design view.
Report window in Layout view
Access 2007 introduces a new view for reports called Layout view. This unique view for reports gives the developer a fast and easy way to create and modify report designs. Unlike Design view, Layout view enables you to work with the various control elements and report sections using existing live data. Similar to Layout view for forms, this new WYSIWYG report-authoring view provides the best of both worlds by combining the ability to change the structure of the report at the same time you're accessing the data.
Just like Layout view for forms, if you have grouped a set of controls, you can move them around the report grid together to maintain their proximity and orientation to one another. In Figure 9, you can see that we're dragging the Birth Date field above the E-mail field. A horizontal bar designates where Access will place the control after you release the mouse button. Because these controls are grouped, Access places the Birth Date field and its label above the Email field. The two controls swap places and align perfectly.
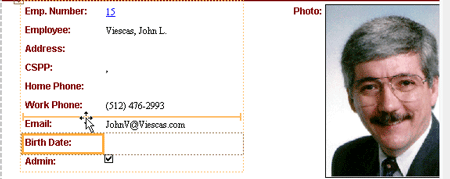
Figure 9 Access makes it easy to move controls around within a group in Layout view.
Report window in Report view
In addition to Layout view, Access 2007 includes another new view for reports called Report view, an interactive view for reports that can respond to control events, much like data entry forms. You can switch to Report view by clicking Report View on the shortcut menu (see Figure 10).
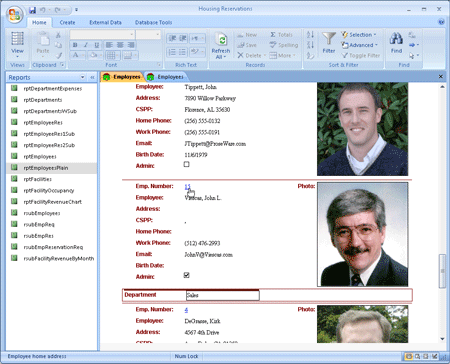
Figure 10 When a report is in Report view, you can program controls to respond to mouse clicks to open a related form.
Previous versions of Access treat reports on screen as static. After you open a report on the screen, you can only view the report or print it. Report view in Access 2007 gives you the ability to interact with the report through filters to drill down to specific records and then print only this smaller group of records. You can include command buttons on your reports with Access 2007 and program the buttons to respond to a mouse click in Report view. In the new Report view, you can designate controls that respond to events as hyperlinks to provide a visual cue that an event occurs when clicking that control. In Figure 10, for example, observe that the Employee Number field looks like a hyperlink with a blue line underneath the data. (In Figure 10 we have scrolled down the records to show John's information.)
Macros
You can make working with your data within forms and reports much easier by triggering a macro action. Office Access 2007 provides more than 70 actions that you can include in a macro. They perform tasks such as opening tables and forms, running queries, running other macros, selecting options from menus, and sizing open windows. You can also group multiple actions in a macro and specify conditions that determine when each set of actions will or will not be executed by Access.
To display a list of macros available in your database, open the Navigation Pane menu and make sure Object Type is selected under Navigate To Category. Then open the menu again and click Macros under Filter By Group, as shown in Figure 11. You can run a macro by right-clicking the macro name in the Navigation Pane and clicking Run on the shortcut menu. To open a macro in Design view, right-click the macro name and click Design View on the shortcut menu. To create a brand new macro, click the New Object Macro button in the Other group of the Create tab on the Ribbon.
Macros are a great way to learn about the basics of responding to events and automating actions in an Access database. However, for any application that you intend to distribute to others, you should use Visual Basic to handle events and automate actions. Nearly all of the sample databases use Visual Basic exclusively.
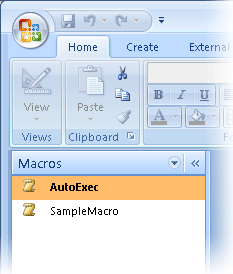
Figure 11 You can filter the Navigation Pane to show the Macros list in the Housing Reservations database.
You can design multiple macro actions within a single macro object and give each one a name in the first column. Any unnamed lines following a line with a name specified all belong to the named macro. In the second column, you can optionally specify a condition test that must be true for the macro command on that line to execute. You can use a continuation indicator (...) on subsequent lines to specify additional commands that should also execute when the condition is true. You select the action you want to run from a list in the Action column and set the arguments required for the action in the Action Arguments section in the lower part of the design window. Some of the limitations of macros include limited ability to branch to other actions and very limited ability to loop through a set of actions.
Modules
You might find that you keep coding the same complex formula over and over in some of your forms or reports. Although you can build a complete Access application using only forms, reports, and macros, some actions might be difficult or impossible to define in a macro. If that is the case, you can create a Visual Basic procedure that performs a series of calculations and then use that procedure in a form or report.
If your application is so complex that it needs to deal with errors (such as two users trying to update the same record at the same time), you must use Visual Basic. Because Visual Basic is a complete programming language with complex logic and the ability to link to other applications and files, you can solve unusual or difficult programming problems by using Visual Basic procedures.
Version 2 of Access introduced the ability to code Basic routines in special modules attached directly to the forms and reports that they support. You can create these procedures from Design view for forms or reports by requesting the Code Builder in any event property. You can edit this code behind forms and reports by clicking View Code in the Tools group on the Design contextual tab when you have a form or report open in Design view. In fact, after you learn a little bit about Visual Basic, you might find that coding small event procedures for your forms and reports is much more efficient and convenient than trying to keep track of many macro objects. You'll also soon learn that you can't fully respond to some sophisticated events, such as KeyPress, in macros because macros can't access special additional parameters (such as the value of the key pressed) generated by the event. You can fully handle these events only in Visual Basic.

Nice post! I really like to read this informative post. Thank you for sharing this with us.
ReplyDeleteaccess database developer Sheffield
Microsoft Office Tutorials: Exploring A Desktop Access 2007 Database >>>>> Download Now
ReplyDelete>>>>> Download Full
Microsoft Office Tutorials: Exploring A Desktop Access 2007 Database >>>>> Download LINK
>>>>> Download Now
Microsoft Office Tutorials: Exploring A Desktop Access 2007 Database >>>>> Download Full
>>>>> Download LINK 4N