Create an all-day event
An event is an activity that lasts 24 hours or longer. Examples of an event include a trade show, a seminar, or a vacation.
In this article
More information about events
Usually an event occurs one time and can last for one day or several days. An annual event, such as a birthday or anniversary, occurs yearly on a specific date.
Events and annual events don't occupy blocks of time in your calendar. These events appear as banners. An all-day appointment displays your time as busy when viewed by other people. An event or annual event displays your time as free.
Create an event
-
In Calendar, click the Home tab.
-
In the New group, click New Items, and then click All Day Event.
-
In the Subject box, type a description.
-
In the Location box, enter the location.
-
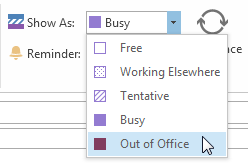
To indicate to people who are viewing your calendar that you are out of office instead of free, on the Event tab, in the Options group, click Out of Office in the Show As list.

-
If the event lasts longer than one day, change the values in the Start time and End time boxes.
-
Click Save and Close.
Tip: In Day/Week/Month view, you can quickly create an event by double-clicking underneath the date heading of the day of the event.
Change an event
-
Open the appointment, event, or meeting that you want to change.
-
Do one of the following:
-
To change options for an item that is not part of a series
-
On the Appointment tab, change the options, such as subject, location, start time or end time, as required, and then click Save and Close.
-
-
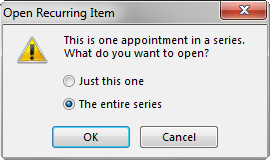
To change options for all items in a series
-
Click The entire series, and then click OK.

-
On the Appointment tab, change the subject or location options as required.
-
To change the recurrence options, in the Options group, click Recurrence, change the start time, end time, recurrence pattern, or range of recurrence as required, and then click OK.
-
Click Save and Close.
-
-
To change options for one item that is part of a series
-
Click Just this one, and then click OK.
-
On the Appointment tab, change the subject, location, start time, or end time as required, and then click Save and Close.
-
-
Tip: In Calendar, you can drag the appointment, event, or meeting to a different date. You can also edit the subject by selecting the event, clicking the description text, and typing your changes. You can change an event into an appointment and block out the appointment time in your calendar by clearing the All day event check box and entering the start times and the end times of the appointment. Because an event is defined as lasting for 24 hours, from midnight to midnight, clearing this check box allows you to enter specific times.
Set an event to recur
-
Open the event that you want to set to recur.
-
On the Appointment tab, in the Options group, click Recurrence.
-
Click the recurrence frequency — Daily, Weekly, Monthly, Yearly — that you want, and then select the options for the frequency.
-
Click OK, and then click Save and Close.
Make an event private
-
Create or open the event that you want to make private.
-
On the Appointment tab, in the Tags group, click Private.

Important: You should not rely on the Private feature to prevent other people from accessing the details of an event, contact, or task. To make sure that other people can't read the item that you mark as private, don't grant them read permission to your Calendar, Contacts, and Tasks folders. A person who is granted read permission to access your folders can use programmatic methods or other email applications to view the details of a private item. Use the Private feature only when you share folders with people whom you trust.
Set or remove a reminder
Do one of the following:
-
For all new events that you create
-
Click the File tab.
-
Click Options.
-
Under Calendar options, to automatically turn on or off the reminders for new events, select or clear the Default reminder check box.
-
If you select the check box, enter how long before the event that the reminder will appear.
-
-
For existing events
-
Open the event or the series, if the event recurs.
-
To turn on or off a reminder, on the Appointment tab, in the Options group, in the Reminder list, click None or how long before the event that you want a notification.
-
To customize the sound that is played when a reminder is displayed, in the Reminder list, at the end of the list click Sound, and then select the sound that you want played. A reminder time must be selected before the Sound command appears.
-
No comments:
Post a Comment