Add or delete a page in Word for Mac 2011
You can easily add or delete a page in your documents with Word for Mac 2011.
Last Updated: 7/20/2016
Add a New Page
To add a new blank page to your document, go to the Document Elements tab of the Ribbon and under Insert Pages click Blank.

To insert a page break, which forces all of the subsequent content onto the next page:
-
Click at the beginning of the paragraph that you want to follow the page break.
-
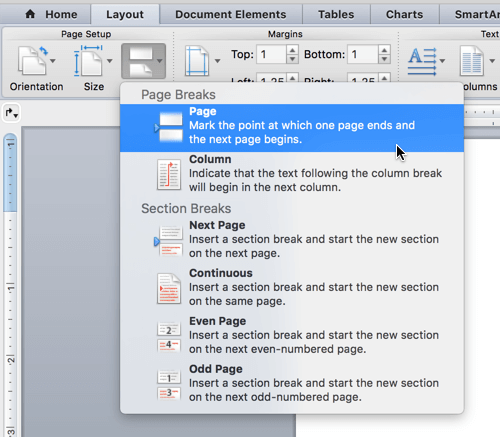
On the Layout tab of the ribbon, click Break.
-
Click Page to insert a page break.

Delete a Page
Note: If you want to delete the entire document, rather than just one or more blank pages within the document, go to Finder, locate your file and drag it to Trash. Your items aren't permanently deleted until you empty the Trash.
The easy way
-
Go to the page you want to remove.
-
On the View menu, click Publishing Layout.
-
On the Layout tab of the Ribbon, under Pages, click Remove

If that didn't work, then the cause of the blank page will take a little more investigation.
What's causing the blank page
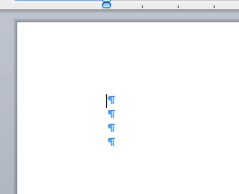
Turn on paragraph marks to see what's causing the blank page by clicking Show all nonprinting characters  on the Standard toolbar.
Extra paragraphs
If you have extra, blank, paragraphs at the end of your document you'll see empty paragraph marks (¶) on the blank page. Select them and then remove them by pressing the Delete key on your keyboard.

Manual page break
If the empty page is the result of a manual page break, you can select the page break and press Delete to remove it.

This is one of the most common causes of an unwanted blank page in the middle of a document too.
Section break
New Page, Odd Page and Even Page section breaks may create a new page in Word. If your empty page occurs at the end of your document and you have a section break there, you can select the section break and press Delete to remove it. That should remove the blank page.

Caution: If a section break is causing a blank page in the middle of a document, removing the section break can cause formatting issues. If you intended for the content that follows that point to have different formatting, then keep the section break. You don't want to delete that section break because that would cause the pages before the section break to take on the formatting of the pages after the section break. You can, however, change the section break to a Continuous section break, which will preserve the formatting changes without inserting a blank page.
To change a section break to a continuous section break:
-
Click on the page AFTER the section break you wish to change.
-
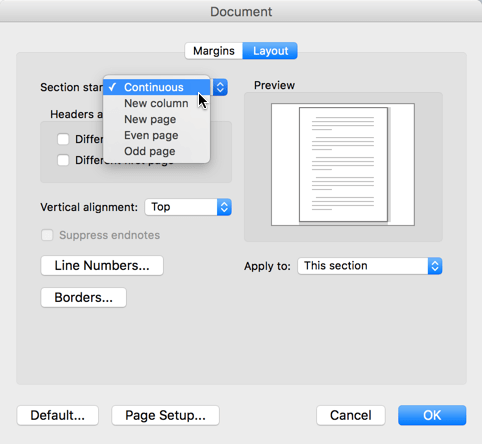
Click the Format menu, then Document.
-
On the Document dialog box change the Section start to Continuous.
-
Click OK

Table at the end of the document
If you still have an unwanted blank page at the end of your document, then it's likely that the preceding page has a table that goes all the way to the bottom of it. Word requires an empty paragraph after the table and if your table goes all the way to the bottom of the page the empty paragraph will be pushed onto the next page. You won't be able to delete that empty paragraph mark.
Note: Many resume templates are formatted with full-page tables
The easiest way to resolve this is to simply hide the empty paragraph at the end of the document.
-
Select the paragraph mark on the extra page.
-
Click the Format menu,
-
Click the Font item on the menu.
-
Click the Hidden checkbox
-
Click OK
-
Click Show all nonprinting characters
 on the Standard toolbar to turn display of nonprinting characters off

The unwanted page should disappear.
Do you have a question about Word for Mac that we didn't answer here?
Help us improve Word for Mac
Do you have suggestions about how we can improve Word? If so, please visit Word for Mac UserVoice and let us know!
No comments:
Post a Comment