Format or customize a table of contents in Word 2016 for Mac
After you create a table of contents, you can customize the way it looks. For example, you can select how many heading levels to include and whether to show lines between entries and the page numbers. You can also change the format of text, and Word will keep that format no matter how many times you update the table of contents.
-
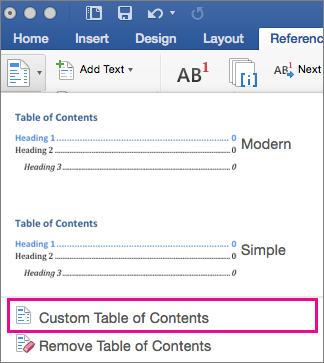
Click References > Table of Contents > Custom Table of Contents.

-
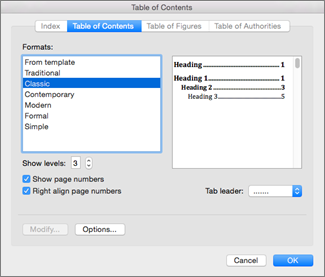
In the Table of Contents dialog box, make your changes. You'll see a preview of the changes in the box on the right.

-
To add lines between entries and page numbers, in the Tab leader list, choose a line style. To remove all lines click (none).
-
To change the overall appearance of your table of contents, in the Formats list, click the format that you want.
-
To change the number of levels displayed in your table of contents, click the up or down arrows next to Show levels.
-
-
Click OK.
Format the text in a table of contents
You can change the way the text looks in each level of a table of contents.
-
Click References > Table of Contents > Custom Table of Contents.

-
In the Table of Contents dialog box, under Formats, click From template.
-
At the bottom of the dialog box, click Modify.
-
In the Style dialog box, in the Styles list, click the level you want to change and then click Modify.
-
In the Modify Style dialog box, make the formatting changes that you want, and then click OK.
-
Repeat steps 4 and 5 for all the levels you want to display in your table of contents.
No comments:
Post a Comment