Delete a list in SharePoint
When a list is no longer needed in SharePoint, you can delete it. You can choose between removing the list just from a single page, or from the site completely. If you delete a list by accident, you can restore it from the recycle bin.
To delete a list, you must have at least Designer permissions for the site. To create a SharePoint list, see Create a list in SharePoint.
Updated January 25, 2017 thanks to customer feedback.
Delete a list completely from SharePoint Online
-
Go to the list you want to delete completely.
-
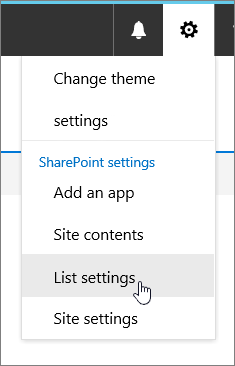
Click Settings
 and then click List settings.
-
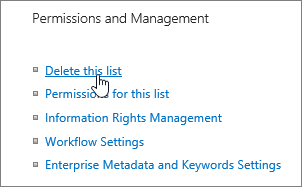
In the Settings page, click Delete this list.
-
In the confirmation dialog, click OK.
Delete a list from a page in SharePoint 2016 or 2013
Note: This procedure does not delete the list from a site. It deletes the list only from the page.
-
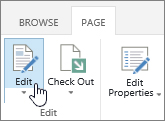
On the page where you want to delete the list, click Page and then click Edit.
-
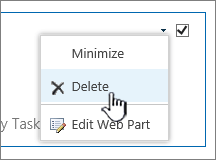
Point to the list you want to delete, click the down arrow, click Delete, and then click OK.
-
When you're finished editing the page, click Save. In some cases, you have the option to Save as Draft or Save and Publish.
Delete a list completely in SharePoint 2016 or 2013
-
Go to the list that you want to delete.
-
Click the List tab and then click List Settings.

-
On the list settings page, click Delete this list, and then click OK.
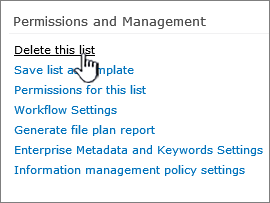
Note: If List Settings are disabled or Delete this list isn't on the list settings page, you may not have the necessary permissions to modify the settings or delete the list, contact your administrator.
Delete a list from a page in SharePoint 2010
Note: This procedure does not delete the list from a site. It deletes the list only from the page.
-
On the page where you want to delete the list, click Page and then click Edit.

-
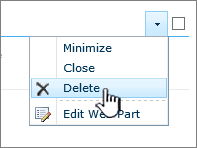
Point to the list you want to delete, click the down arrow, click Delete, and then click OK.
-
When you're finished editing the page, click Save. In some cases, you have the option to Save as Draft or Save and Publish.
Delete a list completely in SharePoint 2010
Use the following procedure to delete a list from a site.
-
Go to the list that you want to delete.
-
Click the List tab and then click List Settings.

-
On the list settings page, click Delete this list, and then click OK.

Note: If List Settings is disabled or Delete this list isn't on the list settings page, you may not have the necessary permissions to modify the settings or delete the list, contact your administrator.
Delete a list in SharePoint 2007
-
If the list is not already open, click its name on the Quick Launch.
If the name of your list does not appear, click View All Site Content, and then click the name of your list.
-
On the Settings menu
 , click List Settings.
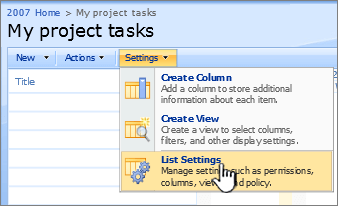
Note: For surveys, on the Settings menu, click Survey Settings. For discussion boards, on the Settings menu, click Discussion Board Settings.
-
Under Permissions and Management, click Delete this list.
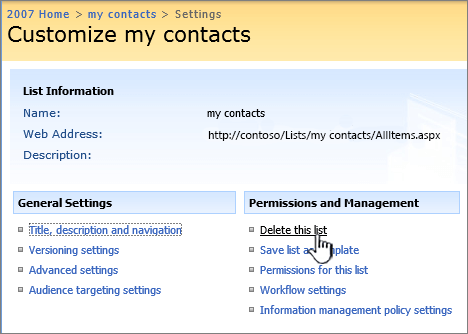
Note: For surveys, click Delete this survey instead. For discussion boards, click Delete this discussion board instead.
-
When you are prompted to confirm the deletion, click OK if you are sure that you want to delete the list.
Tip: Depending on how your site is set up, you may be able to recover a list that you accidentally deleted by using the Recycle Bin.
To find out which version of SharePoint you're using, see
Restore a list item using the Recycle bin
Depending on how you or your admin has set up the site, you can restore the list from the SharePoint Recycle bin for up to 90 days.
For more on the Recycle bin, see Restore items in the Recycle Bin of a SharePoint site.
If you've cleared your SharePoint recycle bin, see how to restore from the Second-Stage recycle bin at Restore deleted items from the site collection recycle bin.
Leave us a comment
Was this article helpful? If so, please let us know at the bottom of this page. If it wasn't helpful, let us know what was confusing or missing. Please include version of SharePoint, OS, and browser you're using. We'll use your feedback to double-check the facts, add info, and update this article.
No comments:
Post a Comment