


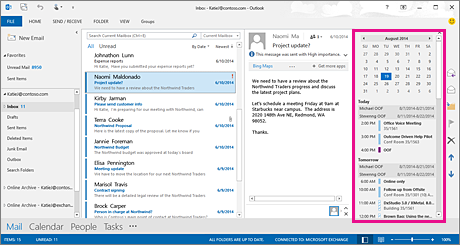
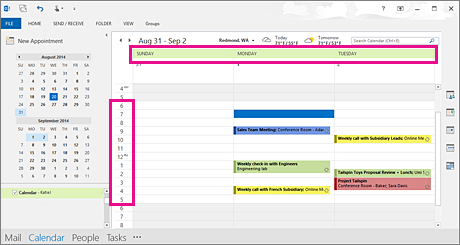
Keep upcoming calendar items visible
Keep your upcoming appointments and meetings in view by opening the Calendar peek on the right side of your Mail.
-
Right-click Calendar on the Navigation Bar, and then click Dock the peek.
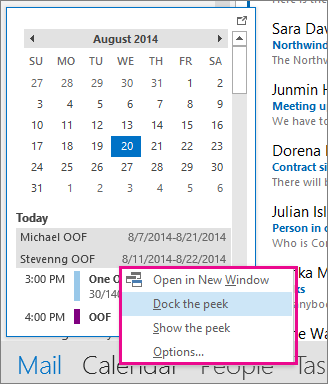
Learn more about keeping your calendar, appointments, and meetings always in view.
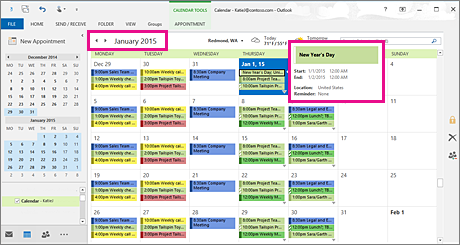
Change to Month view with a Monday start date and show U.S. holidays
View the Calendar by month to see what you are doing at-a-glance. A common way to view the calendar is by setting the work week to start on a Monday, with U.S. holidays.
-
Click Calendar.
-
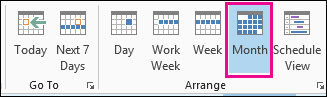
Click Home > Arrange > Month.
-
Click the File tab.
-
Click Options, and then click Calendar.
-
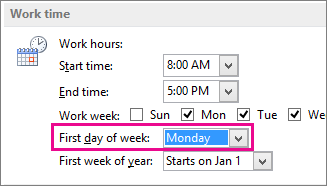
Under Work time, for First day of week, select Monday.
-
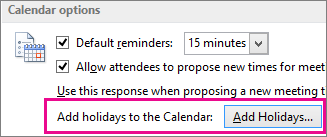
Under Calendar options, for Add holidays to the Calendar, click Add Holidays.
-
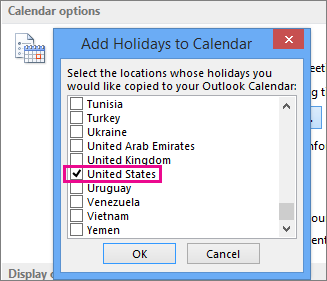
Click United States, and then click OK.
Learn more about adding holidays to your calendar.
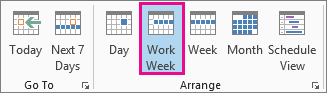
Change Work Week view to Sunday-Tuesday with 12-hr days (non-traditional work week)
If you work a non-traditional work schedule, you can set your Work Week view to only show those working times. For example, if you are a nurse you may only want to view your Sunday – Tuesday, 12-hour shift at the hospital.
-
Click Calendar.
-
Click Home > Arrange > Work Week.
-
Click the File tab.
-
Click Options, and then click Calendar.
-
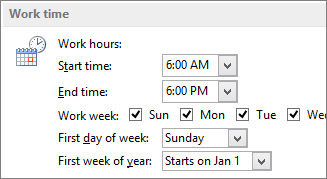
Under Work time, for Start time, select 6:00 AM.
-
Under Work time, for End time, select 6:00 PM.
-
For Work week, select Sun, Mon, and Tue and clear any other selected check boxes.
-
For First day of week, select Sunday.
-
Click OK.
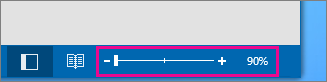
Tip: To view all your hours during a long shift in the Work Week view, use Zoom in the bottom-right corner of the Calendar to make it smaller.
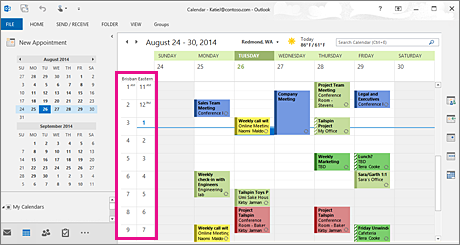
View two time zones in the Week view
When working with partners in different time zones, it's helpful to see both time zones in the Week view. For example, when I schedule meetings from the New York office (Eastern time zone), I want to view my Australian co-worker's schedule (Brisbane time zone) so I don't book her during non-working hours.
-
Click Calendar.
-
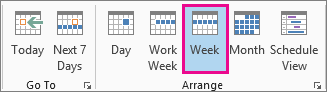
Click Home > Arrange > Week.
-
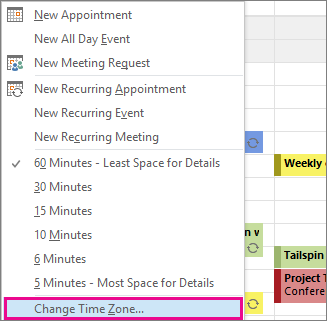
Right-click the empty space at the top of the time bar, and then click Change Time Zone on the shortcut menu.
-
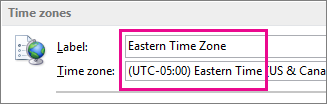
Under Time zones, type Eastern Time Zone in the Label box.
-
In the Time zone list, click (UTC-05:00) Eastern Time (US & Canada).
-
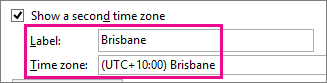
Select Show a second time zone.
-
Type Brisbane in the Label box.
-
In the Time zone list, click (UTC+ 10:00) Brisbane.
-
Click OK.
Learn more about how time-zone normalization works.
Looking for something else?
If you find yourself filtering calendar items or modifying fields, you can easily create a custom view so the information you need is always available.
-
Click View.
-
In the Current View group, click Change View, and then click Manage Views.
-
Click New.
-
In the Name of new view box, type a name for the view.
-
In the Type of view box, select a view type.
-
To change where the view is available, select an option under Can be used on, and then click OK.
-
In the Advanced View Settings: New View dialog box, select the options that you want to use.
-
When you are finished selecting options, click OK.
-
To use the view immediately, click Apply View.
Learn more about changing or customizing a view.
No comments:
Post a Comment