Note: This article has done its job, and will be retiring soon. To prevent "Page not found" woes, we're removing links we know about. If you've created links to this page, please remove them, and together we'll keep the web connected.
Excel 2016 introduced a powerful set of tools called Get & Transform. These tools, based on Power Query technology, enable you to easily connect, combine, and shape data coming from a variety of sources. The following Get & Transform tutorial will guide you through the basics.
We are pleased to announce the next major update to data import and shaping functionality in Excel – the unified Get & Transform experience. With the March, 2017 Microsoft 365 update, we enhanced Excel's data import functionality and rearranged the buttons on the Data tab, so that it's easier than ever to take full advantage of Get & Transform capabilities.

With the unified Get & Transform experience, you benefit from the well-integrated and modern set of data import and shaping capabilities in Excel. You can easily connect and get data from a variety of popular data sources such as files, databases, Azure and Online services, and more. And, you can shape that data in powerful ways by sorting, changing data types, splitting columns, aggregating the data, and so on. The constantly growing offering of new connectors, and easy-to-perform transformations are what make Get & Transform an invaluable and time-saving tool in your day-to-day work.
Please note that the new experience replaces the older, legacy data import wizards, which were available under Data > Get External Data. However, they can still be accessed if you want. See: How do I restore the legacy Get External Data experience?
Note: This feature is only available in Excel if you have a Microsoft 365 subscription. If you are a Microsoft 365 subscriber, make sure you have the latest version of Office.
How do I get data from popular sources like CSV files or the Web?
We know that users who import data like to have the most popular connectors easily accessible for them on the ribbon. In this update, we tried to follow this principle and kept the experience consistent with what you are used to. You can now find the following top three connectors available under the Get & Transform Data section of the Data tab: From Text/CSV, From Web, and From Table/Range.
From Text/CSV
With this connector you can easily import data from your text (*.txt), comma-separated values (*.csv) or formatted text (*.prn) files. This modern connector is based on Power Query technology, and replaces the legacy From Text wizard.
To start importing data with the new connector, click Data > From Text/CSV, choose the source file, and then click OK. The new and enhanced From Text/CSV connector then analyzes the structure of your input file, and automatically applies the relevant import settings. It can split the columns by delimiter, promote the first row to be used as column headers, and more.
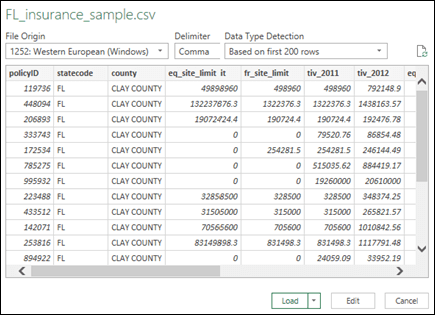
If the preview isn't the way you want, you can configure the basic import settings such as File Origin, Delimiter, or Data Type detection logic right there. Based on your choices, the preview of the data is automatically updated.
You can then click Load to directly load the data into your worksheet, or click the arrow next to Load to load the data into your Data Model. If you want to apply additional data transformations in the Query Editor, click Edit.
From Web
With this connector you can "scrape" data from HTML pages. This is another modern connector that is also based on Power Query technology, and replaces the legacy From Web wizard.
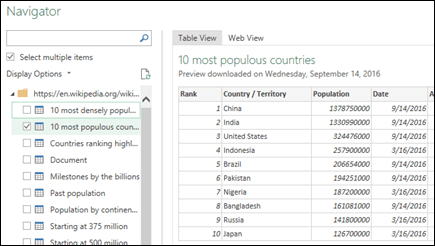
To start using it, click Data > From Web, specify the target page URL, and then click OK. A list of all the tables on the page is shown in the Navigator dialog. You have the option of interacting with the web page in either Table View or Web View. With Table View, first click a table name on the left, and data from that table will display on the right. With Web View you can either click a table from the Navigator list, or from the Web View preview pane. You can select multiple tables in either view.
From Table/Range
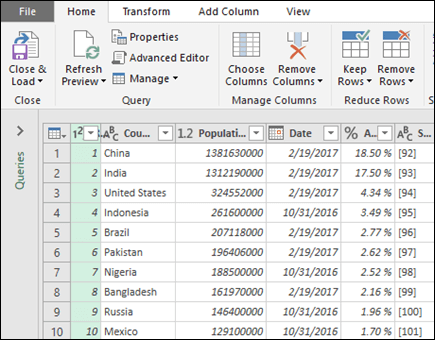
With this connector, you can create a new query that is linked to a table or named range in your Excel worksheet. You can then refine your data, and apply additional transformations to it in the Query Editor window.
How do I get data from additional sources like XML file or Microsoft SQL Server?
You can create a new query to import data from a single data source, such as a Microsoft Access database or OData feed, or you can import data from multiple text files in a folder at once.
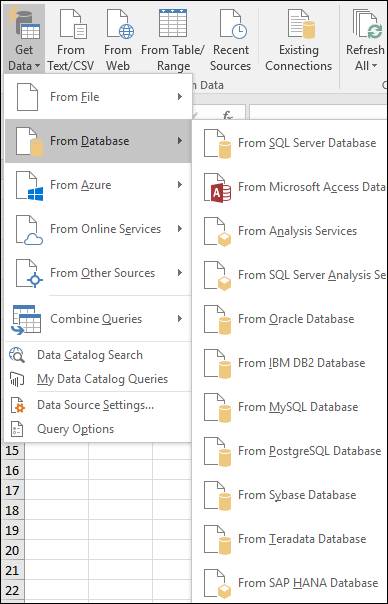
When you click on Data > Get Data, the available data sources are presented to you in a drop-down menu. The source options are organized in categories, including files like Excel workbooks, XML files or the entire folder, databases such as SQL Server or Oracle, Azure services such as HDInsight or Blob Storage, Online services like SharePoint Online List or Salesforce, and a variety of other sources like OData or ODBC.
The list of available connectors is constantly growing.
With this update, we have also removed the following legacy wizards that were previously available under the Get External Data section of the Data tab: From Access, From Web, From Text, From SQL Server, From OData Data Feed, From XML Data Import and From Data Connection Wizard. If for any reason, you require using one of the removed legacy wizards, see: How do I restore the legacy Get External Data experience?
However, there are two popular and quite unique wizards that are part of the old Get External Data feature set and will remain in the new experience: From Analysis Services and From Microsoft Query. They can be found under Data > From Database and Data > From Other Sources categories in the new experience respectively.
How do I leverage Get & Transform capabilities to clean and shape my data?
Get & Transform lets you clean and shape your data as an essential step for robust data analysis. You can remove columns, filter rows, change column data types, replace values and more. This is done through the dedicated Query Editor window that facilitates and displays all your data transformations.
Switch to the Data tab on the ribbon, click Get Data, connect to the desired data source (such as file or database) using one of the available connectors, and preview your data in the Navigator window.
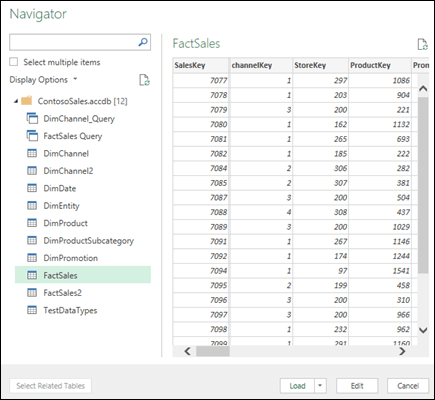
Next, select the tables that you would like to import and click Edit to launch the Query Editor window.
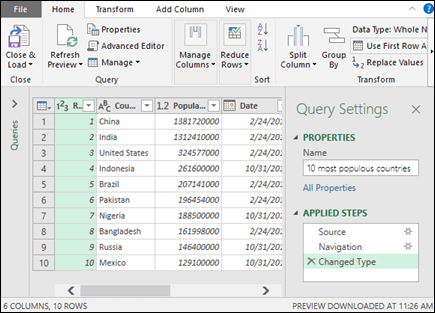
Use the wide collection of commands available from the ribbon inside the Query Editor window. You can apply powerful transformations by sorting and filtering data, converting data types, splitting or merging columns, aggregating your data and more.
All the transformation steps that you apply on your data are recorded and are saved as a part of your query. The recorded transformations can be observed and managed via the APPLIED STEPS section inside the Query Editor window, and will be re-applied to your data every time your query is being refreshed.
How do I get data from recently used sources, Office Database Connection (ODC) files, other workbook connections, or tables?
One of the most popular scenarios in the data import area is connecting and getting data from your recent sources. Users often establish a set of frequently used sources they connect to for importing data.
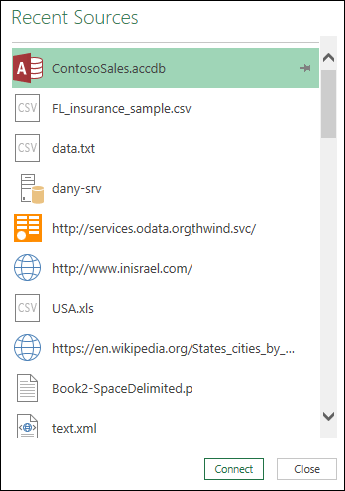
To connect and create a query from one of your recent data sources, click Data > Recent Sources. You can then browse through your recently connected sources, select one, and then click Connect to continue with the import flow.
Another popular scenario is importing data from existing connections or tables in your workbook. For example, you might want to create a new PivotTable based on a previously created workbook connection. Or, you might want to link and import from a data source using an Office Database Connection (ODC) file that was defined by someone within your organization.
With this update, you will be able to export any of your queries' definitions into an ODC file, then share it across your workbooks or with your co-workers. To export a query definition into an ODC file, right-click on a query in the Queries & Connections side pane, and choose Export Connection File. The created ODC file will contain the definition of your query with all dependencies, including the connectivity instructions to the data source, and the transformation steps being applied on your data. Another way to export a query definition is through the Query Properties dialog that can be opened by choosing Properties from the query's context menu.
Once you receive an ODC file, you will be able to consume it, and import the query definition into your workbook. To import data via the ODC mechanism, click Data > Existing Connections. The Existing Connections dialog will appear and you can then import from the available ODC files, existing workbook connections or tables.
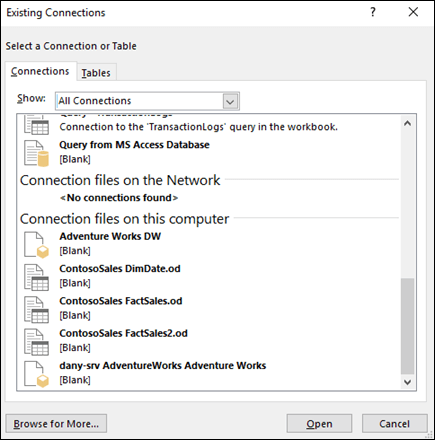
If you need to create an ODC file that will be consumed by another application, like Visio or Excel 2013 and earlier, you can do that using the following connectors: From SQL Server Database, From Microsoft Access Database, From OData Feed, From Analysis Services, From Microsoft Query or the legacy From Data Connection Wizard. It's important to know that when consuming the ODC files from another application, that application will only reuse the connectivity instructions from the ODC, and will not contain any transformation steps that your original query might have contained. If you need to restore the legacy From Access, From SQL Server, From OData Data Feed connectors, see: How do I restore the legacy Get External Data experience?
How do I manage existing workbook queries and connections?
When we introduced Get & Transform into Excel 2016, we introduced two data import methodologies: The first was the new Get & Transform experience which makes use of queries (and also relies on workbook connections behind the scenes for refresh and load to workbook elements). The second was an older, legacy experience which makes use of workbook connections. Managing workbook queries and connections was also done separately. Workbook queries were managed through the dedicated Queries pane, while connections were managed through the Workbook Connections dialog. This caused confusion among our users.
With this update, we addressed this issue. You can now access and manage your workbook queries and connection from the dedicated Queries & Connection side pane. To open the side pane, click the Data > Queries & Connections button.

Clicking on the Queries tab at the top of the pane allows you to browse and manage the available queries in your workbook. Right-click on a query to access the query's context menu, which allows you to perform additional actions. For example, you can refresh query data from the underlying source, copy/paste the query, edit query transformations with Query Editor, and more.
We have also simplified the management of the query and its underlying connection through the new Query Properties dialog. Today, whenever you create a new query in the workbook, a new underlying connection entity is automatically created behind the scenes, and is associated with this query. While the query's role is to connect to the data source and apply the required data transformations on top of it, the underlying connection controls where the data is being loaded (e.g., worksheet or Data Model), as well as the refresh settings for query data, like the refresh frequency. With the new Query Properties dialog, you can easily control all the query properties, such as its name or transformation instructions, and the underlying connection properties, such as refresh settings, in a centralized way. To open the new Query Properties dialog, click on the Properties command from the query's context menu on the Queries & Connection side pane.
Clicking on the Connections tab at the top of the side pane allows you to browse and manage the available legacy connections in your workbook that are associated with one of the legacy wizards such as From Text, From Analysis Services, or From Microsoft Query. Right-click a connection to access the context menu. There you'll be able to perform additional actions, such as refresh connection data from source, delete connection, or manage connection properties through the well familiar Connection Properties dialog.
How do I restore the legacy Get External Data experience?
The new Get & Transform experience is superior in terms of connectors offering and transformation capabilities compared to legacy wizards. However, there are still times when you may want to use one of the old wizards to import your data. For example, when you want to save the data source login credentials as part of your workbook. (Please note that this method does not comply with the modern security standards, and as such is not supported in the new Get & Transform experience).
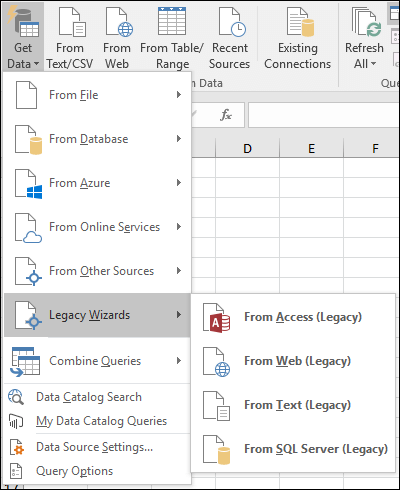
You can access the legacy connectors by customizing the ribbon, or you can bring back and show your legacy data import wizards directly under the Data > Get Data drop-down menu via the new and easy configuration settings from the Excel Options dialog.
Go to File > Options > Data > Show legacy data import wizards, and select the legacy wizards you want to use:

Open the Data > Get Data drop-down menu and launch one of the previously selected legacy data import wizards from the dedicated Legacy Wizards category:
Additional information about Get & Transform
If you want to learn more about the Get & Transform capabilities, a good place to start is the Microsoft Power Query for Excel Help.
Need more help?
You can always ask an expert in the Excel Tech Community or get support in the Answers community.
Microsoft Office Tutorials: Unified Get Transform Experience >>>>> Download Now
ReplyDelete>>>>> Download Full
Microsoft Office Tutorials: Unified Get Transform Experience >>>>> Download LINK
>>>>> Download Now
Microsoft Office Tutorials: Unified Get Transform Experience >>>>> Download Full
>>>>> Download LINK f3