Change margins
In Word, you can customize or choose predefined margin settings. Word automatically sets a one-inch page margin around each page. You also can set margins for facing pages, allow extra margin space to allow for document binding, and change how margins are measured.

-
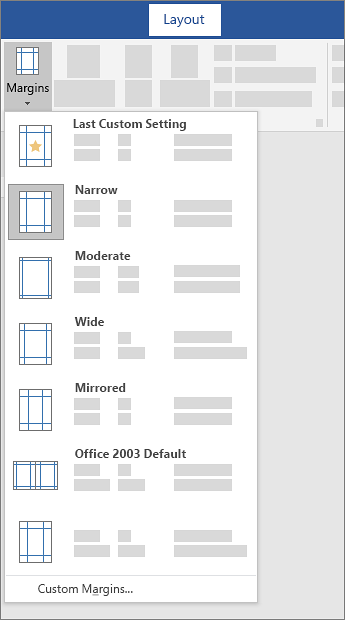
Select Layout > Margins.
-
Select the margin configuration you want.
-
If you don't see the configuration you want, select Custom Margins to define your own margins.
What would you like to do?
Watch a video
Choose page margins using predefined settings
-
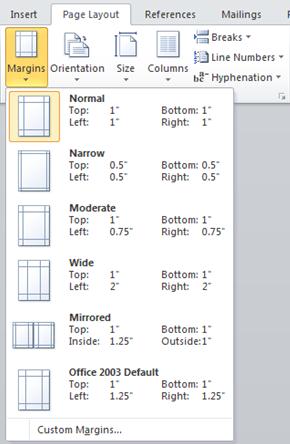
On the Page Layout tab, in the Page Setup group, choose Margins and the Margins gallery appears.
-
Choose the margin type that you want to apply.
Note: If your document contains multiple sections, the new margin type will be applied only to the current section. If your document contains multiple sections and you have multiple sections selected, the new margin type will be applied to each section you have selected.
You easily can change the default margins. And after you do, the new default settings are saved in the template on which the document is based. Thereafter, each new document based on that template will automatically use the new margin settings.
-
Choose Margins after you select a new margin, and then choose Custom Margins.
-
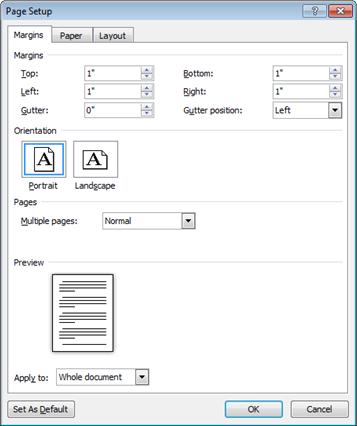
In the Page Setup dialog box, choose Set As Default.
Create custom page margin settings
-
On the Page Layout tab, in the Page Setup group, choose Margins and the Margins gallery appears.
-
At the bottom of the Margins gallery, choose Custom Margins.
-
In the Page Setup dialog box, enter new values for the margins.
More tips about margins
-
To change the default margins, click Margins after you select a new margin, and then click Custom Margins. In the Page Setup dialog box, click Set As Default. The new default settings are saved in the template on which the document is based. Each new document based on that template automatically uses the new margin settings.
-
To change the margins for part of a document, select the text, and then set the margins that you want by entering the new margins in the Page Setup dialog box. In the Apply to box, click Selected text. Microsoft Word automatically inserts section breaks before and after the text that has the new margin settings. If your document is already divided into sections, you can click in a section or select multiple sections and then change the margins.
-
Most printers require a minimum width for margin settings, because they can't print all the way to the edge of the page. If you try to set margins that are too narrow, Microsoft Word displays the message One or more margins are set outside the printable area of the page.
To prevent text from being cut off, click Fix to automatically increase the margin width. If you ignore the message and try to print the document as it is, Word displays another message asking whether you want to continue.
The minimum margin settings depend on your printer, printer driver, and paper size. To learn about the minimum margin settings, check your printer manual.
Set margins for facing pages
Use mirror margins to set up facing pages for double-sided documents, such as books or magazines. When you choose mirror margins, the margins of the left page are a mirror image of those on the right page. That is, the inside margins are the same width, and the outside margins are the same width.
-
On the Page Layout tab, in the Page Setup group, click Margins >Mirrored.
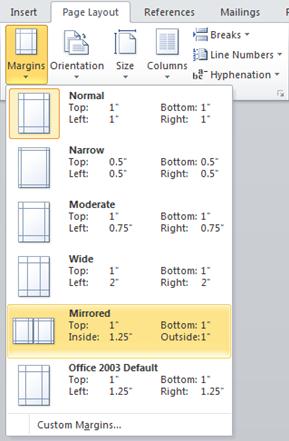
Note: To change margin widths, click Custom Margins at the bottom of the Margins gallery. Enter new values in the Inside and Outside boxes.
Add a gutter margin for bound documents
A gutter margin adds extra space to the side margin, top margin, or inside margins of a document that you plan to bind. A gutter margin helps ensure that text isn't obscured by the binding.
1. Gutter margins for binding
2. Mirror margins for facing pages
To set the gutter margin
-
On the Page Layout tab, in the Page Setup group, click Margins.
-
Click Custom Margins.
-
In the Gutter box, enter a width for the gutter margin.
-
In the Gutter position box, click Left or Top.
Note: The Gutter position box is not available when you use the Mirror margins, 2 pages per sheet, or Book fold option. For those options, the gutter position is determined automatically.
View page margins
Word can display lines in your document to represent text boundaries.
-
On the File tab, click Options.
-
Click Advanced, and then select the Show text boundaries check box under Show document content.
The page margins appear in your document as dotted lines.
Note: You can view page margins in either Print Layout view or Web Layout view, and the text boundaries don't appear on the printed page.
What would you like to do?
Explore page margin options
Microsoft Word offers several page margin options. You can use the default page margins or you can specify your own.
-
Add margins for binding Use a gutter margin to add extra space to the side or top margin of a document that you plan to bind. A gutter margin helps ensure that text isn't obscured by the binding.
1. Gutter margins for binding
2. Mirror margins for facing pages
-
Set margins for facing pages Use mirror margins to set up facing pages for double-sided documents, such as books or magazines. In this case, the margins of the left page are a mirror image of those of the right page (that is, the inside margins are the same width, and the outside margins are the same width).
Note: You can set gutter margins for a document that has mirror margins if the document needs extra space for binding.
-
Add a book fold Using the Book fold option in the Page Setup dialog box, you can create a booklet. You can use the same option to create a menu, invitation, event program, or any other type of document that uses a single center fold.

1. Word inserts a single, center book fold
After you set up a document as a booklet, you work with it just as you would any document, inserting text, graphics, and other visual elements.
-
Most printers require a minimum width for margin settings, because they can't print all the way to the edge of the page. If you try to set margins that are too narrow, Microsoft Word displays the message One or more margins are set outside the printable area of the page.
To prevent text from being cut off, click Fix to automatically increase the margin width. If you ignore the message and try to print the document as it is, Word displays another message asking whether you want to continue.
-
The minimum margin settings depend on your printer, printer driver, and paper size. To learn about the minimum margin settings, check your printer manual.
Change or set page margins
-
On the Page Layout tab, in the Page Setup group, click Margins.

-
Click the margin type that you want. For the most common margin width, click Normal.
Note: When you click the margin type that you want, your entire document automatically changes to the margin type that you have selected.
-
You can also specify your own margin settings. Click Margins, click Custom Margins, and then in the Top, Bottom, Left, and Right boxes, enter new values for the margins.
-
To change the default margins, click Margins after you select a new margin, and then click Custom Margins. In the Page Setup dialog box, click the Default button, and then click Yes. The new default settings are saved in the template on which the document is based. Each new document based on that template automatically uses the new margin settings.
-
To restore the original margin settings, click Margins and then click Custom Margins. Change the margins for Top, Bottom, Left, and Right to 1". Then click the Default button and click Yes.
-
To change the margins for part of a document, select the text, and then set the margins that you want by entering the new margins in the Page Setup dialog box. In the Apply to box, click Selected text. Microsoft Word automatically inserts section breaks before and after the text that has the new margin settings. If your document is already divided into sections, you can click in a section or select multiple sections and then change the margins.
View page margins
-
Click the Microsoft Office Button
 , and then click Word Options.
 -
Click Advanced, and then click the Show text boundaries check box under Show document content.
The page margins appear in your document as dotted lines.
Note: You can view page margins in either Print Layout view or Web Layout view, and the text boundaries do not appear on the printed page.
Set margins for facing pages
When you choose mirror margins, the margins of the left page are a mirror image of those on the right page. That is, the inside margins are the same width, and the outside margins are the same width.
-
On the Page Layout tab, in the Page Setup group, click Margins >Mirrored.
-
Click Margins > Custom Margins, and in the Inside and Outside boxes, enter the widths that you want.
Set gutter margins for bound documents
A gutter margin setting adds extra space to the side margin or top margin of a document that you plan to bind. A gutter margin helps ensure that text isn't obscured by the binding.
-
On the Page Layout tab, in the Page Setup group, click Margins >Custom Margins.
-
In the Multiple pages list, click Normal.
-
In the Gutter box, enter a width for the gutter margin.
-
In the Gutter position box, click Left or Top.
Note: The Gutter position box is not available when you use the Mirror margins, 2 pages per sheet, or Book fold option. For those options, the gutter position is determined automatically.
Set margins for a text box
-
Click on the text box you created to highlight it.
-
Click on the Format tab in the ribbon.
-
Click the small button in the lower left of the Size group.
-
In the Format Text Box window, click the Text Box tab.
-
In the Internal margin section, you can customize the margins to your desired size.
-
Click OK.
If this article did not answer your question, you can chat with a Microsoft virtual agent or a person at any time
Microsoft Office Tutorials: Change Margins >>>>> Download Now
ReplyDelete>>>>> Download Full
Microsoft Office Tutorials: Change Margins >>>>> Download LINK
>>>>> Download Now
Microsoft Office Tutorials: Change Margins >>>>> Download Full
>>>>> Download LINK Nd