Change the timescale in a Project view
Most views in Project have a timescale that shows, well, time. You can adjust the timescale to show smaller or greater time units, from hours all the way up to years. For example, you may want to show time in fiscal, not calendar years, or you may want to show Gantt bars across months, not days.
Change the units shown on the timescale
-
Display a view with a timescale, such as the Gantt Chart.
-
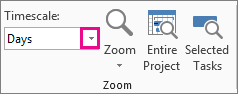
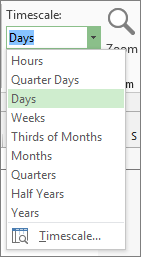
Click View > Timescale box arrow.
-
Pick the time units you want to show on the bottom tier of the timescale. Project automatically adjusts the top and middle tier.
Customize the timescale
You can show up to three timescale tiers in each timescale view, and format each tier individually. Here's how:
-
Display a view with a timescale, such as the Gantt Chart.
-
Click View > Timescale box arrow.
-
Click Timescale.

-
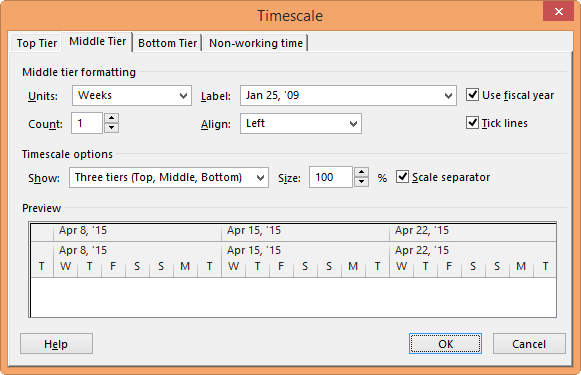
In the Timescale box, pick the options you want, and view any changes you make in the Preview box.
-
In the Show list, pick the number of tiers you want the timescale to show.
-
In the Units box, pick the time unit for the timescale tier of the selected tab in the Timescale box.
-
In the Label list, pick the label format for the selected time units.
-
In the Count box, specify a number to indicate the frequency of unit labels on the timescale tier.
For example, if the unit is weeks, and you enter 2, the timescale tier will show 2-week segments.
-
In the Align list, pick Left, Center, or Right to align the label.
-
Check or uncheck the Tick Lines box to show or hide vertical lines between unit labels.
-
Check or uncheck the Use fiscal year box to base the timescale on fiscal or calendar years.
-
In the Size box, enter a percentage to reduce or enlarge the spacing between units on the timescale tier.
-
Check or uncheck the Scale separator box to show or hide horizontal lines between timescale tiers.
-
Quick ways to zoom the timescale
| Try this | Where is it? |
| Zoom Slider | The zoom slider appears near the bottom of the Project window. |
| Keyboard shortcut | Press CTRL + / (slash on the numeric keypad) to show smaller time units, and CTRL + * (asterisk on the numeric keypad) to show larger time units. |

These instructions are specific to Microsoft Project 2007.
Change the timescale in any timephased view
-
On the View menu, select a view that uses a timescale, such as the Gantt Chart, Task Usage, or Resource Graph view.
-
On the Format menu, click Timescale, and then click the Top Tier, Middle Tier, or Bottom Tier tab.
-
In the Show list, select the number of tiers that you want to display in the timescale. By default, two tiers are displayed.
-
On the tab for the displayed timescale tier, in the Units box, select the time unit that you want to use. The types of units range from years to minutes.
-
In the Label list, select the label format that you want to use to display the time unit.
-
In the Count box, type or select a number to specify the frequency of unit labels on the timescale tier.
For example, if the unit is weeks, and you type 2, then the timescale tier is separated into 2-week segments.
-
In the Align list, select Left, Center, or Right to align the the label.
-
To display or hide vertical lines between unit labels, select or clear the Tick lines check box.
-
To base the timescale tier labels on your fiscal-year settings, select the Use fiscal year check box, or clear the check box to base your timescale tier labels on the calendar year.
-
To display a horizontal line between the timescale tiers, select the Scale separator check box.
-
To condense or spread out the columns of the timescale tier, type or select the percentage you want in the Size box.
-
To focus on a specific time period or group of tasks, or to view the entire duration of your project, click Zoom on the View menu, and then select a view option.
-
To quickly magnify or shrink a view, click Zoom In
 or Zoom Out
  . You can also press CTRL + / (slash on the numeric keypad) to show smaller time units, and CTRL + * (asterisk on the numeric keypad) to show larger time units.
 -
To quickly display a selected task in the timephased portion of a view, click Go To Selected Task
 .
.
Change the timescale in the Calendar view
-
On the View menu, click Calendar.
-
On the Format menu, click Timescale, and then click the Week Headings tab.
-
In the Monthly titles, Daily titles, and Weekly titles boxes, click the date formats that you want to use for the Calendar view.
-
Under Display, click 7 days to display a 7-day week or click 5 days to display a 5-day week.
-
To add miniature calendars for the next and previous months, select the Display month pane check box.
-
To show the beginning and end dates for the range of time you have chosen to view, select the Display monthly titles beginning and end dates.
-
Click the Date Boxes tab.
-
Under Top row and Bottom row, select the information that you want to display in the left and right portions of each row, and then select the patterns and colors you want.
-
To change the appearance of working and nonworking days, click Timescale on the Format menu, click the Date Shading tab, and then click the name of the calendar that you want to change in the Show working time for box. In the Exception type list, click the type of date box you want to change, and then select a pattern and color.
-
To change the column width, drag any vertical line between two date boxes to the left to decrease column width or to the right to increase column width. To fit the displayed columns exactly to the width of the calendar area, double-click any vertical line between two date boxes.
Microsoft Office Tutorials: Change The Timescale In A Project View >>>>> Download Now
ReplyDelete>>>>> Download Full
Microsoft Office Tutorials: Change The Timescale In A Project View >>>>> Download LINK
>>>>> Download Now
Microsoft Office Tutorials: Change The Timescale In A Project View >>>>> Download Full
>>>>> Download LINK 4o