Create and manage custom categories and groups in the Navigation Pane
To use and manage your database objects in Access, you use the Navigation Pane. You can create custom categories and groups in the Navigation Pane, so you can organize your database objects the way that you want. You can, for example, provide shortcuts to only the objects that users need to see, making it easier for them to stay on-task. This topic explains how to create and manage custom categories and groups in the Navigation Pane.
In this article
Create custom categories and groups
When you create a custom category, you create it for the database that you have open, and it travels with that database. You cannot transfer custom categories and groups to other databases.
You use the Navigation Options dialog box to create and manage custom categories and groups. The process follows these broad steps:
-
You first create a custom category. Access provides one for you: Custom. You can rename that category and add or remove groups to suit your needs, or you can create a new category at any time.
-
After you create a category, you create one or more groups for the new category.
-
You close the Navigation Options dialog box, and in the Navigation Pane, you drag or copy and paste the database objects that you want to assign to your custom group. You drag or copy the objects from a special group called Unassigned Objects, which Access creates for you whenever you create a custom category.
Note: When you add a database object from the Unassigned Objects group to your custom group, Access creates a shortcut to that object — you are not moving or copying the object itself. If you rename or delete a shortcut in a custom group, those changes do not affect the actual object, only the shortcut to it.
-
After you populate your custom group or groups, you can hide the Unassigned Objects group and any other groups that you don't want to display.
Create a custom category
-
Right-click the menu at the top of the Navigation Pane and then click Navigation Options.
-
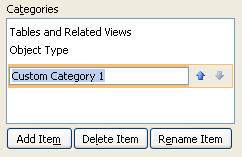
In the Navigation Options dialog box, under the Categories list, click Add Item. A new category appears in the list. This figure illustrates a new custom category:
-
Type a name for the new category and then press ENTER.
Try to create a name that makes sense to the people who use your database. After you create the name, notice that the caption for the list on the right changes to match that name. For example, if you name the new category My Switchboard, the caption in the list on the right reads Groups for "My Switchboard". Also, notice that the list contains a group called Unassigned Objects. Access creates that group by default. This group contains all of the objects in your database, and you use those objects to populate your custom group.
After you create your custom category, you create one or more groups for that category. You can create as many groups as you need. Keep the Navigation Options dialog box open and follow the next steps.
Create a custom group
-
Under the Groups for "Group Name" list, click Add Group, and then type a name for the group. You can repeat this process as often as you need to do. For example, My Switchboard can contain three groups — Data Entry Forms, Reports, and Queries. The needs of your users, or your own preferences, should control the groups that you add at this stage.
-
Leave the check box next to Unassigned Objects selected, and then click OK. Access closes the Navigation Options dialog box and adds your new custom group to the Navigation Pane, but you cannot yet see the new group.
-
Go to the next set of steps to make the new group visible and to add objects to the group.
Add objects to a custom group
-
Click the menu at the top of the Navigation Pane, and in the upper section of the menu, click your new category. The group or groups that you created for your category appear in the lower section of the menu, along with the Unassigned Objects group.
-
In the Unassigned Objects group, select the items that you want to use in your custom group, and then move them to that group. Access provides several ways to move the selected items. You can:
-
Drag the items individually.
-
Hold down CTRL, click multiple items, and then drag the items to your custom group.
-
Right-click one of the selected items, point to Add to group, and then click the name of your custom group.
-
When you finish, you can leave the Unassigned Objects group visible in the Navigation Pane, or you can hide it.
Hide the Unassigned Objects group
-
Right-click the menu at the top of the Navigation Pane and click Navigation Options.
-
In the Groups for category pane, clear the Unassigned Objects check box.
After you create a custom category and group, and you add some shortcuts to that group, you can use those shortcuts to create additional groups. The following steps explain how.
Create a new custom group by using an object in an existing custom group
Note: To use this technique, you must first create a custom category and group by following the steps in the previous sections.
-
With a custom category and group open in the Navigation Pane, right-click an object that you want to place in a new group.
-
Point to Add to group, and then click New Group.
A new group appears in the Navigation Pane.

Enter a name for the new group, and then drag additional shortcuts to the new group as needed.
Show or hide the groups and objects in a category
You can hide some or all of the groups in a custom category and some or all of the objects in a group. Remember these facts as you proceed:
-
Access provides two ways to hide an object. You can use commands that are provided by the Navigation Pane to hide an object from its parent group and category, or you can choose a property for each object and hide it from all the groups and categories in the open database.
-
You can make hidden objects and groups completely invisible, or you can display them in the Navigation Pane as dimmed, unavailable icons. You make that choice by selecting or clearing the Show Hidden Objects check box in the Navigation Options dialog box. You also use that check box when you need to unhide, or restore, a group or an object.
The steps in the following sections explain how to perform each task.
Hide a group in a category
-
In the Navigation Pane, right-click the title bar of the group that you want to hide, and then click Hide.
Note: You can also perform this task by using the Navigation Options dialog box. Open the dialog box (see the steps in the next section if you don't know how), and in the Groups for "category" list, clear the check box next to the group that you want to hide.
Restore a hidden group to a category
-
Right-click the menu bar at the top of the Navigation Pane and then click Navigation Options on the shortcut menu.
-
In the Categories list, select the category that contains the hidden group.
-
In the Groups for "category" list, select the check box next to the hidden group.
-
Click OK.
Hide an object in its parent group
-
In the Navigation Pane, right-click the object and then click Hide.
Hide an object from all categories and groups
-
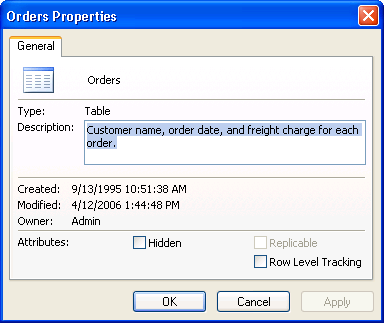
Right-click the object that you want to hide, and then click Object Properties.
The Properties dialog box appears, and Access appends the name of the object to the dialog box title. For example, if you open a form called Orders, the dialog box title displays Orders Properties. The following figure shows the dialog box.
-
Select the Hidden check box.
-
Click OK.
Restore (unhide) a hidden object
-
Right-click the menu at the top of the Navigation Pane and click Navigation Options on the shortcut menu.
-
Under Display Options, select the Show Hidden Objects check box.
-
Click OK and return to the Navigation Pane. The pane shows a dimmed icon for all hidden objects.
-
Do one of the following:
-
If you hid the object only from its parent group and category, right-click the object and then click Unhide.
-
If you hid the object from all categories and groups by setting the Hidden property, right-click the object, click View Properties, and then clear the Hidden check box.
-
Remove and restore objects in custom groups
Your custom groups may change over time, as user and business demands change. You can add or remove the objects in a group at any time. The following procedures explain how.
Delete objects from a custom group
-
In the Navigation Pane, right-click the object that you want to remove, and then click Delete.
Restore an object to a custom group
-
If the Unassigned Objects group is hidden, display it.
How do I display the Unassigned Objects group?
-
Right-click the menu at the top of the Navigation Pane and click Navigation Options on the shortcut menu.
-
In the Groups for "category" pane, select the check box next to Unassigned Objects.
-
-
As needed, drag or copy and paste the object that you want from the Unassigned Objects group to your custom group.
Rename an object in a custom group
-
In the Navigation Pane, right-click the object that you want to rename, and then click Rename Shortcut.
-
Type the new name for the shortcut and then press ENTER.
No comments:
Post a Comment