Change the language Office uses in its menus and proofing tools
In today's global, and multicultural, economy we often find users who want to work in other languages. In this article we'll show you how to get Microsoft Word, PowerPoint, or other Office apps to work in the language, or languages, that you want to work in.
There are three basic areas in Microsoft Office where you may want to change the language.
-
Editing is the language in which you type and edit your content. Primarily this controls the language that your keyboard is set up for.
-
Proofing tools do the spelling and grammar check. Typically you'll set this language to be the same as the editing language.
-
User Interface or "UI" which is all of the buttons, menus and controls in Office. This is sometimes known as the "display language".
You can set both user interface and editing language to be the same thing, or you can set them to be different things if you prefer. Maybe you want your buttons and controls to be in French but you need to type documents in German, for example.
Note: If you want to completely change Office, permanently, to a different language you'll get the best results if you first set that to be your default display language in Windows as well. For more information on doing that see this article for Windows 10 or this article for Windows 7 or 8.
In Office 2016, Office 2013, and Office 2010, the language options are in the Set the Office Language Preferences dialog box. The display and help languages can be set independently. For example, you could have everything match the language of your operating system, or you could use a combination of languages for your operating system, editing, display, and Help.
Editing and Proofing
-
Within any Office application, select File > Options > Language.
-
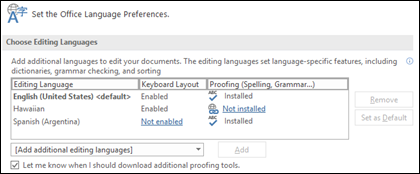
If your language already appears among the editing languages click Set as Default. Otherwise select the language from the Add additional editing languages list then click the Add button. The new language will appear in the list of editing languages.
If the Keyboard Layout shows as Enabled you're all set for editing. If it says Not enabled in the Keyboard Layout column follow these steps to enable it:
-
Click the Not enabled link.
-
In the Add Languages dialog box, click Add a language, select your language in the list, and then click Add.
-
Close the Add Languages dialog box. Your language should display as Enabled under Keyboard Layout in the Choose Editing Languages section.
Under Proofing, if your language shows as Installed you're ready to go. Otherwise click Not installed and Office will take you to a page where you can download the necessary Language Accessory Pack for that language. Follow the instructions on that page to download and install the pack, then come back to the Office Language Preferences dialog box to confirm that it's now installed.
Note: If you're using Office in the Microsoft Store, clicking Not installed will take you to Windows Language Settings where you can select your desired language and it will be downloaded, if necessary, automatically.
Display and Help Languages
Within any Office application, select File > Options > Language.
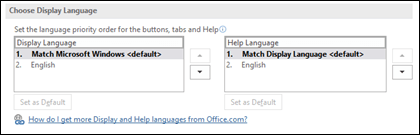
If you've already set your Microsoft Windows display language to be the language you want Office to display in you can leave this set to Match Microsoft Windows. Otherwise select your language and click Set as Default to move that language to the top of the list. The language that is listed first is the one Office will use for its menus and buttons.
Note: If you're using Office in the Microsoft Store and you want to change your default display language go to the Region and Language settings in Windows 10. Click the language you want to set as the default, and choose Set as default.
Repeat to configure your help language if you want to.
If the language you want isn't available...
Download the proper Language Accessory Pack for the language you want to use from this page: Language Accessory Packs for Office. The Language Accessory Pack contains the display and proofing tools for most languages, but you can still choose to have your display in one language and editing in another.
Microsoft Office for Mac already contains all of the available languages, so there's nothing to download. To configure Office to use those languages follow these steps:

User Interface - The display language for Office for Mac follows the language that your operating system is set to.
You can configure this on OS X by going to the Apple menu, choosing System Preferences > Language & Region and setting the desired language to be your primary language by dragging it to the top of the Preferred languages list.
If the language you want doesn't appear just click the + sign and add it.
You'll probably have to restart your Office application in order for ths change to take effect.
Editing - To change your editing language for this file in Office for Mac go to Tools > Language, select your language, and click OK.
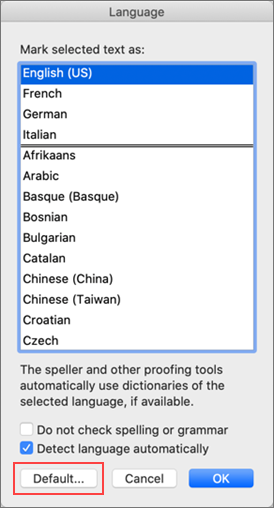
To make it the default for all new documents click Default.
User Interface & Editing - The display and keyboard languages for Office for Android is the same as the language that the device is set to. You can configure those by going to Settings > Language and Input.
Proofing - On Android you can change the proofing language in Word.
In Word on your Android phone, tap the Edit icon  at the top of your screen, and then tap Proofing and Language under Review.
In Word on your Android tablet go to the Review tab and you can select your proofing language from the ribbon.
User Interface & Editing - The display and keyboard languages for Office for iOS are the same as the language that the device is set to. See Change the language on your iPhone or iPad for instructions.
Proofing - On iOS you can change the proofing language in Word.
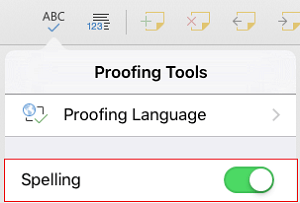
In Word on your iPhone, tap the Edit icon  , tap Home > Review > Proofing tools, and then tap Proofing Language.
In your document, on the Review tab, tap the Spell Check icon  , and then tap Proofing Language.
User Interface & Editing - The display and keyboard languages for Office for Windows Mobile are the same as the language that Windows is set to.
Proofing - On Windows Mobile you can change the proofing language in Word.
In your document, on the Review tab, you can select the proofing language from the ribbon.
User Interface - The best way to set the display language in Office Online is to set the language in the host where your documents live. That's usually OneDrive, SharePoint, Dropbox, etc. When you open a document from one of those sites, Office Online will use the display language you have that service set to.
-
Change views on OneDrive (Scroll to the bottom for language settings)
-
Set your language in SharePoint. If you're using SharePoint, and want a language other than your system language, you'll want to be sure to select a SharePoint language.
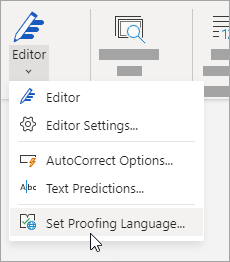
To set the proofing tools language in your app go to Review > Spelling & Grammar > Set Proofing Language.
This change will only affect the current document.
See Also
Check spelling and grammar in a different language
What languages are supported in Office?
Translate words and documents to another language
No comments:
Post a Comment