Add a logo, company name, or header or footer text to handouts
In Handout Master view, you can add elements to the page layout for the printed handouts of your presentation such as your company logo or name.
Add a logo, company name, or header or footer text to handouts
To add header or footer text:
-
To get started, click View > Handout Master.

The changes you make in Handout Master view appear on all your handout pages.
-
On the Handout Master tab, click the header or footer box you want to edit and enter your text.
To add an image:
-
Open the Handout Master tab, click the Insert menu, and then click Picture > Picture from File.
-
Browse to the image you want and click Insert.
-
Drag the image to the location you want and resize it if necessary. For additional formatting options, click the Picture Format tab.
To preview your handouts:
-
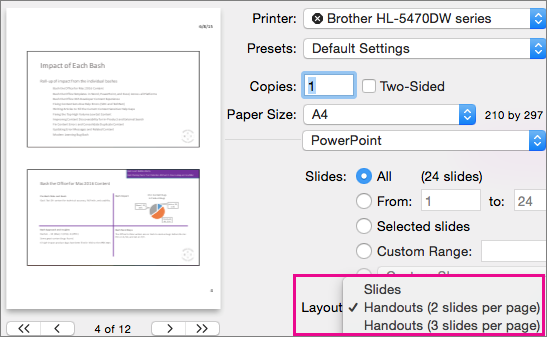
Click File > Print.
-
In the Layout pop-up menu, click the layout type.
-
Page through the Print dialog box thumbnails, and click Cancel when you're done.
If you want to add footers to your presentation, rather than to printed handouts, see Add page numbers, the date and time, or footer text to all slides in PowerPoint for Mac
See Also
Print your slides and handouts
Add the date and time, footer text, or page numbers to all slides
Add a logo to the printed handout
You can add a picture file to the page layout so that a logo appears on every page of the printed handouts for your presentation.
Important: The following procedure only works for handouts that have multiple slides per page. If your slides have notes that you want to include in the handout, complete this procedure in Notes Master view instead of Handout Master view.
-
On the View menu, point to Master, and then click Handout Master.
-
On the Home tab, under Insert, click Picture, and then click Picture from File.
-
Locate the picture file of your company logo, and then click Insert.
-
Do any of the following:
To
Do this
Resize the logo to fit on the page layout
Select the picture, and then drag a sizing handle until the picture is the size that you want. To maintain the picture's proportions while resizing it by using the sizing handles, click the object, hold down SHIFT, and then drag a corner sizing handle.
Move the logo on the page layout
Click and then drag the picture on the page until it is located where you want.
Apply a picture style to the logo
Select the picture, and then click the Format Picture tab. Under Picture Styles, click the picture style you want.
-
When you complete the changes in handout master view, on the message bar click Close Master to return to normal view.
Add a header or footer to the printed handout
In a header or footer, you can include your company name or a legal disclaimer that conveys the copyright or confidentiality of your presentation.
-
On the View menu, point to Master, and then click Handout Master.
-
On the Home tab, under Insert, click Text, and then click Header and Footer.
-
Do any of the following:
To
Do this
Add a header
On the Notes and Handouts tab, select Header, and then type the text you want.
Add a footer
On the Notes and Handouts tab, select Footer, and then type the text you want.
-
Click Apply to All.
-
When you complete the changes in handout master view, on the message bar click Close Master to return to normal view.
See Also
Print your slides and handouts
Add the date and time, footer text, or page numbers to all slides
No comments:
Post a Comment