Insert and play a video file from your PC or OneDrive
In PowerPoint 2010 and later, you can insert an embedded video (the default behavior) or link to a video file stored on your PC.
-
Inserting an embedded video is convenient, but it increases the size of your presentation.
-
A linked video keeps your presentation file smaller, but links can break. We recommend storing presentations and linked videos in the same folder.
Supported video formats
In PowerPoint 2016 and newer versions, we recommend that you use .mp4 files encoded with H.264 video (a.k.a. MPEG-4 AVC) and AAC audio.
For more details, see Video and audio file formats supported in PowerPoint.
Embed a video stored on your PC
-
In Normal view, click the slide that you want the video to be in.
-
On the Insert tab, click the arrow under Video, and then click Video on My PC.
-
In the Insert Video box, click the video that you want, and then click Insert.
Link to a video stored on your PC
To help prevent broken links, we recommend copying the video into the same folder as your presentation, and then linking to it there.
-
In Normal view, click the slide where you want the link to the video to be in.
-
On the Insert tab, click the arrow under Video, and then click Video on my PC.
-
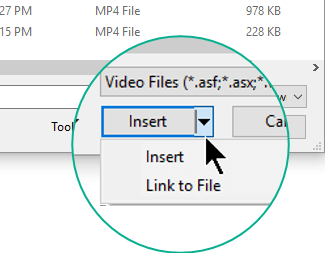
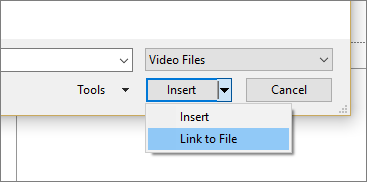
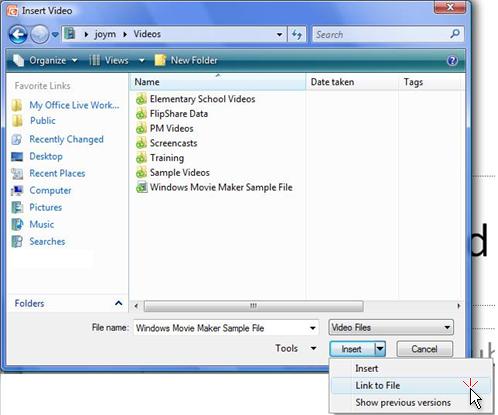
In the Insert Video box, click the file that you want to link to, click the down arrow next to the Insert button, and then click Link to File.
PowerPoint 2016 and newer versions support the playback of video with multiple audio tracks. They also support closed captions and subtitles that are embedded in video files. For more information, see Make your PowerPoint presentations accessible.
YouTube video
If you want to insert a video on YouTube, switch to Insert or link to a video on YouTube.
Embed a video stored on OneDrive
You can also insert videos that you have stored in your OneDrive.
-
In PowerPoint, click the slide that you want to add a video to.
-
On the Insert tab, click Video > Online Video.
-
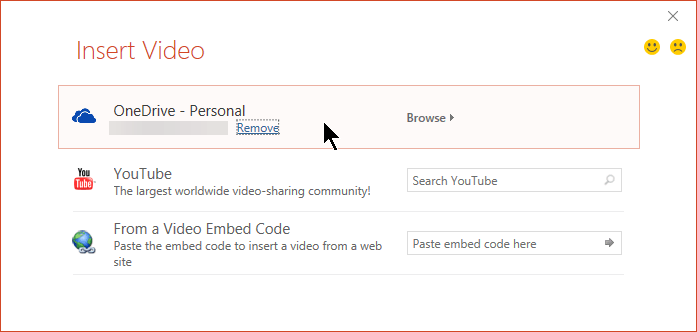
In the Insert Video dialog box, click OneDrive, and then navigate to the location where your video has been uploaded.
-
Click Insert.
The video file is downloaded to your computer and then embedded in the presentation.
Preview a video
When a video is selected on a slide, a toolbar appears below the video that has a play/pause button, a progress bar, incremental forward/backward buttons, a timer, and a volume control. Click the Play button at the left of that toolbar to preview the video.

Play a video automatically or when clicked
By default, in Slide Show, the video plays as part of the click sequence. That means that when you click anywhere on the slide to advance to the next step (or when you press the Spacebar, Right arrow key, or other key that advances to the next step) the video plays. This Start option is called In Click Sequence.
But if you prefer, you can make the video start automatically as soon as it appears onscreen, or make it play when it is clicked:
-
Select the video frame.
-
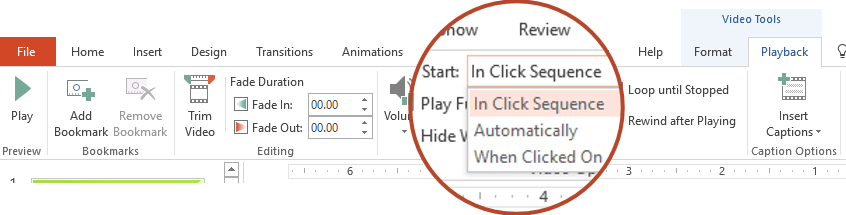
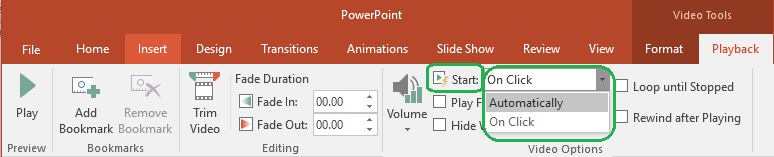
On the ribbon, on the Video Tools Playback tab, open the Start list and choose the option you prefer:
Option
Description
In Click Sequence
This is the default behavior, as described above. When you click anywhere on the slide to advance to the next step, the video plays.
Automatically
The video starts automatically.
(If there are animation steps before it, the animation steps will play first and then the video starts playing automatically. If there are no other animation steps before the video on the slide, the video begins playing immediately.)
When Clicked On
The video starts only when it has been clicked.
For more details about the options for playing the video in Slide Show, see Set the 'Play' options for a video.
Supported video formats
In PowerPoint 2013, we recommend that you use .mp4 files encoded with H.264 video (a.k.a. MPEG-4 AVC) and AAC audio.
For more details, see Video and audio file formats supported in PowerPoint.
Embed a video stored on your PC
-
In Normal view, click the slide that you want the video to be in.
-
On the Insert tab, click the arrow under Video, and then click Video on My PC.
-
In the Insert Video box, click the video that you want, and then click Insert.
Link to a video stored on your PC
To help prevent broken links, we recommend copying the video into the same folder as your presentation, and then linking to it there.
-
In Normal view, click the slide where you want the link to the video to be in.
-
On the Insert tab, click the arrow under Video, and then click Video on my PC.
-
In the Insert Video box, click the file that you want to link to, click the down arrow next to the Insert button, and then click Link to File.
YouTube video
If you want to insert a video on YouTube, switch to Insert or link to a video on YouTube.
Preview a video
When a video is selected on a slide, a toolbar appears below the video that has a play/pause button, a progress bar, incremental forward/backward buttons, a timer, and a volume control. Click the Play button at the left of that toolbar to preview the video.
Play a video automatically or when clicked
By default, in Slide Show, the video plays when it is clicked. But if you prefer, you can make the video start automatically as soon as it appears onscreen:
-
Select the video frame.
-
On the PowerPoint ribbon, on the Video Tools Playback tab, open the Start list and choose Automatically:
For more details about the options for playing the video in Slide Show, see Set the 'Play' options for a video.
Supported video formats
In PowerPoint 2010, we recommend that you use .wmv files.
For more details, see Video and audio file formats supported in PowerPoint.
Embed a video stored on your PC
-
In Normal view, click the slide in which you want to embed the video.
-
On the Insert tab, in the Media group, click the arrow under Video.
-
Select Video from file, and then browse to the location of your video, and select it.
-
On the Insert button, click the down arrow, and then click Insert.
Link to a video stored on your PC
To help prevent broken links, we recommend copying the video into the same folder as your presentation, and then linking to it there.
-
On the Slides tab in Normal view, click the slide to which you want to add a video or animated GIF file.
-
On the Insert tab, in the Media group, click the arrow under Video.
-
Select Video from file, and then browse to the location of your video, and select it.
-
On the Insert button, click the down arrow, and then click Link to file.
Preview a video
When a video is selected on a slide, a toolbar appears below the video that has a play/pause button, a progress bar, incremental forward/backward buttons, a timer, and a volume control. Click the Play button at the left of that toolbar to preview the video.
Play a video automatically or when clicked
By default, in Slide Show, the video plays when it is clicked. But if you prefer, you can make the video start automatically as soon as it appears onscreen:
-
Select the video frame.
-
On the PowerPoint ribbon, on the Video Tools Playback tab, open the Start list and choose Automatically:

For more details about the options for playing the video in Slide Show, see Set the 'Play' options for a video.
In PowerPoint 2007, you can only link to a video.
To prevent possible problems with links, it is a good idea to copy the movies into the same folder as your presentation before you add the movies to your presentation.
Link to a movie
-
In Normal view, click the slide to which you want to add a movie or animated GIF file.
-
On the Insert tab, in the Media Clips group, click the arrow under Movie.

-
Do one of the following:
-
Click Movie from File, locate the folder that contains the file, and then double-click the file that you want to add.
-
Click Movie from Clip Organizer, scroll to find the clip that you want in the Clip Art task pane, and then click it to add it to the slide.
Tip: You can preview a clip before you add it to your presentation. In the Clip Art task pane, in the Results box that displays the available clips, move your mouse pointer over the clip's thumbnail, click the arrow that appears, and then click Preview/Properties.
-
Start a movie automatically or when clicked
When you insert a movie, you are prompted with a message asking how you want the movie to start: automatically (Automatically) or when you click the movie (When Clicked).
-
To automatically start the movie when you show the slide, click Automatically. You can pause a movie while it is playing by clicking it. To continue playing the movie, click it again.
-
To manually start the movie when you click it on the slide, click When Clicked.
When you insert a movie, a pause trigger effect is added. It's called a trigger because you have to click something specific within the slide to play the movie. For example, in a presentation, you click the movie frame to pause the movie and click it again to resume playing it.
Note: You can change this option at any time. Click the movie, and then under Movie Tools, click the Options tab. In the Movie Options group, select the option that you want from the Play Movie list.

Play a movie full screen
You can play a movie so that it fills up the entire screen when you are giving your presentation, instead of playing it as part of a slide in your presentation. This is called playing a movie full screen. Depending on the resolution of your original movie file, it might appear distorted when it is enlarged. You will always want to preview your movie, so that if the movie appears distorted or blurry, you can undo the full screen option. Generally, a small movie that is set to play full screen will not look good when it is enlarged.
If you set the movie to be displayed full screen and it is also set to start automatically, you can drag the movie frame off the slide into the gray area so that it will not be visible on the slide or flash briefly before the movie goes to full screen.
-
In Normal view, click the movie frame on the slide that you want to play full screen.
-
Under Movie Tools, on the Options tab, in the Movie Options group, select the Play Full Screen check box.
Preview a movie
-
In Normal view, click the movie frame on the slide that you want to preview.
-
Under Movie Tools, on the Options tab, in the Play group, click Preview.
Tips
-
You can also preview a movie in Normal view by double-clicking it.
-
If your movie or animated GIF file is part of a custom animation sequence, to preview it, click Play in the Custom Animation task pane.
-
If there are multiple slides in your presentation, use the title placeholder to identify the slide that contains the movie frame, so you know which slide to click and play.
-
If you inserted a movie as an object to play in Microsoft Windows Media Player, you may have to click the Stop, Start, and Pause buttons in Windows Media Player to control your movie.
Play a movie across several slides
You may want the movie that you inserted in a presentation to continue to play when you advance to the next slide. To do this, you need to specify when the movie should stop playing. Otherwise, it will stop the next time that you click the mouse.
Note: You must have a play effect to do the following procedure. If you already inserted the movie and chose When Clicked when prompted, you can switch to Automatically to add a play effect.
Switch from When Clicked to Automatically
-
In Normal view, click the movie.
-
Under Movie Tools, on the Options tab, in the Movie Options group, in the Play Movie list, click Automatically.
Keep the movie playing across slides
Note: This procedure plays the movie once for the length of the movie file. It does not play the movie repeatedly.
-
In Normal view, click the movie frame on the slide.
-
Under Movie Tools, on the Options tab, in the Movie Options group, in the Play Movie list, click Play across slides.
-
On the Animations tab, in the Animations group, click Custom Animation.

-
In the Custom Animation task pane, click the line that represents the movie play effect (the line with the triangle), click the arrow, and then click Effect Options.
-
To keep the movie playing for several slides, under Stop playing, click After, and then set the total number of slides that the file should play across.
Tip: If you set this value to 999 (the maximum), and the movie is long enough, it will play for the entire presentation, and you won't need to adjust the value if you add or delete slides from your presentation.
Play a movie continuously throughout a presentation
You may want a movie to play for the duration of a presentation or to keep playing until you stop it. If the length of the movie is shorter than the length of the presentation, you can set the movie to start again after it finishes, so that some portion of the movie is always playing during your presentation.
-
In Normal view, click the movie frame on the slide.
-
Under Movie Tools, on the Options tab, in the Movie Options group, select the Loop Until Stopped check box.
Tip: When you loop a movie, it plays repeatedly until you click it. You can also play a movie across multiple slides.
If your movie does not play, see the article Are you having video or audio playback issues? to troubleshoot.
Using QuickTime movies in PowerPoint 2007
An Apple QuickTime movie (.mov) file cannot be inserted into a Microsoft Office PowerPoint 2007 presentation. To play a QuickTime movie during your presentation, do one of the following:
-
Link to the QuickTime movie. See the section called Link to a move above. During your presentation, click the linked object or text, and QuickTime for Windows will start and play the movie automatically.
-
Convert the file to a Microsoft Windows video (.avi) file or other compatible multimedia file format that PowerPoint 2007 can insert. For information about converting video files, and the file types supported by PowerPoint, see Video and audio file formats supported in PowerPoint.
About videos and animated GIF files in PowerPoint 2007
You can add movies and animated GIF files to slides from files on your computer, the Microsoft Clip Organizer, a network, or an intranet. To add the movie or animated GIF file, you insert it onto the specific slide. There are several ways you can start the movie or GIF file: have it play automatically when the slide is displayed, click it, or create a timing for it so that it plays after a certain delay. You can also keep a movie playing over several slides or have it play continuously throughout your presentation. You can also set movie options, such as hiding the movie frame or resizing it.
Unlike pictures or drawings, movie files are always linked to your presentation, rather than embedded in it. When you insert a linked movie file, PowerPoint creates a link to the movie file's current location. If you later move the movie file to a different location, PowerPoint cannot locate it when you want the file to play. It is a good practice to copy the movies into the same folder as your presentation before you insert the movies. PowerPoint creates a link to the movie file and can find the movie file as long as you keep it in the presentation folder, even if you move or copy the folder to another computer.
Another way to be sure that your linked files are in the same folder as your presentation is to use the Package for CD feature. This feature copies all the files to one location (a CD or folder) with your presentation and automatically updates all the links for the movie files. When your presentation contains linked files, you must copy the linked files as well as the presentation if you plan to give the presentation on another computer or send it to someone in e-mail.
When you insert a movie, a pause trigger effect is added. This setting is known as a trigger because you have to click something in the slide to play the movie. In a presentation, you click the movie frame to pause the movie and click it again to resume it.
How the play and pause effects work with movies that start automatically
When you insert a movie and then select Automatically, two effects are added to the Custom Animation task pane: a pause effect and a play effect. Without the pause effect, the movie would restart from the beginning each time you clicked it, instead of pausing and then continuing when you clicked again.
After you insert a movie, you see something similar to the following image in the Custom Animation task pane.
In this image, the first line (with a "0") is the play effect. It represents the automatic start. The clock icon is the symbol for the start setting called Start After Previous. This setting enables your movie to play automatically after the slide is displayed or after another effect plays (if there is one). The triangle icon (similar to the symbol on the play button of a VCR or DVD player) is the indicator for the play effect.
The second line is the trigger bar, and below that (the line with a "1") is the pause effect. You see a mouse icon and a double-bar symbol (similar to the symbol on the pause button of a VCR or DVD player). This effect is added whether the movie starts automatically or by a mouse click. Its position under the trigger bar indicates that you have to click the movie (as opposed to clicking anywhere on the slide) to start the movie.
How the pause effect works with movies that start when clicked
After you insert a movie, you see something similar to the following image in the Custom Animation task pane.
Unlike what happens when you choose to start a movie automatically, the only effect that is applied when you choose to start the movie by clicking it is the pause effect — the line with the mouse icon and the double-bar (pause) symbol.
YouTube instead?
Go to Insert a YouTube video
Mac instead?
Go to Add a video on your Mac
Thanks for this. I really like what you've posted here and wish you the best of luck with this blog and thanks for sharing. Video presentation
ReplyDeleteMicrosoft Office Tutorials: Insert And Play A Video File From Your Pc Or Onedrive >>>>> Download Now
ReplyDelete>>>>> Download Full
Microsoft Office Tutorials: Insert And Play A Video File From Your Pc Or Onedrive >>>>> Download LINK
>>>>> Download Now
Microsoft Office Tutorials: Insert And Play A Video File From Your Pc Or Onedrive >>>>> Download Full
>>>>> Download LINK FD