Customize the list of recently used files in Office apps
Microsoft Office programs display the last few documents you opened in that program so that you can use those links to quickly access the files. This feature is turned on by default, but you can turn it off, turn it back on, clear, or adjust the number of files that it displays.
Notes:
-
If this feature was turned off and you subsequently turn it back on, only the files that you open and save after you turn it on are listed.
-
If you close a file, and then move it to another location, such as by using Windows Explorer, the link to that file in the program in which you created it no longer works. You must choose the location from File > Open and browse to the file to open it. After you've opened the file from its new location, that link is added to the list. For more information on opening a file this way see: Open files from the File menu.
Pin a file to the recently used files list
-
Click the File tab.
-
Click Open to see a list of the recently used files.
-
Click Pin this item to the list
 .
.
When a file is pinned to the list, the pin icon looks like this: In older versions of Office, it looks like this:
Tip: Click the pin button again to unpin the file.
Files pinned to the list are displayed in chronological order, with the most recently used file at the top.
Remove an individual file from the recently used file list
If there are files on your recently used list that you'd like to remove, simply right-click them and choose Remove from list.
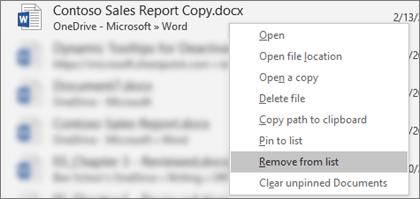
Caution: Make sure you click Remove from List and not Delete file unless you want to actually remove the file from your entire system.
Change the number of files that appear in the list of recently used files
-
Click the File tab.
-
Click Options.
-
Click Advanced.
-
Under Display, in the Show this number of Recent Documents list, click the number of files that you want to display.
Tip: To not see any files in the recently used files list, set the Show this number of Recent Documents list to zero.
Clear unpinned files from the list of recently used files
-
Click the File tab.
-
Click Open.
-
Right click a file in the list, and then click Clear unpinned Documents.
-
Click Yes to clear the list.
What if old, or unexpected, files suddenly appear on my recently used list?
Starting with Office 2013, your recently used files list synchronizes with your Microsoft Account. That's handy because it means that if you sign in on multiple devices (desktop and laptop, for example) you have the same files listed in both places for easy access.
If you have an older machine that hasn't been turned on in a while, however, when you bring it online it may synchronize and it's possible that some of the documents from its old list might end up on your current recently used list.
Another way we sometimes see this happen is if somebody else, like a family member, uses your computer. If they're signed in as you, any documents they work on would then appear on your recently used list.
The best way to remove these unexpected files is to follow the procedure above, under "Remove an individual file from the recently used file list". Right-click the unexpected files and choose Remove from list.
Pin a file to the recently used files list
-
Click the File tab.
-
Click Recent to see a list of the recently used files.
-
Right click the file you want to keep, and then select Pin to list, or click the pin icon:
 .
.When a file is pinned to the list, the pin icon looks like a push pin viewed from the top:
. -
Click the pin button again to unpin the file.
Change the number of files that appear in the list of recently used files
-
Click the File tab.
-
Under Help, click Options.
-
Click Advanced.
-
Under Display, in the Show this number of Recent Documents list, click the number of files that you want to display.
Note: These steps do not apply to InfoPath 2010.
Add a quick access list to the Backstage file navigation bar
-
Click the File tab.
-
Click Recent.
-
Select the check box to Quickly access this number of recent documents: and choose how many files you want to see.
-
Links to those files will appear above Info in the navigation bar, regardless of where you are in the Backstage View.
Note: Clearing the check box removes the list.
Clear the list of recently used files
-
Click the File tab.
-
Click Recent.
-
Right click a file in the list and select Clear unpinned items.
-
Click Yes to clear the list.
Note: Setting the number of recent files to zero also clears the list. To turn the feature back on, set the number to something other than zero. Update the list by opening the files again and resetting the pins.
Pin a file to the Recent Documents list
The following only applies to Access 2007, Excel 2007, PowerPoint 2007, and Word 2007.
-
To keep or pin a file in the Recent Documents list, click the Microsoft Office Button
 , and then click Pin this document to the Recent Documents list . When a document is pinned to the Recent Documents list, the pin button looks like a push pin viewed from the top: .
Change the number of files that appear in the list of recently used files
Access
-
Click the Microsoft Office Button
, and then click Access Options. -
Click Advanced.
-
Under Display, in the Show this number of Recent Documents list, click the number of files that you want to display.
Excel
-
Click the Microsoft Office Button
, and then click Excel Options. -
Click Advanced.
-
Under Display, in the Show this number of Recent Documents list, click the number of files that you want to display.
InfoPath
-
On the Tools menu, click Options, and then click the General tab.
-
Select or clear the Recently used file list check box.
-
If you want to show your recently used files, in the Entries list, click the number of files that you want to display.
PowerPoint
-
Click the Microsoft Office Button
, and then click PowerPoint Options. -
Click Advanced.
-
Under Display, in the Show this number of Recent Documents list, click the number of files that you want to display. If you do not want to display any files, click 0.
Visio
-
On the Tools menu, click Options, and then click the General tab.
-
In the Recently used file list, click the number of files that you want to display.
Word
-
Click the Microsoft Office Button
, and then click Word Options. -
Click Advanced.
-
Under Display, in the Show this number of Recent Documents list, click the number of files that you want to display.
Clear the list of recently used files
If you set the number to zero, the list is empty. You have to turn back on the feature and set the number to something other than zero, and then update the list by opening the files again and resetting the pin.
Access
-
Click the Microsoft Office Button
, and then click Access Options. -
Click Advanced.
-
Under Display, in the Show this number of Recent Documents list, click 0.
Excel
-
Click the Microsoft Office Button
, and then click Excel Options. -
Click Advanced.
-
Under Display, in the Show this number of Recent Documents list, click 0.
PowerPoint
-
Click the Microsoft Office Button
, and then click PowerPoint Options. -
Click Advanced.
-
Under Display, in the Show this number of Recent Documents list, click 0.
InfoPath
-
On the Tools menu, click Options, and then click the General tab.
-
Clear the Recently used file list check box.
Visio
-
On the Tools menu, click Options, and then click the General tab.
-
In the Recently used file list, click 0.
Word
-
Click the Microsoft Office Button
, and then click Word Options. -
Click Advanced.
-
Under Display, in the Show this number of Recent Documents list, click 0.
No comments:
Post a Comment