Create or run a macro
In Word, you can automate frequently used tasks by creating and running macros. A macro is a series of commands and instructions that you group together as a single command to accomplish a task automatically.
To save time on tasks you do often, bundle the steps into a macro. First, you record the macro. Then you can run the macro by clicking a button on the Quick Access Toolbar or pressing a combination of keys. It depends on how you set it up.
Record a macro with a button
-
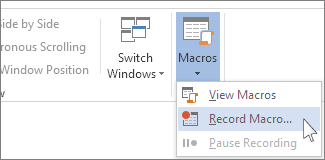
Click View > Macros > Record Macro.
-
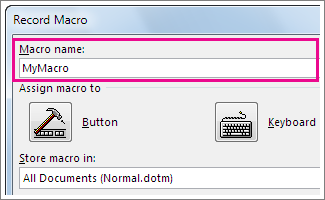
Type a name for the macro.
-
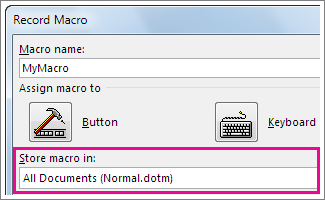
To use this macro in any new documents you make, be sure the Store macro in box says All Documents (Normal.dotm).
-
To run your macro when you click a button, click Button.

-
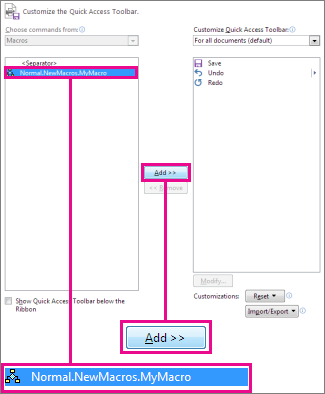
Click the new macro (it's named something like Normal.NewMacros.<your macro name>), and click Add.
-
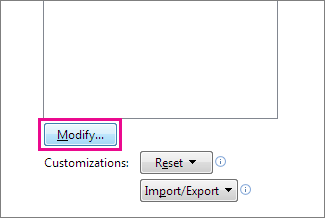
Click Modify.
-
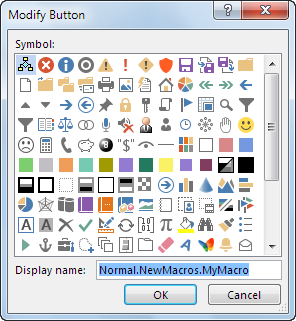
Choose a button image, type the name you want, and click OK twice.
-
Now it's time to record the steps. Click the commands or press the keys for each step in the task. Word records your clicks and keystrokes.
Note: Use the keyboard to select text while you're recording your macro. Macros don't record selections made with a mouse.
-
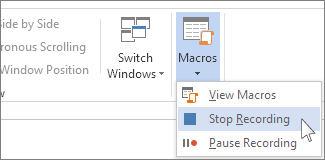
To stop recording, click View > Macros > Stop Recording.
The button for your macro appears on the Quick Access Toolbar.

To run the macro, click the button.
Record a macro with a keyboard shortcut
-
Click View > Macros > Record Macro.

-
Type a name for the macro.

-
To use this macro in any new documents you make, be sure the Store macro in box says All Documents (Normal.dotm).

-
To run your macro when you press a keyboard shortcut, click Keyboard.

-
Type a combination of keys in the Press new shortcut key box.
-
Check to see whether that combination's already assigned to something else. If it's already assigned, try a different combination.
-
To use this keyboard shortcut in any new documents you make, be sure the Save changes in box says Normal.dotm.
-
Click Assign.
-
Now it's time to record the steps. Click the commands or press the keys for each step in the task. Word records your clicks and keystrokes.
Note: Use the keyboard to select text while you're recording your macro. Macros don't record selections made with a mouse.
-
To stop recording, click View > Macros > Stop Recording.

To run the macro, press the keyboard shortcut keys.
Run a macro
To run a macro, click the button on the Quick Access Toolbar, press the keyboard shortcut, or you can run the macro from the Macros list.
-
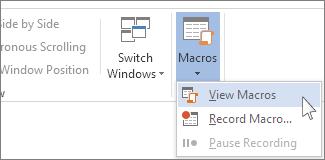
Click View > Macros > View Macros.
-
In the list under Macro name, click the macro you want to run.
-
Click Run.
Make a macro available in all documents
To make a macro from one document available in all new documents, add it to the Normal.dotm template.
-
Open the document that contains the macro.
-
Click View > Macros > View Macros.

-
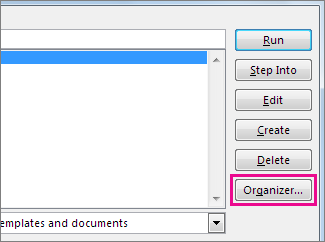
Click Organizer.
-
Click the macro you want to add to the Normal.dotm template, and click Copy.
Add a macro button to the ribbon
-
Click File > Options > Customize Ribbon.
-
Under Choose commands from, click Macros.
-
Click the macro you want.
-
Under Customize the ribbon, click the tab and custom group where you want to add the macro.
If you don't have a custom group, click New Group. Then click Rename and type a name for your custom group.
-
Click Add.
-
Click Rename to choose an image for the macro and type the name you want.
-
Click OK twice.
Write a macro from scratch in Visual Basic
-
On the Developer tab, in the Code group, click Macros.
-
In the Macro name box, type a name for the macro.
Note: If you give a new macro the same name as a built-in macro in Word, the new macro actions will replace the built-in macro. To view a list of built-in macros, click Word Commands in the Macros in list.
-
In the Macros in list, click the template or document in which you want to store the macro.
To make your macro available in all documents, be sure to click Normal.dotm.
-
Click Create to open the Visual Basic Editor.
After you open the Visual Basic Editor, you may want more information about working with Visual Basic for Applications. For more information, click Microsoft Visual Basic Help on the Help menu or press F1.
You can record a sequence of actions, or you can write a macro from scratch by entering Visual Basic for Applications code in the Visual Basic Editor.
Note: To work with macros in Office Word 2007, you need to show the Developer tab.
Show the Developer tab
-
Click the Microsoft Office Button
 , and then click Word Options.
 -
Click Popular.
-
Under Top options for working with Word, select the Show Developer tab in the Ribbon check box.
Note: The Ribbon is a component of the Microsoft Office Fluent user interface.
Record a macro
-
On the Developer tab, in the Code group, click Record Macro.

-
In the Macro name box, type a name for the macro.
Note: If you give a new macro the same name as a built-in macro in Office Word 2007, the new macro actions will replace the built-in macro. To view a list of built-in macros, on the Developer tab, in the Code group, click Macros. In the Macros in list, click Word Commands.
-
In the Store macro in box, click the template or document in which you want to store the macro.
Important: To make your macro available in all documents, be sure to click Normal.dotm.
-
In the Description box, type a description of the macro.
-
Do one of the following:
-
Begin recording To begin recording the macro without assigning it to a button on the Quick Access Toolbar or to a shortcut key, click OK.
-
Create a button To assign the macro to a button on the Quick Access Toolbar, do the following:
-
Click Button.
-
Under Customize Quick Access Toolbar, select the document (or all documents) for which you want to add the macro to the Quick Access Toolbar.
Important: To make your macro available in all documents, be sure to click Normal.dotm.
-
Under Choose commands from dialog box, click the macro that you are recording, and then click Add.
-
To customize the button, click Modify.
-
Under Symbol, click the symbol that you want to use for your button.
-
In the Display name box, type the macro name that you want to display.
-
Click OK twice to begin recording the macro.
The symbol that you choose is displayed in the Quick Access Toolbar. The name that you type is displayed when you point to the symbol.
-
-
Assign a keyboard shortcut To assign the macro to a keyboard shortcut, do the following:
-
Click Keyboard.
-
In the Commands box, click the macro that you are recording.
-
In the Press new shortcut key box, type the key sequence that you want, and then click Assign.
-
Click Close to begin recording the macro.
-
-
-
Perform the actions that you want to include in the macro.
Note: When you record a macro, you can use the mouse to click commands and options, but not to select text. You must use the keyboard to select text. For more information about selecting text by using the keyboard, see Select text.
-
To stop recording your actions, click Stop Recording in the Code group.
Change the keyboard shortcut for a macro
-
Click the Microsoft Office Button
 , and then click Word Options.
 -
Click Customize.
-
Next to Keyboard shortcuts, click Customize.
-
In the Categories list, click Macros.
-
In the Macros list, click the macro that you want to change.
-
In the Press new shortcut key box, type the key combination that you want to choose.
-
Check the Current keys box to make sure that you aren't assigning a key combination that you already use to perform a different task.
-
In the Save changes in list, click the option that matches where you want to run your macro.
Important: To make your macro available in all documents, be sure to click Normal.dotm.
-
Click Close.
Run a macro
-
On the Developer tab, in the Code group, click Macros.

-
In the list under Macro name, click the macro that you want to run.
-
Click Run.
Write a macro from scratch in Visual Basic
-
On the Developer tab, in the Code group, click Macros.

-
In the Macro name box, type a name for the macro.
Note: If you give a new macro the same name as a built-in macro in Office Word 2007, the new macro actions will replace the built-in macro. To view a list of built-in macros, click Word Commands in the Macros in list.
-
In the Macros in list, click the template or document in which you want to store the macro.
To make your macro available in all documents, be sure to click Normal.dotm.
-
Click Create to open the Visual Basic Editor.
After you open the Visual Basic Editor, you may want more information about working with Visual Basic for Applications. For more information, click Microsoft Visual Basic Help on the Help menu or press F1.
No comments:
Post a Comment