Create a custom field template for the Field Templates pane
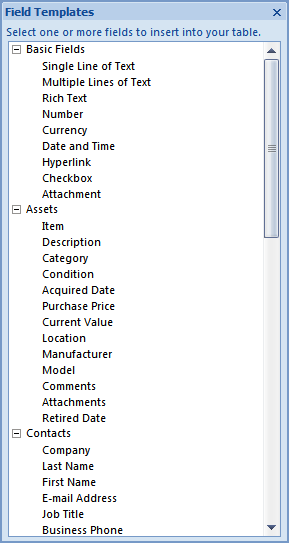
Sometimes it is easier to choose from a predefined list of fields than to manually create a field. You can use the Field Templates pane to choose from a list of predefined fields. You can also create your own custom defined field templates and then add them to the Field Templates pane. Microsoft Office Access 2007 comes with a set of built-in field templates that can save you considerable time when you create fields. To create a new field by using a field template, you display the Field Templates pane and then drag one or more templates to a table that is open in Datasheet view.
This article introduces field templates and explains how to insert a field that is based on a prebuilt template into your table. The article then provides detailed instructions about how to create and insert your own custom field templates.
In this article
What is a field template?
A field template is a predefined set of characteristics and properties that describe a field. The field template definition includes a field name, a data type, a setting for the field's Format property, and also a number of other field properties that, when taken together, form a model that serves as the basis for creating a new field.
Add a field by using a field template
To add a field by using a field template, you display the Field Templates pane and then drag one or more templates to a table that is open in Datasheet view.
-
Click the Microsoft Office Button
 , and then click Open.
 -
In the Open dialog box, select and open the database.
-
In the Navigation Pane, double-click the table in which you want to add a field.
The table opens in Datasheet view.
-
On the Datasheet tab, in the Fields & Columns group, click New Field.

The Field Templates pane appears.
-
Select one or more fields in the Field Templates pane and drag them to the table. When the insertion line appears where you want to position the field, drop the field in place.

The fields that you have inserted appear in the datasheet.
Field templates are models. They provide a basis from which you can create new fields.
Create a custom field template
Suppose that you want to create a custom field template that appears in the Field Templates pane. Here's an overview of the steps required, followed by an example:
-
Create a table in a database and populate it with the custom field or fields that you want to appear in the Field Templates pane. Be sure also to set the field properties for each custom field as needed.
-
Save your table and export it in XML format. This creates an XML file in the format that Office Access 2007 uses for field templates.
-
Rename the .xml file so that it has an .accfl file name extension, because that is the extension that Access uses for field template files.
-
Place the .accfl file in a location where Access expects to find the field templates. Access looks in the user templates folder and the system templates folder as follows:
The user templates folder:-
Windows Vista
C:\Users\user name\AppData\Roaming\Microsoft\Templates -
Microsoft Windows XP
C:\Documents and Settings\user name\Application Data\Microsoft\TemplatesNote: By default, the AppData folder in Windows Vista and the Application Data folder in Windows XP have their hidden attributes set. As a result, they will not appear in Folder view in Windows Explorer. To navigate to one of these hidden folders, type the complete folder specification in the address bar in Windows Explorer.
The system templates folder: -
Windows Vista or Windows XP
C:\Program Files\Microsoft Office\Templates\1033\Access
-
-
Finally, you must exit and restart Access for your custom templates to appear in the Field Templates pane. This is because Access loads the field templates only when the program starts.
For example, suppose that you want to create a field template for a Date/Time field that is displayed by default in this format: Mon, Sep 18, 2006 3:00p. The field's value defaults to the date and time at the time of entry. You must supply a value for this field, so the validation rule is set to Is Not Null. If you attempt to violate this rule, the validation text You must supply a value for this field appears.
Follow these steps to create this custom field template.
-
Create the database and table
-
Click the Microsoft Office Button
 , and then click New.
 -
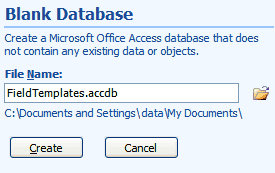
In the File Name box, type a file name. To change the location, click the folder icon to browse for a new location.
-
Click Create.
The new database is opened, and a new table named Table1 is created and opened in Datasheet view.
-
In the Navigation Pane, right-click the Table1 table, and then click Design View on the shortcut menu.
-
When the Save As dialog box appears, type DatesTimes as the name for the table, and then click OK.
Access opens the table in Design view.
-
-
Create the field and set the field properties
-
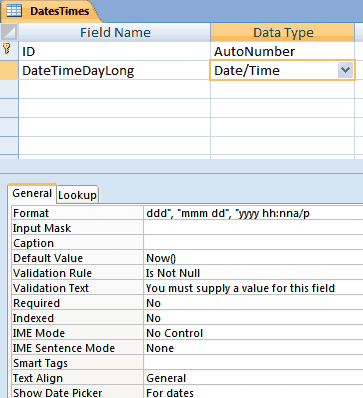
In the Field Name column, select the first blank row, and then type a name for the field; for example, DateTimeDayLong.
-
Select the adjacent cell in the Data Type column, and then select Date/Time from the list.
-
Under Field Properties, on the General tab, in the Format property box, type ddd, mmm dd, yyyy hh:nna/p. You don't have to supply quotation marks; they are added automatically. This setting displays the field as Mon, Sep 18, 2006 3:00p.
-
In the Default Value property box, type Now(). The Now function supplies the current date and time.
-
In the Validation Rule property box, type Is Not Null.
-
In the Validation Text property box, type You must supply a value for this field.
-
Click the Microsoft Office Button
 and then click Save.
At this point, your table (in Design view) should look something like the illustration.
-
-
Export the table in XML format
-
Right-click the DatesTimes table or its title bar, and then click Close on the shortcut menu to close the table.
-
In the Navigation Pane, right-click the DatesTimes table, point to Export on the shortcut menu, and then click XML File.
-
On the first page of the Export - XML File Wizard, type a destination file name, or accept the one that is supplied for you, and then click OK.
-
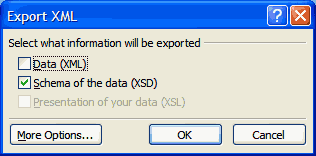
In the Export XML dialog box, clear the Data (XML) check box, and select the Schema of the data (XSD) check box.
-
Click OK.
-
On the next page of the Export - XML File Wizard, click Close.
The .xml file is created in the location that you specified.
-
-
Rename the .xsd file to .accfl
-
Click the Start button, point to All Programs, click Accessories, and then click Windows Explorer.
-
Locate the .xsd file that you just created. By default, if you accepted the supplied name and location, it will be named DatesTimes.xsd and will reside in your default documents folder.
-
Right-click the file and then click Rename on the shortcut menu.
-
Rename the file to change the file extension to .accfl. Remember to press ENTER when you are finished.

-
-
Move the file to the user templates folder
-
In Windows Explorer, right-click the file and click Cut on the shortcut menu.
-
Browse to and select the appropriate user templates folder, as described here:
-
Windows Vista
C:\Users\user name\AppData\Roaming\Microsoft\Templates -
Microsoft Windows XP
C:\Documents and Settings\user name\Application Data\Microsoft\Templates
-
-
Right-click in the user templates folder, and then click Paste on the shortcut menu.
-
-
Restart Access
-
Switch to Access, click the Microsoft Office Button
 , and then click Exit Access.
 -
Then restart Access.
-
Now, the DateTimeDayLong field appears in the list of field templates when you display the Field Templates pane, as shown in the following illustration.
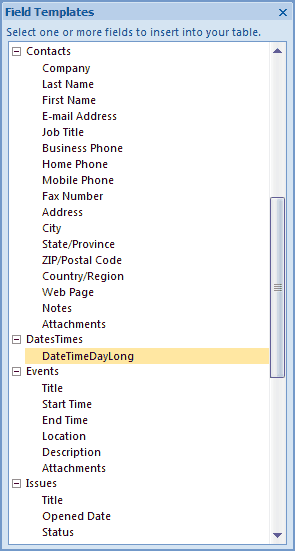
You can select the field in the Field Templates pane and drag it to a table that is open in Datasheet view. When the insertion line appears where you want to position the field, drop the field in place.
No comments:
Post a Comment