Change the size or contents of the To-Do Bar
You can customize the To-Do Bar to occupy a larger or smaller part of your screen, or to change how much information appears.
Tip: You can also turn off the To-Do Bar. On the View tab, in the Layout group, click To-Do Bar and then click Normal or Off.
In this article
Change the size of the To-Do Bar
-
Point to the edge of the To-Do Bar. When the pointer becomes a
 , drag to resize.
 -
To minimize the To-Do bar, on the View tab, in the Layout group, click To-Do Bar, and then click Minimized.
-
To restore the To-Do Bar to the size it was when last turned off or minimized, on the View tab, in the Layout group, click To-Do Bar, and then click Normal.
Change the information shown in the To-Do Bar
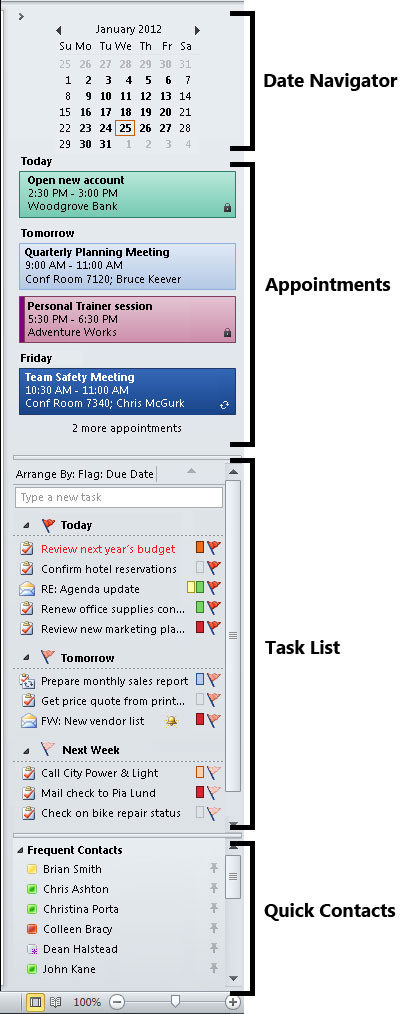
The To-Do Bar consists of four parts — the Date Navigator, the Appointments section, the Task List, and Quick Contacts. You can resize or hide each part.
Note: Quick Contacts requires Microsoft Office Communications Server 2007R2 with Microsoft Office Communicator 2007 or Microsoft Communicator 2010.
To hide any part of the To-Do Bar, do one of the following:
-
In any Outlook folder, on the View tab, in the Layout group, click To-Do Bar and then click Date Navigator, Appointments, Task List, or Quick Contacts. A check mark indicates the part is turned on. Click to remove the check mark and hide the part, or click again to restore the check mark and turn the part back on.
-
In any Outlook folder, on the View tab, in the Layout group, click To-Do Bar and then click Options. In the To-Do Bar Options dialog box, select the check box for each part that you want to show, or clear the check boxes for each part that you want to hide.
The Date Navigator
Multiple calendars can be arranged horizontally in one row by increasing the width of the To-Do Bar. To show more calendars arranged vertically, change the number of calendar rows that appear in the To-Do Bar.
Do one of the following:
-
Show more calendars arranged horizontally
By default, one calendar is shown in the Date Navigator. You can change the number of calendars displayed by modifying the size of the To-Do Bar window:
-
Point to the edge of the To-Do Bar. When the pointer changes to
 , drag left or right to increase or decrease the width of the To-Do Bar.
When you release the mouse button, the number of calendars increases or decreases to fill the available space.
-
-
Show more calendars arranged vertically
By default, only one row of calendar months is shown in the Date Navigator. In the To-Do Bar Contents dialog box, you can specify the number of calendars shown vertically:
-
In any Outlook folder, on the View tab, in the Layout group, click To-Do Bar and then click Options.
-
Under Show Date Navigator, in the Number of month rows text box, type a number from 0 to 9.
The more rows of months that appear in the Date Navigator increases the size of the Date Navigator area.
-
Appointments
To view more appointments in the Appointments section, hide or reduce the size of the other To-Do Bar parts. To change the number of appointments shown in the To-Do Bar, do the following:
-
Point to the bar between the Appointments section and the Task List. When the pointer changes
 , drag up or down to increase or decrease the size of the Appointments section.
When you release the mouse button, the number of appointments increases or decreases to fill the available space.
To change the information that is shown in the Appointments section, do the following:
-
In any Outlook folder, on the View tab, in the Layout group, click To-Do Bar, and then click Options.
-
Under Show Appointments, select or clear the check boxes of the options that you want.
Clear the Show Appointments check box to hide the Appointments section.
The Task List
To view more tasks in the Task List, turn off or reduce the size of the other To-Do Bar parts. To directly change the number of tasks shown, do the following:
-
Point to the bar between the Appointments section and the Task List. When the pointer changes
 , drag up or down to increase or reduce the size of the Task List section.
When you release the mouse button, the number of appointments increases or decreases to fill the available space.
Visual guide to the To-Do Bar

No comments:
Post a Comment