Change the page margins for a form template
Page margins are the blank space around the edges of a page. Typically, in InfoPath, nothing appears or prints in the margins except headers and footers, if your form template has them. When designing a form template, you can specify default margin settings for each view in a form.
-
On the View menu, click Manage Views.
-
In the Views task pane, select the view whose margins you want to modify, and then click View Properties.
-
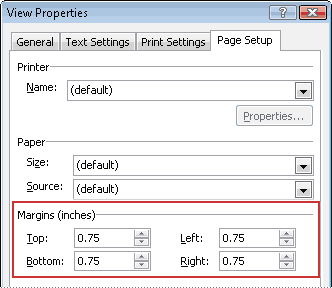
In the View Properties dialog box, click the Page Setup tab.
-
Under Margins, select the options that you want.

-
To see how page margins will affect your form template design, click Print Preview
 on the Standard toolbar.
 Tip: To quickly determine whether controls and other design elements will fit on a printed page, you can display a page width guide along the right side of the form template by clicking Page Width Guide on the View menu. A page width guide appears as a dashed vertical line on the form template. The line indicates where the right margin of the printed page is located, based on the default printer for your computer.
Microsoft Office Tutorials: Change The Page Margins For A Form Template >>>>> Download Now
ReplyDelete>>>>> Download Full
Microsoft Office Tutorials: Change The Page Margins For A Form Template >>>>> Download LINK
>>>>> Download Now
Microsoft Office Tutorials: Change The Page Margins For A Form Template >>>>> Download Full
>>>>> Download LINK EM