Change the location where you sync SharePoint libraries on your computer
Note: The procedures in this topic apply only to the previous OneDrive sync client. Not sure which sync client you're using?
By default, OneDrive for Business syncs SharePoint libraries in folders under your Windows "User" folder, for example: C:\Users\username\
When you sync your OneDrive for Business library, your files are placed in a folder named "OneDrive for Business @CompanyName" if the library is hosted on SharePoint Online, and "OneDrive for Business" if the library is hosted on a corporate SharePoint server. If you sync libraries on other sites, OneDrive for Business creates folders for them using their library names, and places these folders in a folder name "SharePoint."
You can change the root path for libraries you sync to your computer, though you can do this only if you're not currently syncing any libraries. If you're already syncing at least one library and you want to change the path, you must first stop syncing all libraries. Then, the first time you run the OneDrive for Business wizard to sync a library to your computer, you'll see an option to change the location.
Note: You must stop all libraries, not just the one you want to change, before choosing another folder to sync to. Follow the steps below to stop your synced folders and change their location.
When you change the root folder, that means every library you sync will be under that folder. For example, if you change it to "C:\mysyncfolders\", then OneDrive for Business or SharePoint will create a folder under that folder for your library files. OneDrive for Business and SharePoint will not put anything in the root folder directly.
Stop syncing SharePoint folders
If you are currently syncing folders, do the following to stop them from syncing:
-
Right click the OneDrive for Business icon
 in the Windows notification area at the bottom of your screen, and then select Stop syncing a folder…
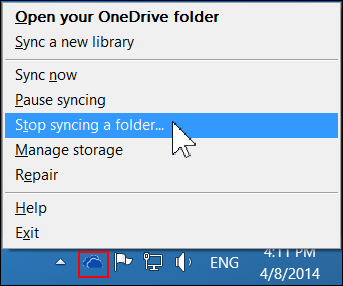
Note: If the OneDrive for Business icon
isn't visible, click the Show hidden icons button  in the notification tray.
 -
Select the folder you want to stop syncing, and then select Stop syncing.
-
Click Yes to agree to permanently stop syncing the folder, and then click OK.
Change folders and sync
Once you've stopped all folders from syncing, follow these steps:
-
Navigate to your OneDrive for Business library you want to sync, and click Sync.
-
Click Change in the OneDrive for Business dialog box, and then select a new location as the root path on your local drive. OneDrive for Business does not support syncing to a network drive.
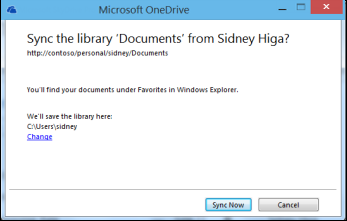
Warning: If you're already syncing files to your computer using OneDrive for Windows, you should not use the same location that you use with OneDrive for Windows to sync files with OneDrive for Business.
-
If you don't see the "Change" link in the dialog box, it means you're currently syncing at least one library. Go back and stop syncing all drives.
No comments:
Post a Comment