Share SharePoint files or folders in Office 365
The files you store on a SharePoint site are usually available to everyone with permissions to the site, but you may want to share specific files or folders with people who don't otherwise have access to the site. When you share files and folders, you can decide whether to let people edit or just view them.
Important: If you're sharing OneDrive for Business files, see Share OneDrive files and folders. The sharing experience for OneDrive for Business has changed and this article now focuses on sharing files that are stored on SharePoint sites.
You may also be able share files with external users (people not on your network) by inviting them as "Guests," or by creating and posting guest links. For details, see Share sites or documents with people outside your organization.
Share a file by using Get a link
You can share a link to a file that others can also share by using Get a link. Get a link is available only for individual files, but it's the easiest way to share files with everyone in your organization or to share with people externally (as long as external sharing is enabled for your sites).
-
Go to the site library that has the file you want to share.
-
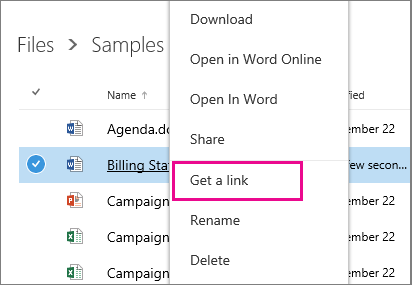
Right-click the file you want to share, and then select Get a link. If you don't see Get a link, click Share, and then click Get a link.
-
Choose the type of link you want to create.
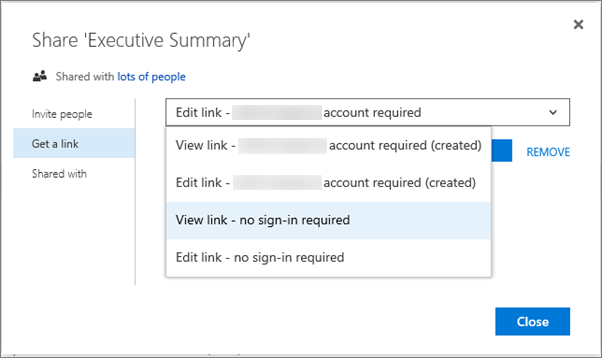
Links for internal sharing:
-
Edit link – account required After they sign in, people in your organization can edit, copy, or download the file.
-
View link – account required After they sign in, people in your organization can view, copy, or download the file.
Guest links:
-
Edit link – no sign-in required People outside your organization can edit the file and may also be able to copy and download the file. People may need to sign in with a Microsoft account to copy or download the file.
-
View link – no sign-in required People outside your organization can view the file and may also be able to copy and download the file. People may need to sign in with a Microsoft account to copy or download the file.
Notes: If you see only a restricted link option instead of the options shown here, sharing links may be disabled or you may not have permission to use them. For information about how an admin can enable sharing, see Video: Share a site without access request.
If guest access is disabled, you'll see only account required options.
-
-
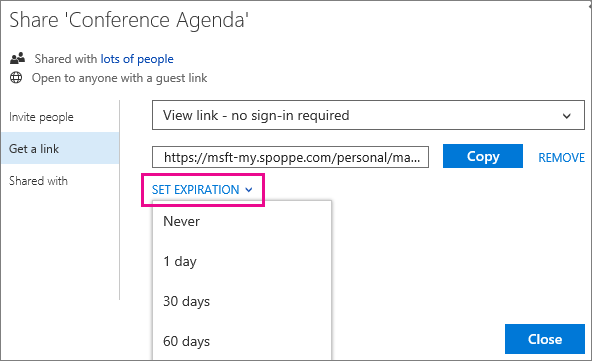
If you choose a no sign-in required link and you want to set the link to expire, click Set expiration, and then choose how long before the link expires, such as 30 days. Account required links don't expire and there's no option to set an expiration for those links.
-
Click Copy to copy the link to the clipboard.
-
Paste the link into an email and send it or post it on a website for the people you want share with.
Notes:
-
Links created by using Get a link are not discoverable by search, so only people who receive a link from someone else can use it.
-
Account required links are designed for sharing within your organization. Therefore, recipients need to sign in with their user name and password from your organization. When a user opens the sharing link, she is granted permissions for that item and added to the access control list.
-
No sign-in required links are guest links that are ideal for external sharing. These links are available by default in Office 365, but administrators can disable external sharing for your sites. For details, see Share sites or documents with people outside your organization.
-
You can remove no sign-in required links at any time in the Share dialog box mentioned in the steps above. The REMOVE link is right next to the Copy button.
-
Site administrators can restrict sharing so that only owners can share files and sites. For information about how to enable sharing links, see Video: Share a site without access request.
Share a file or folder by inviting people
To share folders or to share files when Get a link isn't available, you can invite people.
-
Go to the site library that has the file or folder you want to share.
-
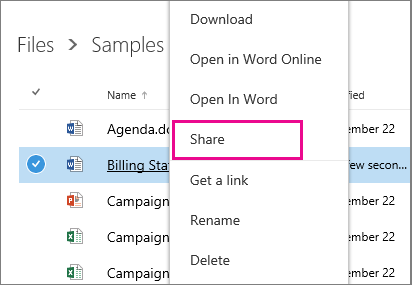
Right-click the file you want to share, and then select Share.
-
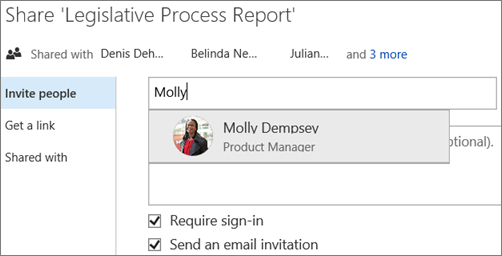
In the Share dialog box on the Invite people tab, type names or email addresses of people you want to share the file or folder with.
-
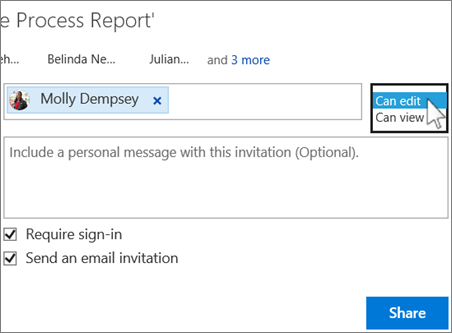
Select a permission setting, such as Can edit.
-
If you want, type a message to be included with an email that's sent to all invitees. The email includes a link to the shared file.
-
If you don't want to send an email, uncheck Send an email invitation (you may need to click Show Options first).
-
Click Share.
Note: If guest access is disabled, you may not see the Require sign-in option.
More information in this article
Learn more about file storage and sharing in Office 365
For recommendations on where to store files in Office 365 and how to set things up, see Set up Office 365 file storage and sharing.
See who you're sharing a file or folder with
-
Right-click the file or folder and then click Share.
-
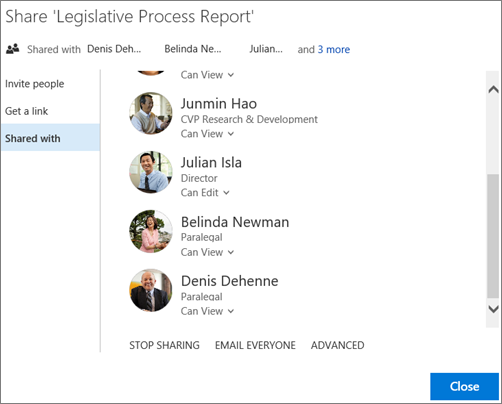
In the Share dialog box, click Shared with.
-
If you're sharing with more people than whose names will fit on the card, select the more link at the end of the list of names. You can scroll the list to see all names.
Tip: If the library you're working in has a Sharing column, you can select the people icon to open the Share dialog box.

Stop sharing a file or folder
To make a file or folder private again, you can stop sharing it.
-
Right-click the file and then click Share.
-
On the Shared with tab in the Share dialog box, select STOP SHARING below the list of people you're sharing with.
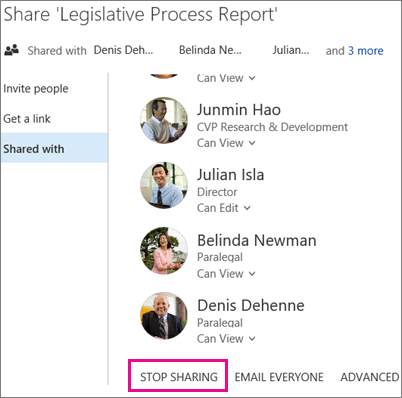
Important: The STOP SHARING link that removes all users at once is not available for folders. To quickly stop sharing a folder with many users or groups, try this: Click ADVANCED, use the check boxes to select the users or groups you want to remove, and then click Remove User Permissions.
No comments:
Post a Comment