Get started with basic site customizations
You can quickly and easily create dynamic and professional-looking Web sites — including team sites, blog sites, and a variety of Meeting Workspace sites — by using any of a wide array of site templates. The Web pages that are created from these site templates work just as they are for many organizations and purposes, but sometimes you might want to customize a page in your site, or even all of the pages in your site. For example, if you want to use a new intranet site to get your organization's sales force excited about and trained on a new product, you can base the site on the Team Site template. Then you can add text or graphics to individual pages, change the top link bar, rearrange and edit the items on the Quick Launch, and change the fonts and formatting for the site.
Microsoft Office SharePoint Designer 2007 is the tool of choice for customizing Windows SharePoint Services 3.0 sites and Microsoft Office SharePoint Server 2007 sites. This article introduces you to just a few of the basic ways in which you can customize a SharePoint site by using Office SharePoint Designer 2007.
Note: All of the examples in this article use the SharePoint Team Site template.
In this article
A quick introduction to customizing pages
You open a page and want to start customizing, but you can't seem to select what you want, and the pointer often looks like the one in the following illustration.
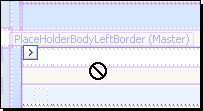
A pointer that looks like this indicates areas that are not editable. Whether a region is editable is controlled by the content placeholders that are specified on the master page on which a page is based. Therefore, to understand how to customize pages, you must first understand master pages and content placeholders.
Where does the home page get its content and formatting?
The home page's content and formatting come from the default master page. Master pages are page templates that stay attached to pages. When a master page changes, all of the pages attached to it also change. Master pages make it easier to update many pages in a single operation. Master pages also make it easy to apply a consistent look and feel — including graphics, fonts, and formatting — to just a few or to all of the pages in your SharePoint site.
The default master page in Windows SharePoint Services 3.0 sites is named default.master and is located in the site's _catalogs/masterpage folder. Default.master controls the formatting of the home page and of all other default pages (such as list forms). To customize the look and feel of the home page, either you can add content to the regions of the home page that are designated as editable by the default master page, or you can customize the site's default master page.
Note: Site home pages in Office SharePoint Server 2007 may be controlled not by default.master but rather by a different master page. Which master page the home page is attached to is determined by the site definition from which the site was created.
What are placeholders?
When you first open the home page of a SharePoint site in Office SharePoint Designer 2007, you will notice placeholders on the home page that look like the one illustrated here.

Master page placeholders define the regions on the attached pages where you can add or edit content. Placeholders also reserve spots for functionality that either is already used on the page or is reserved for future use by another program, such as Microsoft Office Forms Server 2007 or Microsoft Office Project Server 2007. Master pages in Office SharePoint Server 2007 sites have more default, required placeholders than do master pages in Windows SharePoint Services 3.0 sites.
On the region label, the placeholder name is followed by either (Master) or (Custom). Placeholders marked (Master) contain default content from a master page in the site, and placeholders marked (Custom) contain custom content that has been added to the current page.
To customize placeholder content, such as the top link bar or the Quick Launch, you must first unlock the placeholder for editing. To do this, click the arrow next to the placeholder and then click Create Custom Content.

You can customize each placeholder on a master page independently of the others. For example, you can change the styles applied to a placeholder, move it to another position on the page, or remove it altogether. However, you should remove content placeholders only with great caution. If you remove a content placeholder from your master page, every content page that supplies content for that region shows an error.
What happens when things go wrong?
While editing the home page, sometimes even experienced users can make mistakes. When customization of the home page goes awry, you can reset to the original home page by using the site definition from which the site was originally created. To learn how, read the article Reset a customized page to the site definition. Also, if you have versioning turned on for a document library in your site and the page that you are editing is stored in that document library, you can always roll back to a previous version of the page if you encounter a problem.
What about pages that aren't the home page?
Like the home page, all of the default pages in a SharePoint site are controlled by a master page. If you want to customize a page, you can start by entering custom content in the placeholders on the page. If there are changes that you cannot make by working in the placeholders, you can edit the master page that controls the page.
When you open any page in Office SharePoint Designer 2007, you can identify which master page controls that page's formatting by looking in the upper-right corner of Page view, where the location and name of the page are specified, as shown in the following illustration.

In this case, the page AllItems.aspx is attached to the default master page, which is located in the masterpage folder in the _catalogs folder in the site and is named default.master. Each time that you customize a page, you decide which of two kinds of customizations to make:
-
Customizations to a single page only, by adding or editing content in a content placeholder
-
Customizations to a master page, which will be reflected on all pages that are attached to that master
Add text or a graphic to a page
After you click a content placeholder and make that area editable by clicking Create Custom Content, you can click inside the placeholder box and then start typing. You can also drag images that reside in the site from the Folder List into the placeholder.
Customize the top link bar
The tabs on the top link bar automatically both list the home page and link to it. They also both list and link to the home page of any subsite under this site, but only if you created the subsite by using the browser and selected the Display this site on the top link bar of the parent site option.
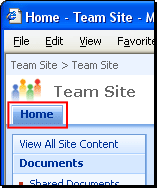
You can modify the top link bar either in the browser (by clicking Site Settings and then going to the Top Link Bar page) or in Office SharePoint Designer 2007 (by using the following steps). Modifying the top link bar in Office SharePoint Designer 2007 is a more visual way of working because you can drag pages onto the link bar. Also, when you name a page in Navigation view, the page title that is shown in the browser window is automatically changed to the new name.
-
Open the site for which you want to modify the top link bar in Office SharePoint Designer 2007.
-
On the Site menu, click Navigation.
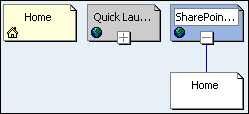
Navigation view opens to display a visual representation of the site. Link bars are represented by the boxes with globe symbols.
Add a link for an existing page in your site to the top link bar
-
In the Folder List, click the page that you want to link to from the top link bar, and then drag it to a position just below the SharePoint Top Navigation Bar box. When the page is in place, you see a connector line indicating that a link to this page is added to the top link bar.
Note:
-
The main page for lists is named AllItems.aspx and is located in the Lists/list name/ directory in your site (where list name is the name of the list, such as Announcements, Calendar, Links, Tasks, or Team Discussion). The main page for libraries is named AllItems.aspx and is located in the library name/forms/ directory in your site (where library name is the name of the library).
-
If the Folder List is not visible, click Folder List on the Task Panes menu. If you cannot read the labels on the boxes in Navigation view because the text is cut off, rest the pointer on the box. The full name is displayed in a ScreenTip. If no pages are displayed under the SharePoint Top Navigation Bar box, click the plus sign (+) at the bottom of the box to expand the list of pages.
-
Add a link for a new page to the top link bar
-
Right-click the SharePoint Top Navigation Bar, point to New, and then click Page.
A new page is created.
If you do not see the new page in the Folder List, double-click it to open it for editing, and then it will appear.
Rename a link on the top link bar
-
Under the SharePoint Top Navigation Bar box, right-click the page that you want to change, and then click Rename.
-
Type the new name for the page. The link on the link bar is changed as soon as you click away from the page.
This change affects only the link on the SharePoint top link bar. It does not affect either the file name or the page title.
Delete a link from the top link bar
-
In Navigation view, under the SharePoint Top Navigation Bar box, right-click the page that you want to delete, and then click Delete.
The link to the page is deleted from the top link bar. The page itself is not deleted.
Change the order of links on the top link bar
-
You can drag pages to reorder them. For example, if a page named Home is listed first and a page named Plans is listed second, but you want to reverse that order, in Navigation view, drag Home to the right of Plans.
Note: Make sure that both boxes remain below the SharePoint Top Navigation Bar box.
Customize the Quick Launch
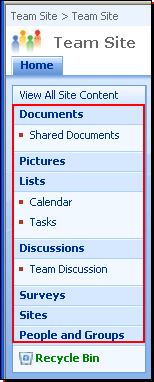
The Quick Launch automatically displays links to all SharePoint lists and libraries on your site that you create in Office SharePoint Designer 2007 or in the browser (in the browser, you must choose the option to Display this list [or library] on the Quick launch). The Sites section automatically provides links to all subsites of the site. The People and Groups section automatically provides links to a list of all users and groups that have access permissions for this site. Following are the steps that you can take to customize the documents, pictures, lists, discussions, and surveys sections of the Quick Launch with Office SharePoint Designer 2007.
-
In Office SharePoint Designer 2007, open the site for which you want to modify the Quick Launch.
-
On the Site menu, click Navigation.
Navigation view opens to display a visual representation of the site. Link bars are represented by the boxes with globe symbols.

Delete a section of the Quick Launch
You might want to delete a section of the Quick Launch if you don't use the feature represented by that section. For example, if you don't use discussions, you can delete the Discussions section.
-
Right-click the box that represents the section you want to delete, such as Discussions, and then click Delete on the shortcut menu.
Add a link for an existing page in your site to the Quick Launch
-
In the Folder List, click the page that you want to link to from the Quick Launch, and then drag the page to a location under the Quick Launch box.
Note:
-
The main page for lists is called AllItems.aspx and is located in the Lists/list name/ directory in your site. The main page for libraries is called AllItems.aspx and is located in the library name/forms/ directory in your site.
If you want the link to appear at the same level as the headings on the Quick Launch (such as Documents, Pictures, and Lists), make sure that you drag it directly below the Quick Launch box. If you want the link to appear below an existing heading, make sure that you drag it directly below that heading. A link to the page is added to the Quick Launch.
-
If the Folder List is not visible, click Folder List on the Task Panes menu. If you cannot read the labels on the boxes in Navigation view because the text is cut off, rest the pointer on the box. The full name is displayed in a ScreenTip. If no pages are displayed under the Quick Launch box, click the plus sign (+) at the bottom of the box to expand the list of pages.
Add a link for a new page to the Quick Launch
-
Right-click the Quick Launch box, point to New on the shortcut menu, and then click Page.
A new page is created.
This option creates a new page and a corresponding link as a header at the same level as Documents, Pictures, and Lists. If you want to create the new page in an existing section, right-click the box for that section heading instead of the Quick Launch box, point to New on the shortcut menu, and then click Page.
Rename a link on the Quick Launch
-
Under the Quick Launch box, right-click the page that you want to change, and then click Rename.
-
Type the new name for the page. The link on the link bar is changed as soon as you click outside the page.
This change affects only the link on the Quick Launch. It does not affect the file name or the page title.
Change the order of links on the Quick Launch
-
In Navigation view, drag pages to reorder them. For example, if you want Lists to come before Documents, click Documents and then drag it to the right of Lists (or click Lists and then drag it to the left of Documents).
Note: When you do this, make sure that the boxes remain under the Quick Launch box.
Change fonts and formatting
The fonts and formatting of each site are controlled by industry-standard cascading style sheets (CSS). For Windows SharePoint Services 3.0 sites, the CSS rules are specified in a file called core.css that is located at http://my_server/_layouts/language ID/styles. (Office SharePoint Server 2007 sites might use a different style sheet.) If you have permission to edit the core.css file, you can modify it to change the font colors, font sizes, paragraph spacing, background images, borders, character spacing, and much more. When you modify core.css, a local copy of core.css is automatically created in your site. The local core.css overrides the server core.css when it is attached to a page or master page. But if you make a mistake and want to go back to the default core.css, it is easy to do by just deleting the copied core.css.
By working with the default master page for your site and by using the CSS Properties and Manage Styles task panes, you can identify which styles are applied to the visual element that you want to change and then modify those styles. If you want your changes to appear on all pages in the site, make sure that you are working with the default master page for the site, and not the default.aspx page.
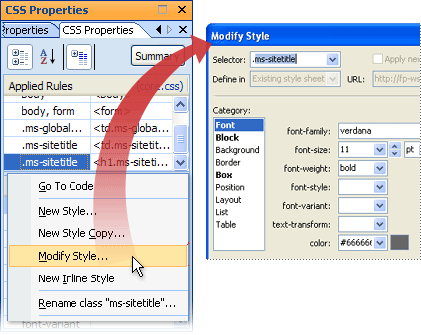
For example, if you want to change the background color of the page, you need to locate the styles where the background color is defined and then change those styles to apply the background color that you want.
It is usually a good idea to create a copy of Default.master rather than modifying Default.master directly. However, if you do make changes directly to Default.master and are not satisfied with the changes that you have made, you can always reset Default.master to the site definition. For more information, see the article Reset a customized page to the site definition.
-
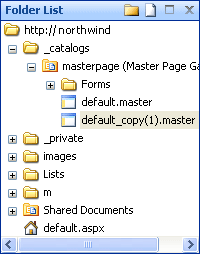
To create a copy of Default.master, in the Folder List, right-click Default.master, and then click Copy.
-
Right-click the masterpage folder, and then click Paste.
-
Double-click default_copy(1).master to open it for editing.
-
In Design view, click the default_copy(1).master where you want to modify the style.
Note: Some content areas that appear in Design view do not have styles applied to them, and therefore no corresponding style appears in the Apply Styles task pane. For example, if you select a content placeholder, no style appears in the Apply Styles task pane. Content placeholders, however, do appear inside HTML elements such as the <td> tag.
-
If the Apply Styles task pane is not visible, on the Task Panes menu, click Apply Styles.
-
In the Apply Styles task pane, click Options, and then click Show Styles Used On Selection.
Each style applied to the area where the cursor is located is outlined in blue, and a preview of the style appears inside the outline.
In the following illustration, div.ms-titleareaframe is selected in Design view. In the Apply Styles task pane, three styles that are applied to div.ms-titleareaframe appear. The top style, Div.ms-titleareaframe, defines the background color.
Note: Because styles are case-sensitive, the uppercase Div.ms-titleareaframe is different from the lowercase div.ms-titleareaframe.
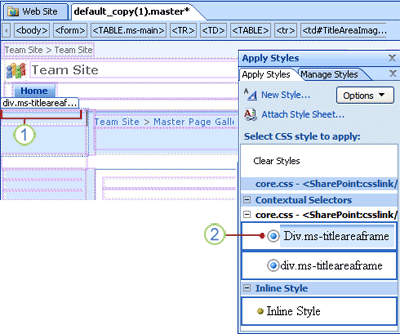
1. Div.ms-titleareaframe is selected in Design view.
2. The three styles applied to div.mstitleareaframe appear in the Apply Styles task pane.
-
Right-click the style that you want to modify, and then click Select All X Instance(s), where X is the number of instances in which the style is applied on the page.
For this example, right-click the top style, Div.ms-titleareaframe.
-
After you select all instances of the style, right-click the style again, and then click Modify Style.
-
In the Modify Style dialog box, make the changes that you want, and then click OK.
To follow the example, in the Modify Style dialog box, under Category, click Background. In the background-color list, click Red
 , and then click OK.
The new style is applied to the page.
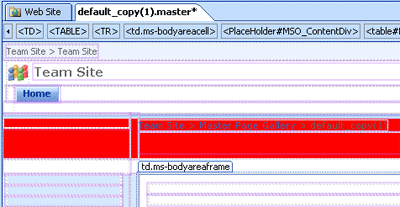
Continue modifying the styles until the master page looks how you want it to.
If at any time you decide that you are not satisfied with the changes that you have made to the master page, you can reset it to the site definition. For more information, see the article Reset a customized page to the site definition.
Suggested next steps
Basic customizations are a good place to start, but to make sweeping, site-wide customizations, you must first learn more about master pages and style sheets. For more information, see the following articles:
No comments:
Post a Comment