Add page number X of Y to a document
If you need to show the current page number and the total number of pages in a document, you can use the Page Number Gallery, or you can insert field codes. The quickest way is to use the Page Number gallery. Just remember, the Page Number Gallery will replace the existing header or footer if you have one.
What do you want to do?
Use the Page Number Gallery to insert Page X of Y
The Page Number Gallery provides a menu of ready-to-use page numbers.
-
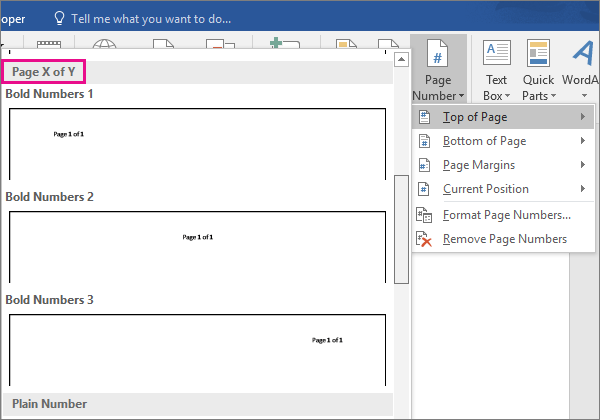
On the Insert tab, click Page Number.

-
Click a location, such as Top of Page.
Note: The Page Margins location does not include preformatted Page X of Y page numbers.
-
In the gallery, scroll through the options until you see Page X of Y.

-
Click a page number format.
-
To return to the body of your document, click Close Header and Footer on the Design tab (under Header & Footer Tools), or double-click anywhere outside the header or footer area.

Use field codes to insert Page X of Y
When you use the Page Number Gallery, Word automatically inserts two field codes for you—Page and NumPages. You add those codes manually when you don't want to lose information already in a header or footer.
-
Double-click in the header area or the footer area (near the top of the page or near the bottom of the page).
This opens the Design tab under Header & Footer Tools.
-
Position your cursor where you'd like to add the page numbers.
To place the page numbers in the center or on the right side of the page, do the following:
-
To place your page numbers in the center, click Insert Alignment Tab in the Position group of the Design tab, click Center, and then click OK.
-
To place your page numbers on the right side of the page, click Insert Alignment Tab in the Position group of the Design tab, click Right, and then click OK.
-
-
Type page and a space.
-
On the Insert tab, click Quick Parts and then click Field.
-
In the Field names list, click Page, and then click OK.
-
After the page number, type a space, type of, and then type another space.
-
On the Insert tab, click Quick Parts and then click Field.
-
In the Field names list, click NumPages, and then click OK.
-
After the total number of pages, type a space, and then type pages.
-
To change the numbering format, click Page Number in the Header & Footer group, and then click Format Page Numbers.
-
To return to the body of your document, click Close Header and Footer on the Design tab (under Header & Footer Tools).
If you'd like to learn more about field codes, see Field codes in Word.
Learn more about page numbers
-
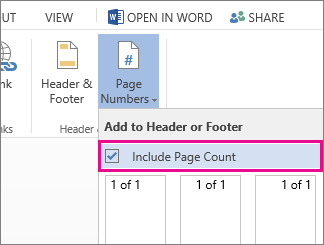
To show the total number of pages as well as the page number (for example, page 3 of 10), check the Include Page Count box near the top of the gallery.

-
If you don't want page numbers after all, click Remove Page Numbers at the bottom of the gallery.
-
To show the document title, author's name, or some other text with the page number, or to hide the page number on the title page, start by using Insert > Header & Footer instead of Insert > Page Numbers. For more info, see Add page numbers to headers or footers.
-
For more options—if, for example you want different page numbering in different sections—edit the document in Word instead of editing it in Word Online. If you don't have Word, you can try or buy it now.
No comments:
Post a Comment