To do a complete uninstall of Office for Mac 2011, you can download and run this handy automated tool. This is for troubleshooting purposes only. To do a regular uninstall, see Uninstall Office for Mac.
Note: If you don't want to use the tool and prefer to do all these steps by hand, you can learn how to Manually remove all OfficeForMac2011 files here.
Use the Remove2011 tool to completely remove Office for Mac 2011.
1. Download and open the Remove2011 tool
-
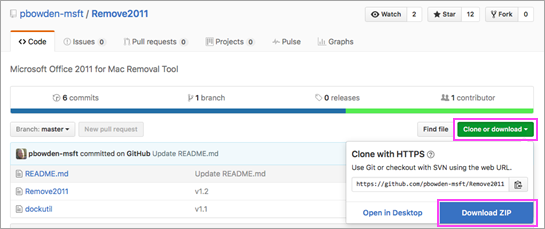
Go to this website.
-
Click the green Clone or download button. Click Download ZIP.
-
In your Downloads folder, open the Remove2011-master folder.
2. Run the Remove2011 tool
-
Control + click Remove2011 > Open. Click Open again to confirm.
-
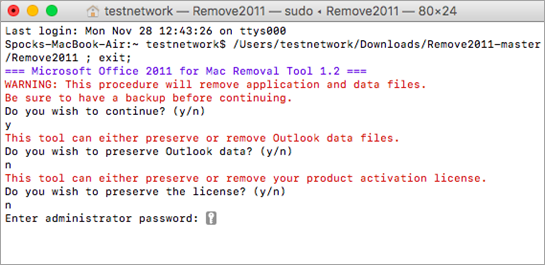
Type Y and press Enter to proceed.
-
Type Y to keep your Outlook data. Type N to delete it. Press Enter to confirm your choice.
-
Type Y to keep your license data on your computer. Type N to delete it. Press Enter to confirm your choice.
-
Enter your local Mac admin password and press Enter. Your password will not display as you type.
Note: If you still have an Office for Mac 2011 application open, you'll see a warning. Type Y and press Enter to force close the program and continue with the uninstall.
-
When the tool says "...completed," close this window and move on to the next section.
3. Run the dockutil tool
-
Go back to the Remove2011-master folder.
-
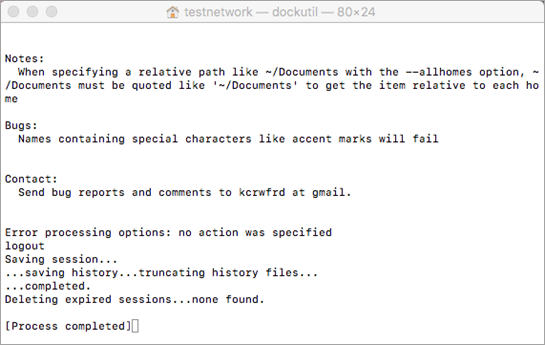
Control + click dockutil > Open. Click Open again to continue.
-
The tool will run automatically. It's done when you see Process completed.
4. Remove icons from the dock
-
If you have Office for Mac 2011 icons in your dock, right click and hold the icon.
-
Go to Options > Remove from dock.
-
All done! You've completely removed Office for Mac 2011 from your Mac.
Manual removal of Office for Mac 2011
The steps below are already automated in the process above. However, if you wish to complete the removal manually instead of using the tool, you can follow these steps.
Before you begin...
-
You must be signed in as administrator. If you own your own personal Mac, you probably already are.
Note: If you're using a Mac that's part of a network at work, you might have to ask someone in your IT organization for help with signing in as administrator.
-
Make sure there's nothing in Trash that you want to keep.
There are several things to remove. This article steps you through each one.
Important: The location of certain files are different if you have Service Pack 2 (SP2) installed. To check if it is installed, open Word, and then click About Word from the Word menu. If the version number is 14.2.0 or above, you have Service Pack 2 and you should follow the Service Pack 2 steps when provided in this article.
Step 1: Remove the Microsoft Office 2011 folder
-
Click Go > Applications.
-
Drag the Microsoft Office 2011 folder to Trash.
Note: Removing preferences using the steps below will delete any customizations that were made. These customizations include changes to toolbars, custom dictionaries, and keyboard shortcuts that were created.
Step 2: Remove com.microsoft files from Library > Preferences
-
Hold down the OPTION key while you click Go.
Note: Why hold down the Option key? The Library folder is a hidden folder, this way you can display it.
-
Click Home and open Library.
-
Open Preferences and sort files and folders by alphabetical order.
Note: If you have Office 2016 for Mac installed on your computer, DO NOT remove the file com.microsoft.autoupdate2.plist.
-
Drag all files that begin with "com.microsoft" to Trash.
-
Still in Preferences, open ByHost, and drag all files that begin with "com.microsoft" to Trash.
-
Before continuing, if you created custom templates that you want to keep, copy them to another folder.
Back in Library, open Application Support > Microsoft, and drag the Office folder to Trash.
Step 3: Remove com.microsoft.office.licensing files from Computer > Library folders
-
Click Go > Computer > double-click your hard disk icon.
The default name of your hard disk is Macintosh HD.
-
Open Library, and then open LaunchDaemons. Drag com.microsoft.office.licensing.helper.plist to Trash.
-
Back in Library, open Preferences. Drag com.microsoft.office.licensing.plist to Trash.
-
Back in Library, open PrivilegedHelperTools. Drag com.microsoft.office.licensing.helper to Trash.
Note: If you have Office 2016 for Mac installed on your computer, DO NOT remove any files with V2 in the name. These files are all specific to Office 2016 for Mac.
-
On the Apple menu, click Restart.
Step 4: Remove Microsoft folders and Office 2011 files
-
Click Go > Computer, and double-click your hard disk icon.
The default name of your hard disk is Macintosh HD.
-
Open Library, and then open Application Support.
-
Drag the Microsoft folder to Trash.
Warning: If you have the Microsoft Silverlight plug-in installed, you may need to reinstall if after removing this folder. Go here to reinstall Microsoft Silverlight.
-
Back in Library, open Fonts. Drag the Microsoft folder to Trash.
-
Back in Library, open Receipts. Drag any files that begin with "Office2011_" to Trash.
Note: These files are not always found on the computer.
-
Make sure all the files and folders in the Trash can be deleted. On the Finder menu, click Empty Trash.
-
On the Apple menu, click Restart.
Step 5: Move to desktop and rename the Microsoft User Data folder
-
Click Go > Computer, and double-click your hard disk icon.
The default name of your hard disk is Macintosh HD.
-
Open Library, and then open Application Support.
-
Drag the Microsoft folder to Trash.
Warning: If you have the Microsoft Silverlight plug-in installed, you may need to reinstall if after removing this folder. Go here to reinstall Microsoft Silverlight.
-
Back in Library, open Fonts. Drag the Microsoft folder to Trash.
-
Back in Library, open Receipts. Drag any files that begin with "Office2011_" to Trash.
Note: These files are not always found on the computer.
-
Make sure all the files and folders in the Trash can be deleted. On the Finder menu, click Empty Trash.
-
On the Apple menu, click Restart.
Step 6: Remove Office application icons
-
Hold down the CONTROL key, and then click an Office application icon in the Dock such as Microsoft Word. Do this for each icon in your dock.
-
Click Options > Remove from Dock.
I never thought it was possible to recover stolen cryptocurrency due to my past experience trying to recover $228k that was stolen from my usdt w.a.l.l.e.t; until I read an article on this webpage www.thedailychargeback.com , I summited all documents needed to carryout the recovery operation, they successfully recover $205k from what I lost, I advice anyone having problems with lost or stolen cryptocurrency issues to reach to them.
ReplyDeleteHad a credit union mistakenly apply my payment 2 days later than I should have missing my statement and date. They said they fixed the mistake and I will see this correction on my next statement but the issue is it was reported to the bureaus with wrong amount prior to them correcting this. The amount is over $16k so this is making a huge impact on my credit score/utilization/total balances and ability to get approved for new credit. Well, I fixed my credit and got rid off my debts with the help of PINNACLE CREDIT SPECIALIST whom a trusted friend recommended and he did a perfect job increasing my credit score to (801 TransUnion, 805 Experian, 807 Equifax) all credit card debts are marked as paid, public record, bankruptcy and hard inquiries are all gone. I’m so happy. I refer this great hacker to those who have a fixed date to fix their credit profile. Text PINNACLE ON +1 (585) 466 4373. Tell them Tricia Walton Referred you. You can also reach them on PINNACLECREDITSPECIALIST@GMAIL.COM
ReplyDelete