Sunday, February 28, 2021

Explore the files list in teams

Teams often work with a lot of files. The Files list makes it easier to locate the one you need.

Your browser does not support video.

Watch this video for a quick tour of the Files list.

Select Files Files button on the left side of Teams for quick access to all your files, arranged in the following views:

  • Recent lists every file you've recently viewed or edited.

    Tip: Another way to view your recent files is to enter /files in the command bar at the top of Teams.

  • Microsoft Teams contains all the documents that were recently created or edited in the channels that appear in your teams list.

  • Downloads shows all the files you've downloaded from Teams. This list is cleared each time you sign out of Teams.

  • Cloud storage shows the cloud storage services you've connected to Teams. Select a service to view your cloud files.

    List of folders and files in OneDrive

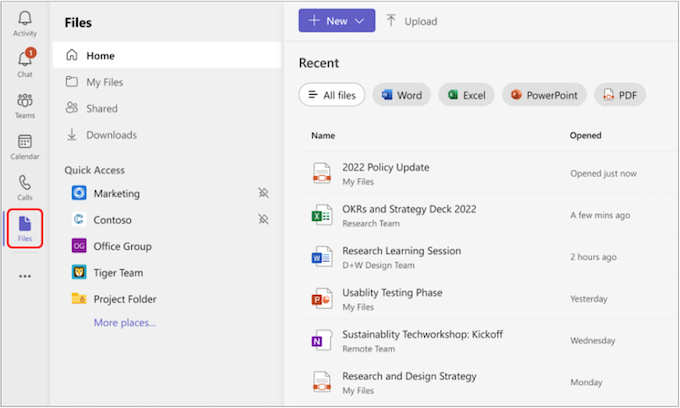
    From here, you can delete any personal file you've added to Teams, upload files, and create new files. Files added to cloud storage are private until you share them.

    By default, OneDrive cloud storage will be available. If your IT admin made it possible to add other cloud storage services, you'll see an Add cloud storage button at the bottom of the screen.

To view files in a specific chat or channel

  • Tap Files at the top of the conversation.

To view your recent files

  • Tap More Teams more icon  and then Files at the bottom right of the screen.
    From there you can also access your cloud storage files.

By default, OneDrive cloud storage will be available. Depending on policies set by your IT admin, you may be able to add other cloud storage services. For information on setting up other cloud storage services, see Add third-party apps to the Files app on iOS.

To view files in a specific chat or channel 

  • Tap Files at the top of the conversation.

To view your recent files

  • Tap More Teams more icon  and then Files at the bottom right of the screen.
    From there you can also access your cloud storage files.

By default, OneDrive cloud storage will be available. Depending on policies set by your IT admin, you may be able to connect other cloud storage services to Teams.

To learn more, see Files in Microsoft Teams.

Get geographic location data

To insert geographic data into Excel, you first convert text into the Geography data type. Then you can use another column to extract certain details relative to that data type, like Total population, or Time zone.

Note: The Geography data type is only available to Worldwide Multi-Tenant clients (standard Microsoft 365 accounts).

Use the Geography data type

  1. Type some text in cells. For example, type a country, state, province, territory, or city name into each cell.

  2. Then select the cells.

  3. Although it's not required, we recommend creating an Excel table. Later on, this will make extracting online information easier. To create a table, go to Insert > Table.

  4. With the cells still selected, go to the Data tab, and then click Geography.

  5. If Excel finds a match between the text in the cells, and our online sources, it will convert your text to the Geography data type. You'll know they're converted if they have this icon: Linked record icon for Geography

  6. Select one or more cells with the data type, and the Insert Data  button Add Column button will appear. Click that button, and then click a field name to extract more information. For example, pick Population.

  7. Click the Insert Data  button again to add more fields. If you're using a table, type a field name in the header row. For example, type Area in the header row and the Area column will appear with data.

Tips: 

  • To see all of the fields available, click the geography icon ( Linked record icon for Geography ) or select the cell and press Ctrl+Shift+F5.

  • If you see Question mark icon instead of an icon, then Excel is having a hard time matching your text with data in our online sources. Correct any spelling mistakes and when you press Enter, Excel will do its best to find matching information. Or, click Question mark icon and a selector pane will appear. Search for data using a keyword or two, choose the data you want, and then click Select.

  • You can also write formulas that reference data types.

See also

Poisson function

Returns the Poisson distribution. A common application of the Poisson distribution is predicting the number of events over a specific time, such as the number of cars arriving at a toll plaza in 1 minute.

Syntax

POISSON(x,mean,cumulative)

X     is the number of events.

Mean     is the expected numeric value.

Cumulative     is a logical value that determines the form of the probability distribution returned. If cumulative is TRUE, POISSON returns the cumulative Poisson probability that the number of random events occurring will be between zero and x inclusive; if FALSE, it returns the Poisson probability mass function that the number of events occurring will be exactly x.

Remarks

  • If x is not an integer, it is truncated.

  • If x or mean is nonnumeric, POISSON returns the #VALUE! error value.

  • If x ≤ 0, POISSON returns the #NUM! error value.

  • If mean ≤ 0, POISSON returns the #NUM! error value.

  • POISSON is calculated as follows.

    For cumulative = FALSE:

    Equation

    For cumulative = TRUE:

    Equation

Example

X

Mean

Formula

Description (Result)

2

5

=POISSON([X],[Mean],TRUE)

Cumulative Poisson probability with the specified arguments (0.124652)

2

5

=POISSON([X],[Mean],FALSE)

Poisson probability mass function with the specified arguments (0.084224)

Translate text into a different language

Surface Book device photo

The Translate feature is currently available for Word, Excel, OneNote, and PowerPoint. You can get a translator add-in for Outlook in the Office store. See Translator for Outlook for more information.

Now available to Microsoft 365 Subscribers on Windows who have chosen to be on the Beta channel.

When you receive an email in another language, a prompt will appear at the top of the message asking if you'd like Outlook to translate it into your default language.

An email header showing Outlook offering to translate from Chinese Simplified to English.

If you select Translate message, Outlook will replace the message text with translated text. 

You can then select Show original message to see the message in the original language or Turn on automatic translation to always translate messages in another language.

If you select Never translate, Outlook won't ask you if you'd like to translate messages in that language in the future.

You can change your translation preferences and choose your translation language by going to File > Options > Language.

Tip: Want to translate just a selected bit of text from a message? Select that text and right-click. Outlook will show you the translation right there in the context menu that appears.

Word for Microsoft 365 makes it easy

In Word for Microsoft 365 when you open a document in a language other than a language you have installed in Word, Word will intelligently offer to translate the document for you. Click the Translate button and a new, machine-translated, copy of the document will be created for you.

A prompt offering to translate the document for you.

Translate words or phrases in Word, Excel, or PowerPoint

  1. In your document, spreadsheet or presentation, highlight the cell or text you want to translate.

  2. Select Review > Translate.

  3. Select your language to see the translation.

  4. Select Insert. The translated text will replace the text you highlighted in step 1.

    Note: In Excel, there is no Insert button, you'll have to copy/paste the text you highlighted in step1.

    You might see a list of several translations. Expand the translated item to show a usage example in both languages. Choose the one you want and click Copy.

    Translation options for a word

Available in: WordPowerPointExcel

This feature is available to Microsoft 365 subscribers and Office 2019 customers using Version 1710 or higher of Word; or Version 1803 or higher of PowerPoint or Excel. You must also be connected to the internet, and have Office connected experiences enabled to use Translator.

Subscribers get new features and improvements monthly.

Buy or try Microsoft 365

Not sure what version of Office you're running? See What version of Office am I using?

This feature is not currently available to customers using Microsoft 365 operated by 21Vianet.

Animation of the Translator feature converting from English to Russian.

Translate a whole file in Word

  1. Select Review > Translate > Translate Document.

  2. Select your language to see the translation.

  3. Select Translate. A copy of the translated document will be opened in a separate window.

  4. Select OK in the original window to close translator.

Available in: Word

This feature is available to Microsoft 365 subscribers and Office 2019 customers using Version 1710 or higher of Word. You must also be connected to the internet, and have Office connected experiences enabled to use Translator.

Users with Office 2016, but without a subscription, will have the same translation features that are available in Office 2013 and earlier. 

Subscribers get new features and improvements monthly. 

Not sure what version of Office you're running? See What version of Office am I using?

Shows animation for document translation

Translate words or phrases in OneNote for Windows 10

  1. In your notes highlight the text you want to translate.

  2. Select View > Translate > Selection.

  3. Select your language to see the translation.

  4. Select Insert. The translated text will replace the text you highlighted in step 1.

Translate a whole page in OneNote for Windows 10

  1. Select View > Translate > Page.

  2. Select your language to see the translation.

  3. Select Translate. The translated page will be added as a sub-page of the existing page.

  4. Select OK in the original window to close translator.

If you later want to change the To language for document translation, or if you need to translate a document to more than one language, you can do so, by selecting Set Document Translation Language...from the Translate menu.

Shows Set Document Translation Language under theTranslate menu

See also

The translation tools available depend on which Office program you're using:

  • Translate Document/Translate Item: Word, Outlook.

  • Translate Selected Text: Word, Outlook, OneNote, PowerPoint, Publisher, Excel, Visio.

  • Mini Translator: Word, Outlook, PowerPoint, OneNote

    Available translation tools in Office programs

You can have an entire Word document or Outlook message translated by a computer ("machine translation") and displayed in a web browser. When you choose this kind of translation, the content in your file is sent over the Internet to a service provider.

Note: Machine translation is helpful for conveying the basic subject matter of the content and for confirming whether the content is relevant to you. For high accuracy or sensitive files, human translation is recommended, because machine translation might not preserve the full meaning and tone of the text.

Choose your translation language

  1. On the Review tab, in the Language group, click Translate > Choose Translation Language.

    Choose Translation Language

  2. Under Choose document translation languages click the Translate from and Translate to languages that you want, and then click OK.

Translate the document or message

  1. On the Review tab, in the Language group, click Translate.

  2. Click Translate Document (Translate Item in Outlook). The From and To languages that you selected are listed.

    Translating a document or message

A browser tab opens with your file in both the original language and the language that you selected for translation.

Note: If this is the first time you have used translation services, you may need to click OK to install the bilingual dictionaries and enable the translation service through the Research pane. You can also see which bilingual dictionaries and machine translation services you have enabled by clicking the Translation options link in the Research pane. See the next section (Translate selected text) to learn how to access the Research pane.

You can use the Research pane to translate a phrase, sentence, or paragraph into several selected language pairs in the following Microsoft Office programs: Excel, OneNote, Outlook, PowerPoint, Publisher, Visio, and Word.

Note: In PowerPoint, only one slide's text box can be translated at a time.

  1. On the Review tab, in the Language group, click Translate > Translate Selected Text to open the Research pane.

    Translate Selected Text

    Note: In Word, you can right-click anywhere in the document, and then click Translate.

  2. In the Research pane, in the All Reference Books list, click Translation.

    The Translation option in the Research pane

  3. Do one of the following to translate a word or short phrase:

    • Select the words, press ALT, and then click the selection. The results appear in the Research pane under Translation.

    • Type the word or phrase in the Search for box, and then press Enter.

      Notes: 

      • If this is the first time you have used translation services, click OK to install the bilingual dictionaries and enable the translation service through the Research pane.

      • You can also see which bilingual dictionaries and machine translation services you have enabled by clicking the Translation options link in the Research pane.

      • To change the languages that are used for translation, in the Research pane, under Translation, select the languages that you want to translate from and to. For example, to translate English to French, click English in the From list and French in the To list.

      • To customize which resources are used for translation, click Translation options, and then select the options that you want.

In Word, Outlook, PowerPoint, and OneNote, the Mini Translator displays the translation of one word as you point at it with your cursor. You can also copy the translated text to the Clipboard, paste it into another document, or play a pronunciation of the translated word.

  1. On the Review tab, in the Language group, click Translate > Mini Translator.

    Mini Translator

  2. Point to a word or phrase that you want translated with your mouse. When a faint dialog box appears overlayed in your document, move your mouse over it to see any translations available.

Note: The Mini Translator will continue to appear whenever you move over words. To turn it off, repeat step 1 above.

For more information, see See translations with the Mini Translator.

To translate text directly in a browser, you can use Bing Translator. Powered by Microsoft Translator, the site provides free translation to and from more than 70 languages. To learn more, see Translating text using Translator.

This feature is only available if you have an Office 365 subscription, or Office 2019 for Mac, and only for Word, Excel, and PowerPoint.  For Translator in Outlook see Translator for Outlook for more information.

Translate a whole document

  1. Select Review > Translate > Translate Document.

  2. Select your language to see the translation.

  3. Select Translate. A copy of the translated document will be opened in a separate window.

    Available in: Word

Translate selected text

  1. In your document, highlight the text you want to translate.

  2. Select Review > Translate > Translate Selection.

  3. Select your language to see the translation.

  4. Select Insert. The translated text will replace the text you highlighted in step 1.

    Available in: WordPowerPointExcel

Translate a whole document

Word for the web makes it easy to translate an entire document. When you open a document that is in a language other than your default language, Word for the web will automatically offer to create a machine-translated copy for you.

A prompt in Word for the web offering to create a translated copy of the document.

If you'd prefer to initiate the translation manually, you can still do that with these steps:

  1. Select Review > Translate > Translate Document.

  2. Select your language to see the translation.

  3. Select Translate. A copy of the translated document will be opened in a separate window.

    Available in: Word

Translate selected text

  1. In your document, highlight the text you want to translate.

  2. Select Review > Translate > Translate Selection.

  3. Select your language to see the translation.

  4. Select Insert. The translated text will replace the text you highlighted in step 1.

    Available in: Word

Translate an email

  1. When you receive an email in another language, a prompt will appear at the top of the message asking if you'd like Outlook to translate it into your default language.

    Screenshot of the prompt to translate a message

  2. If you select Translate message, Outlook will replace the message text with translated text. 

    You can then select Show original message to see the message in the original language or Turn on automatic translation to always translate messages in another language.

  3. If you select Never translate, Outlook won't ask you if you'd like to translate messages in that language in the future.

  4. You can change your translation preferences and choose your translation language by going to SettingsSettings > 
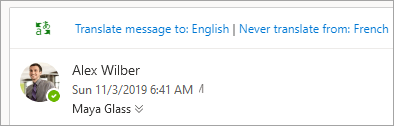
View all Outlook settings > Mail > Message handling.

    Available in: Outlook

More information

Sort records based on partial values in a field

There may be times when you want to sort records in Access based only on the month portion of date values and ignore the day and year. Or, you might want to sort records based only on the first few characters of a text field. This topic shows you how to do perform these searches by creating simple expressions.

What do you want to do?

Sort on partial date values

When you sort records by using one of the Sort commands, the entire date value — day, month, and year — is used to determine the position of each record. But suppose you want to sort birthdays based only on the months in which they occur, and ignore the day and year portion of the values.

Sorting on just a portion of the date values requires writing an expression. You can sort on the data in a table or the results of a query — but you must first be in Datasheet view. You write your expression in the query region of the Filter tab. The expression you create extracts just the data you want and then uses it as the basis for sorting.

Display the Filter tab

  1. Switch your table or query to Datasheet view.

    If you are working with a query, run the query to display the results in Datasheet view.

  2. On the Home tab, in the Sort & Filter group, click Advanced and then click Advanced Filter/Sort on the shortcut menu.

    Access displays a new object tab with Filter in the name.

Create the expression

  1. On the Home tab, in the Sort & Filter group, click Advanced and then click Advanced Filter/Sort on the shortcut menu.

  2. Type an expression in the Field row in the first column. For example, to sort by month regardless of the year, type the expression Expr1: DatePart("m",[BirthDate]) in the Field row in the first column.

  3. To sort records by days within each month, type Expr2: DatePart("d",[BirthDate]) in the Field row in the second column.

    The DatePart function in the first column sorts the records by month, and the DatePart function in the second column sorts the records by days within each month.

  4. In the Sort row, select Ascending or Descending for each of the expressions.

    An ascending sort in the first column displays January at the top and December at the bottom. An ascending sort in the second column displays 1 at the top and 31 at the bottom. A descending sort order does the opposite.

  5. On the Home tab, in the Sort & Filter group, click Toggle Filter.

Top of Page

Sort on partial text values

Sorting on partial text values is very similar to sorting on partial date values. You need to write an expression in the Advanced Filter/Sort window to extract the characters that form the basis for sorting.

Assume that the City field contains values such as North Seattle, South Seattle, North Tacoma, or South Tacoma. Suppose you want to ignore the first word and sort the records on the second word alone.

  1. On the Home tab, in the Sort & Filter group, click Advanced and then click Advanced Filter/Sort on the shortcut menu.

  2. Type an expression in the Field row in the first column. For example, type =Mid([City], 7) to ignore the first six characters in the City field.

    The Mid function returns a substring contained in a specified string or field. In this case, for each record, the function returns the value starting from the seventh character (that is, after the space) in the City field.

  3. In the Sort cell, select Ascending or Descending.

  4. On the Home tab, in the Sort & Filter group, click Toggle Filter.

Top of Page

Spc function

Note: The function, method, object, or property described in this topic is disabled if the Microsoft Jet Expression Service is running in sandbox mode, which prevents the evaluation of potentially unsafe expressions. For more information on sandbox mode, search for "sandbox mode" in Help.

Used with the Print # statement or the Print method to position output.

Syntax

Spc ( n )

The required nargument is the number of spaces to insert before displaying or printing the next expression in a list.

Remarks

If n is less than the output line width, the next print position immediately follows the number of spaces printed. If n is greater than the output line width, Spc calculates the next print position using the formula:

currentprintposition + (n Mod width)

For example, if the current print position is 24, the output line width is 80, and you specify Spc(90), the next print will start at position 34 (current print position + the remainder of 90/80). If the difference between the current print position and the output line width is less than n (or n Mod width), the Spc function skips to the beginning of the next line and generates spaces equal to n – (widthcurrentprintposition).

Note:  Make sure your tabular columns are wide enough to accommodate wide letters.

When you use the Print method with a proportionally spaced font, the width of space characters printed using the Spc function is always an average of the width of all characters in the point size for the chosen font. However, there is no correlation between the number of characters printed and the number of fixed-width columns those characters occupy. For example, the uppercase letter W occupies more than one fixed-width column and the lowercase letter i occupies less than one fixed-width column.

Example

Note: Examples that follow demonstrate the use of this function in a Visual Basic for Applications (VBA) module. For more information about working with VBA, select Developer Reference in the drop-down list next to Search and enter one or more terms in the search box.

This example uses the Spc function to position output in a file and in the Immediate window.

' The Spc function can be used with 
' the Print # statement.
Open "TESTFILE" For Output As #1 ' Open file for output.
Print #1, "10 spaces between here"; Spc(10); "and here."
Close #1 ' Close file.

The following statement causes the text to be printed in the Immediate window (using the Print method), preceded by 30 spaces.

Debug.Print Spc(30); "Thirty spaces later..."

Getting started with the onenote class notebook a walkthrough for teachers

The OneNote Class Notebook is an app that helps you set up OneNote in your class. This app will create a class notebook, which includes three types of sub-notebooks:

  • Student Notebooks — private notebooks that are shared between each teacher and their individual students. Teachers can access these notebooks at any time, but students cannot see other students' notebooks.

  • Content Library — a notebook for teachers to share course materials with students. Teachers can add and edit its materials, but for students, the notebook is read-only.

  • Collaboration Space — a notebook for all students and the teacher in the class to share, organize, and collaborate.

In addition, we have released the Class Notebook Add-in, which is a useful tool to help make Class Notebooks even more efficient for teachers. This add-in is freely available for users of OneNote 2013 and 2016 for Windows, and is also built into OneNote 2016 for Mac. To learn more, please see these Support articles:

What you'll need

  • An Microsoft 365 subscription for Education that includes OneDrive for Business. If you're not sure you have this, please contact your IT administrator to verify.

  • An organizational account for yourself (the teacher) with permissions to use the OneNote Class Notebook app to create the class notebooks.

  • Your students must have an Microsoft 365 organizational account.

We recommend Internet Explorer 10 or Internet Explorer 11 to use the OneNote Class Notebook app. Other modern browsers should also work.

GETTING STARTED

Launch the OneNote Class Notebook

  1. Sign in to Office 365.

  2. Click the app launcher in the upper left, then All apps.

    The Microsoft 365 app launcher

  3. In the list of apps that appears, click the Class Notebook app.

Create a Class Notebook

Create a Class Notebook in OneNote

(Optional) Add another teacher to your Class Notebook

Add or remove co-teachers in Class Notebook for OneNote

Add your students to your Class Notebook

Add students to a Class Notebook in OneNote

Managing Class Notebooks

To manage other capabilities for your Class Notebooks, click the Manage notebooks button from the Class Notebook wizard.

Screenshot of the Notebook Lists icon.

This displays a page that shows all class notebooks created by you, as well as information for customizing each one.

Options include:

  • Renaming student sections — To rename any student sections, click the little pencil icon, and then type the new name of the section. Be sure to click Save after renaming student sections.

  • Adding student sections — To distribute a new section to all students, click the Add section button. Be sure to click Save after adding student sections.

  • Enabling the Teacher-Only section group — The Teacher-Only section group is a private space where only the teacher can see what's inside. To add a Teacher Only section group to your Class Notebook, click Enable Teacher-Only section group. Other teachers that have access to your Class Notebook will also have access to the Teacher-Only section group, but students cannot see anything here.

  • Locking the Collaboration Space — Enabling this option changes the Collaboration Space to read-only (or lockdown) to prevent any students from editing. You can toggle the switch from locked to unlocked at any time.

  • Opening the Class Notebook — Click Open to open the Class Notebook.

  • Sharing a link to the Class Notebook — To send a link to the Class Notebook to your class, select and copy the text in the Link box, and then paste it into an email.

Options for managing notebooks

Help your students find their Class Notebook

Find and share Class Notebook URL

TROUBLESHOOTING

Troubleshoot Class Notebook

I don't see the OneNote Class Notebook icon in my app launcher. What's wrong?

Try the following:

  1. Make sure you have one of the following licenses:

    • Office 365 Education for Faculty

    • Office 365 A1 Plus PLUS for Faculty

    • Microsoft 365 Faculty Individual Sign Up

    • Office 365 A1 for Faculty

    • Microsoft 365 Plan A2 for Faculty

    • Office 365 A3 for Faculty

    • Microsoft 365 Plan A4 for Faculty

    • SharePoint (Plan 1) for Faculty

    • SharePoint (Plan 2) for Faculty

    • Office Professional Plus for Faculty

    • Office Web Apps (Plan 1) For Faculty

    • Office Web Apps (Plan 2) For Faculty

  2. Check that the OneNote Class Notebook app is not disabled in the Admin Portal:

    • Open the app launcher and then click Admin.

      The Office 365 app launcher with the Admin app highlighted

    • In the left navigation pane, under Admin, click SharePoint.

      Screenshot of the Admin navigation pane

    • On the next screen, in the left navigation pane, click Settings.

      Screenshot of the Site Collections task pane

    • Check that OneNote Class Notebook is set to Show.

      Screenshot of the Show/Hide options

  3. If you still don't see the OneNote Class Notebook icon after following the preceding steps, please file a support ticket at https://aka.ms/EDUSupport.

Highlight your text

Text highlighting in PowerPoint for Microsoft 365 and PowerPoint 2019 lets subscribers mark text in yellow or another highlighter color. (This feature is available on both Windows and macOS, and it's available in your browser in PowerPoint for the web.)


If you don't see the Text Highlight Color  Shows the Highlight With Text Icon in PowerPoint. button on the Home tab of the Ribbon, read Requirements below for more details.

Highlight one piece of text

  1. Select the text that you want to highlight.

  2. On the Home tab, select the arrow next to Text Highlight Color Shows the Highlight With Text Icon in PowerPoint. .

  3. Choose a color. The text you selected will be highlighted in the color you chose.

Highlight multiple pieces of non-contiguous text

  1. With no text selected on the slide, on the Home tab, select the arrow next to Text Highlight Color Shows the Highlight With Text Icon in PowerPoint. .

  2. Choose a color, and then move the mouse pointer over the text area of your slide.

    The mouse pointer changes to a highlighter. Hightlighter Pointer Icon .

  3. Select each portion of text that you want to highlight.

  4. When you're done highlighting, press Esc on the keyboard to turn off the highlighter.

Remove highlighting from text

  1. Select the highlighted text.

  2. On the Home tab, select the arrow next to Text Highlight Color Shows the Highlight With Text Icon in PowerPoint. and click No Color.

Other ways to highlight

Here are two other ways to emphasize something on screen while you're presenting:

Requirements for Text Highlighting

Task, checklist, planning symbol

Applies to:

PowerPoint for Microsoft 365
 Current Channel: Version 1606 or later
 Semi-Annual Enterprise Channel: Version 1701 or later 
PowerPoint 2019
 Find your Office version

Windows
 Find your Windows version


If you don't see the Text Highlight Color  Shows the Highlight With Text Icon in PowerPoint. button on the Home tab of the Ribbon, read Requirements below for more details.

Highlight one piece of text

  1. Select the text that you want to highlight.

  2. On the Home tab, select the arrow next to Text Highlight Color Text highlighter button .

  3. Choose a color. The text you selected will be highlighted in the color you chose.

Highlight multiple pieces of non-contiguous text

  1. With no text selected on the slide, on the Home tab, select the arrow next to Text Highlight Color Text highlighter button .

  2. Choose a color, and then move the mouse pointer over the text area of your slide.

    The mouse pointer changes to a highlighter. Text highlighter tool .

  3. Select each portion of text that you want to highlight.

  4. When you're done highlighting, press Esc on the keyboard to turn off the highlighter.

Remove highlighting from text

  1. Select the highlighted text.

  2. On the Home tab, select the arrow next to Text Highlight Color Text highlighter button and click No Color.

Another way to highlight

Turn your mouse into a laser pointer to draw attention to something on a slide

Requirements for Text Highlighting

Task, checklist, planning symbol

Applies to:

PowerPoint for Microsoft 365 for Mac Version 16.10 or later 
PowerPoint 2019 for Mac
 Find your Office version

Mac OS X 10.10 or later 

Highlight text

  1. Select the text that you want to highlight.

  2. On the Home tab, select the arrow next to Text Highlight Color Text Highlighter button .

  3. Choose a color. The text you selected will be highlighted in the color you chose.