Use the Find and Replace features in Excel to search for something in your workbook, such as a particular number or text string. You can either locate the search item for reference, or you can replace it with something else. You can include wildcard characters such as question marks, tildes, and asterisks, or numbers in your search terms. You can search by rows and columns, search within comments or values, and search within worksheets or entire workbooks.
Find
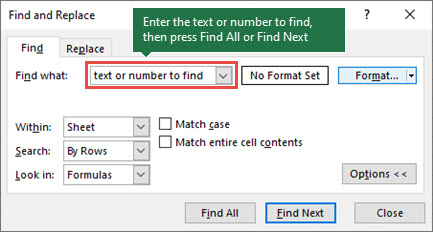
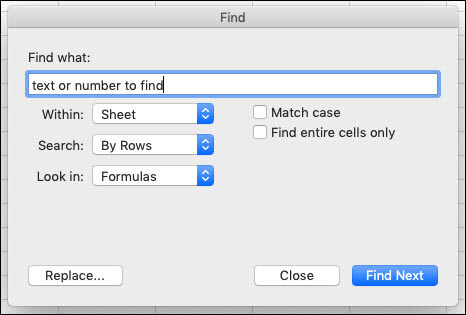
To find something, press Ctrl+F, or go to Home > Editing > Find & Select > Find.
Note: In the following example, we've clicked the Options >> button to show the entire Find dialog. By default, it will display with Options hidden.
-
In the Find what: box, type the text or numbers you want to find, or click the arrow in the Find what: box, and then select a recent search item from the list.
Tips: You can use wildcard characters — question mark (?), asterisk (*), tilde (~) — in your search criteria.
-
Use the question mark (?) to find any single character — for example, s?t finds "sat" and "set".
-
Use the asterisk (*) to find any number of characters — for example, s*d finds "sad" and "started".
-
Use the tilde (~) followed by ?, *, or ~ to find question marks, asterisks, or other tilde characters — for example, fy91~? finds "fy91?".
-
-
Click Find All or Find Next to run your search.
Tip: When you click Find All, every occurrence of the criteria that you are searching for will be listed, and clicking a specific occurrence in the list will select its cell. You can sort the results of a Find All search by clicking a column heading.
-
Click Options>> to further define your search if needed:
-
Within: To search for data in a worksheet or in an entire workbook, select Sheet or Workbook.
-
Search: You can choose to search either By Rows (default), or By Columns.
-
Look in: To search for data with specific details, in the box, click Formulas, Values, Notes, or Comments.
Note: Formulas, Values, Notes and Comments are only available on the Find tab; only Formulas are available on the Replace tab.
-
Match case - Check this if you want to search for case-sensitive data.
-
Match entire cell contents - Check this if you want to search for cells that contain just the characters that you typed in the Find what: box.
-
-
If you want to search for text or numbers with specific formatting, click Format, and then make your selections in the Find Format dialog box.
Tip: If you want to find cells that just match a specific format, you can delete any criteria in the Find what box, and then select a specific cell format as an example. Click the arrow next to Format, click Choose Format From Cell, and then click the cell that has the formatting that you want to search for.
Replace
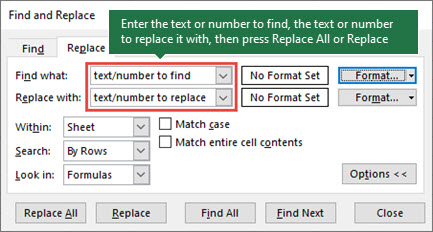
To replace text or numbers, press Ctrl+H, or go to Home > Editing > Find & Select > Replace.
Note: In the following example, we've clicked the Options >> button to show the entire Find dialog. By default, it will display with Options hidden.
-
In the Find what: box, type the text or numbers you want to find, or click the arrow in the Find what: box, and then select a recent search item from the list.
Tips: You can use wildcard characters — question mark (?), asterisk (*), tilde (~) — in your search criteria.
-
Use the question mark (?) to find any single character — for example, s?t finds "sat" and "set".
-
Use the asterisk (*) to find any number of characters — for example, s*d finds "sad" and "started".
-
Use the tilde (~) followed by ?, *, or ~ to find question marks, asterisks, or other tilde characters — for example, fy91~? finds "fy91?".
-
-
In the Replace with: box, enter the text or numbers you want to use to replace the search text.
-
Click Replace All or Replace.
Tip: When you click Replace All, every occurrence of the criteria that you are searching for will be replaced, while Replace will update one occurrence at a time.
-
Click Options>> to further define your search if needed:
-
Within: To search for data in a worksheet or in an entire workbook, select Sheet or Workbook.
-
Search: You can choose to search either By Rows (default), or By Columns.
-
Look in: To search for data with specific details, in the box, click Formulas, Values, Notes, or Comments.
Note: Formulas, Values, Notes and Comments are only available on the Find tab; only Formulas are available on the Replace tab.
-
Match case - Check this if you want to search for case-sensitive data.
-
Match entire cell contents - Check this if you want to search for cells that contain just the characters that you typed in the Find what: box.
-
-
If you want to search for text or numbers with specific formatting, click Format, and then make your selections in the Find Format dialog box.
Tip: If you want to find cells that just match a specific format, you can delete any criteria in the Find what box, and then select a specific cell format as an example. Click the arrow next to Format, click Choose Format From Cell, and then click the cell that has the formatting that you want to search for.
There are two distinct methods for finding or replacing text or numbers on the Mac. The first is to use the Find & Replace dialog. The second is to use the Search bar in the ribbon.
Find & Replace dialog
Search bar and options
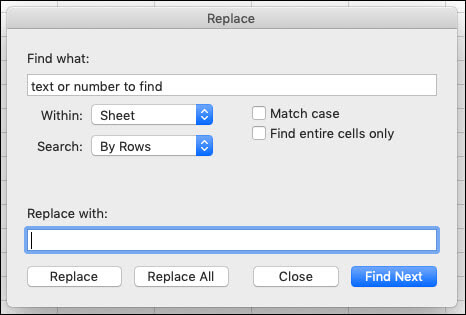
Find text or numbers with the Find & Replace dialog
To find something, press Ctrl+F, or go to Home > Find & Select > Find.
-
In the Find what: box, type the text or numbers you want to find.
-
Click Find Next to run your search.
-
You can further define your search if needed:
-
Within: To search for data in a worksheet or in an entire workbook, select Sheet or Workbook.
-
Search: You can choose to search either By Rows (default), or By Columns.
-
Look in: To search for data with specific details, in the box, click Formulas, Values, Notes, or Comments.
Note: Formulas, Values, Notes and Comments are only available on the Find tab; only Formulas are available on the Replace tab.
-
Match case - Check this if you want to search for case-sensitive data.
-
Match entire cell contents - Check this if you want to search for cells that contain just the characters that you typed in the Find what: box.
-
Tips: You can use wildcard characters — question mark (?), asterisk (*), tilde (~) — in your search criteria.
-
Use the question mark (?) to find any single character — for example, s?t finds "sat" and "set".
-
Use the asterisk (*) to find any number of characters — for example, s*d finds "sad" and "started".
-
Use the tilde (~) followed by ?, *, or ~ to find question marks, asterisks, or other tilde characters — for example, fy91~? finds "fy91?".
Replace text or numbers with the Find & Replace dialog
To replace text or numbers, press Ctrl+H, or go to Home > Find & Select > Replace.
-
In the Find what box, type the text or numbers you want to find.
-
In the Replace with box, enter the text or numbers you want to use to replace the search text.
-
Click Replace or Replace All.
Tip: When you click Replace All, every occurrence of the criteria that you are searching for will be replaced, while Replace will update one occurrence at a time.
-
You can further define your search if needed:
-
Within: To search for data in a worksheet or in an entire workbook, select Sheet or Workbook.
-
Search: You can choose to search either By Rows (default), or By Columns.
-
Match case - Check this if you want to search for case-sensitive data.
-
Match entire cell contents - Check this if you want to search for cells that contain just the characters that you typed in the Find what: box.
-
Tips: You can use wildcard characters — question mark (?), asterisk (*), tilde (~) — in your search criteria.
-
Use the question mark (?) to find any single character — for example, s?t finds "sat" and "set".
-
Use the asterisk (*) to find any number of characters — for example, s*d finds "sad" and "started".
-
Use the tilde (~) followed by ?, *, or ~ to find question marks, asterisks, or other tilde characters — for example, fy91~? finds "fy91?".
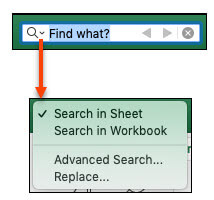
Find text or numbers from the Search bar
-
Click any cell to search the entire sheet, or select a specific range of cells to search.
-
Press
 +F or click the icon to expand the Search bar, then In the search field
  , type the text or number that you want to find.
Tips: You can use wildcard characters — question mark (?), asterisk (*), tilde (~) — in your search criteria.
-
Use the question mark (?) to find any single character — for example, s?t finds "sat" and "set".
-
Use the asterisk (*) to find any number of characters — for example, s*d finds "sad" and "started".
-
Use the tilde (~) followed by ?, *, or ~ to find question marks, asterisks, or other tilde characters — for example, fy91~? finds "fy91?".
-
-
Press the Return key.
-
To find the next instance of the item that you're searching for, click in the search field and press Return, or in the Find dialog box, click Find Next.
Tip: You can cancel a search in progress by pressing ESC .
-
To specify additional search options, click the magnifying glass, and then click Search in Sheet or Search in Workbook. You can also select the Advanced option, which will launch the Find dialog.
Replace text or numbers from the Search pane
-
Click any cell to search the entire sheet, or select a specific range of cells to search.
-
Press
+F to expand the Search bar, then In the search field , type the text or number that you want to find.Tips: You can use wildcard characters — question mark (?), asterisk (*), tilde (~) — in your search criteria.
-
Use the question mark (?) to find any single character — for example, s?t finds "sat" and "set".
-
Use the asterisk (*) to find any number of characters — for example, s*d finds "sad" and "started".
-
Use the tilde (~) followed by ?, *, or ~ to find question marks, asterisks, or other tilde characters — for example, fy91~? finds "fy91?".
-
-
In the search field, click the magnifying glass, and then click Replace.
-
In the Replace with box, type the replacement characters.
To replace the characters in the Find what field with nothing, leave the Replace with field empty.
-
Click Find Next.
-
To replace the highlighted occurrence, click Replace.
To replace all occurrences of the characters in the sheet without reviewing them first, click Replace All.
Tip: Cancel a search that is in progress simply by pressing ESC.
-
To specify additional search options, click the magnifying glass, and then click Search in Sheet or Search in Workbook. You can also select the Advanced option, which will launch the Replace dialog.
Find
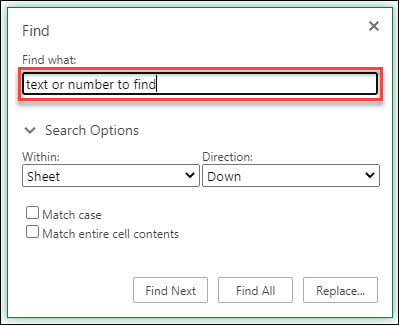
To find something, press Ctrl+F, or go to Home > Editing > Find & Select > Find.
Note: In the following example, we've clicked > Search Options to show the entire Find dialog. By default, it will display with Search Options hidden.
-
In the Find what: box, type the text or numbers you want to find.
Tips: You can use wildcard characters — question mark (?), asterisk (*), tilde (~) — in your search criteria.
-
Use the question mark (?) to find any single character — for example, s?t finds "sat" and "set".
-
Use the asterisk (*) to find any number of characters — for example, s*d finds "sad" and "started".
-
Use the tilde (~) followed by ?, *, or ~ to find question marks, asterisks, or other tilde characters — for example, fy91~? finds "fy91?".
-
-
Click Find Next or Find All to run your search.
Tip: When you click Find All, every occurrence of the criteria that you are searching for will be listed, and clicking a specific occurrence in the list will select its cell. You can sort the results of a Find All search by clicking a column heading.
-
Click > Search Options to further define your search if needed:
-
Within: To search for data within a certain selection, choose Selection. To search for data in a worksheet or in an entire workbook, select Sheet or Workbook.
-
Direction: You can choose to search either Down (default), or Up.
-
Match case - Check this if you want to search for case-sensitive data.
-
Match entire cell contents - Check this if you want to search for cells that contain just the characters that you typed in the Find what box.
-
Replace
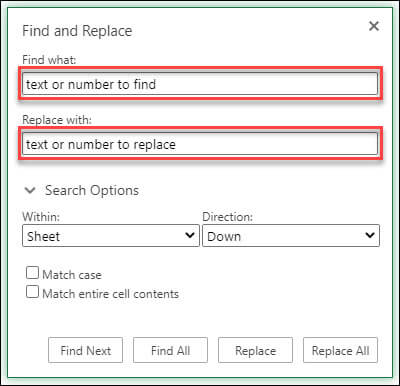
To replace text or numbers, press Ctrl+H, or go to Home > Editing > Find & Select > Replace.
Note: In the following example, we've clicked > Search Options to show the entire Find dialog. By default, it will display with Search Options hidden.
-
In the Find what: box, type the text or numbers you want to find.
Tips: You can use wildcard characters — question mark (?), asterisk (*), tilde (~) — in your search criteria.
-
Use the question mark (?) to find any single character — for example, s?t finds "sat" and "set".
-
Use the asterisk (*) to find any number of characters — for example, s*d finds "sad" and "started".
-
Use the tilde (~) followed by ?, *, or ~ to find question marks, asterisks, or other tilde characters — for example, fy91~? finds "fy91?".
-
-
In the Replace with: box, enter the text or numbers you want to use to replace the search text.
-
Click Replace or Replace All.
Tip: When you click Replace All, every occurrence of the criteria that you are searching for will be replaced, while Replace will update one occurrence at a time.
-
Click > Search Options to further define your search if needed:
-
Within: To search for data within a certain selection, choose Selection. To search for data in a worksheet or in an entire workbook, select Sheet or Workbook.
-
Direction: You can choose to search either Down (default), or Up.
-
Match case - Check this if you want to search for case-sensitive data.
-
Match entire cell contents - Check this if you want to search for cells that contain just the characters that you typed in the Find what box.
-
Need more help?
You can always ask an expert in the Excel Tech Community, get support in the Answers community, or suggest a new feature or improvement on Excel User Voice.

 to the earlier version of your workbook. In addition to files saved on your computer or on a network, you can enter a web address to a site where your workbooks are saved.
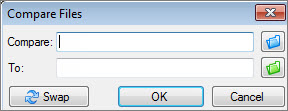
 to the version you want to compare that earlier version against.
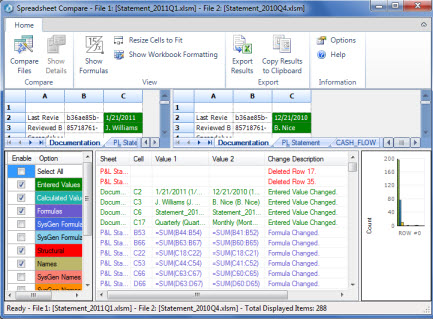


 and then select Only you can see this. Some information you might not be able to edit because it is controlled by your IT or HR department.