You can avoid unexpected results and wasted paper by previewing your worksheet before printing.
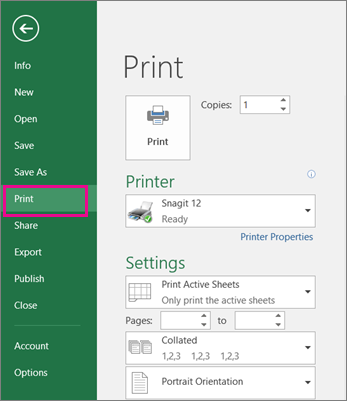
When you select one or more sheets and then click File > Print, you'll see a preview of how the data will appear on the printout.
-
Select the worksheet(s) you want to preview.
-
Click File, and then click Print to display the Preview window and printing options.

Keyboard shortcut You can also press Ctrl+F2.
Notes:
-
Unless you're using a color printer, the preview will appear in black-and-white, even if there is color in your sheet(s).
-
Next Page and Previous Page are available only when you select more than one sheet, or when a sheet contains more than one page of data. To view multiple worksheets, under Settings, click Entire workbook.
More useful information
-
To preview the next and previous pages, click the arrows for Next Page and Previous Page at the bottom of the Print Preview window—or type the page number.
-
To exit Print Preview and return to your workbook, click any the arrow in the upper-left of the Print Preview window.
-
To view page margins, click the Show Margins button in the lower right corner of the Print Preview window.
-
To change margins, drag the margins to the height and width that you prefer. You can also change the column widths by dragging the handles at the top or bottom of the print preview page. For more about page margins, see Set page margins before printing a worksheet.
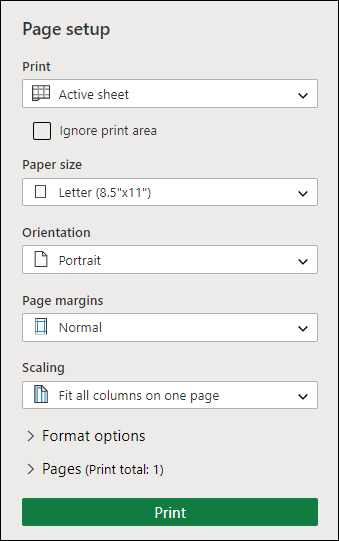
Tip: To make page setup changes, such as changing page orientation and page size, select the appropriate options under File > Print > Settings.
To select one or more sheets
| To select | Do this |
|---|---|
| A single sheet | Click the sheet tab. If you don't see the tab that you want, click the scrolling buttons to display the tab, and then click it. |
| Two or more adjacent sheets | Click the tab for the first sheet. Then hold down the SHIFT key and click the tab for the last sheet that you want to select. |
| Two or more nonadjacent sheets | Click the tab for the first sheet. Then hold down CTRL while you click the tabs of the other sheets that you want to select. |
| All sheets in a workbook | Right-click a sheet tab, and then click Select All Sheets. |
Tip: When selecting multiple sheets, [Group] appears in the title bar at the top of the sheet. To cancel a selection of multiple sheets in a workbook, click any unselected worksheet. If no unselected sheet is visible, right-click the tab of a selected sheet, and then click Ungroup Sheets.
-
Click the worksheet or select the worksheets you want to preview.
To select
Do this
A single sheet
Click the sheet tab.

If you don't see the tab that you want, click the tab scrolling buttons to display the tab, and then click the tab.

Two or more adjacent sheets
Click the tab for the first sheet. Then hold down SHIFT while you click the tab for the last sheet that you want to select.
Two or more nonadjacent sheets
Click the tab for the first sheet. Then hold down CTRL while you click the tabs of the other sheets that you want to select.
All sheets in a workbook
Right-click a sheet tab, and then click Select All Sheets on the shortcut menu.
Tip: When multiple worksheets are selected, [Group] appears in the title bar at the top of the worksheet. To cancel a selection of multiple worksheets in a workbook, click any unselected worksheet. If no unselected sheet is visible, right-click the tab of a selected sheet, and then click Ungroup Sheets on the shortcut menu.
-
Click the Microsoft Office Button
 , click the arrow next to Print, and then click Print Preview.
Keyboard shortcut You can also press CTRL+F2.
-
To preview the next and previous pages, on the Print Preview tab, in the Preview group, click Next Page and Previous Page.
Note: Next Page and Previous Page are available only when you select more than one worksheet, or when a worksheet contains more than one page of data.
-
To view page margins, on the Print Preview tab, in the Preview group, select the Show Margins check box.
This displays the margins in the Print Preview view. To change margins, you can drag the margins to the height and width that you want. You can also change the column widths by dragging the handles at the top of the print preview page.
Tip: To make page setup changes, on the Print Preview tab, in the Print group, click Page Setup, and then select the options that you want on the Page, Margins, Header/Footer, or Sheet tabs of the Page Setup dialog box.
-
Click the sheet or select what you want to preview.
-
Click File > Print > Print.
-
Select the print options you want to use.

-
Click Print.
-
If you like what you see, click Print in the upper-left corner or close the browser window that shows the preview to go back and make changes before you print.


HAVE YOU BEEN SCAMMED OF YOUR COINS AND WANTS TO GET IT RECOVERED BACK???
ReplyDeleteI invested a total of$95,000.00USD worth of Bitcoin with an online company who does trading and was guaranteed a payout of 25% a week. They ended up shutting down their company website but their website was still running. So I could still see my dashboard at that time and instead of paying weekly they ended up compounding my money. It ended up compounding to$179, 000USD so I requested for a withdrawal which was declined before they shutdown their website, I complained to my colleague at work who directed me about this recovery expert, Mr. Morris Ray, that helped him, I contacted him immediately, what surprised me most, was that I recovered my money that same week. You can contact him on his email at MorrisGray830 @ Gmail . com and on WhatsApp: + 1 (607) 698-0239 and he will assist you on the steps to recover your invested funds.
Just trying to help those who where scammed just the way I was too.