A relationship in Access helps you combine data from two different tables. Each relationship consists of fields in two tables with corresponding data. For example, you might have a ProductID field in a Products table and in an OrderDetails table. Each record in the OrderDetails table has a ProductID that corresponds to a record in the Products table with the same ProductID.
When you use related tables in a query, the relationship lets Access determine which records from each table to combine in the result set. A relationship can also help prevent missing data, by keeping deleted data from getting out of synch, and this is called referential integrity.
Before you work with relationships, make sure you understand the background concepts. For more information, see Guide to table relationships and Get started with table relationships.
Overview
In an Access database, you create a table relationship using one of the following methods:
-
In the Relationships window, add the tables that you want to relate, and then drag the field to relate them from one table to the other table.
-
Drag a field on to a table datasheet from the Field List pane.
When you create a relationship between tables, the common fields are not required to have the same names, although it is often the case that they do. The common fields must have the same data type. If the primary key field is an AutoNumber field, however, the foreign key field can also be a Number field if the FieldSize property of both fields is the same. For example, you can match an AutoNumber field and a Number field if the FieldSize property of both fields is Long Integer. When both common fields are Number fields, they must have the same FieldSize property setting.
Top of Page
Create a table relationship by using the Relationships window
-
On the Database Tools tab, in the Relationships group, click Relationships.
-
If you have not yet defined any relationships, the Show Table dialog box automatically appears. If it does not appear, on the Design tab, in the Relationships group, click Show Table.
The Show Table dialog box displays all of the tables and queries in the database. To see only tables, click Tables. To see only queries, click Queries. To see both, click Both.
-
Select one or more tables or queries and then click Add. After you have finished adding tables and queries to the Relationships document tab, click Close.
-
Drag a field (typically the primary key) from one table to the common field (the foreign key) in the other table. To drag multiple fields, press the CTRL key, click each field, and then drag them.
The Edit Relationships dialog box appears.
-
Verify that the field names shown are the common fields for the relationship. If a field name is incorrect, click on the field name and select the appropriate field from the list.
To enforce referential integrity for this relationship, select the Enforce Referential Integrity check box. For more information about referential integrity, see the section Enforce Referential Integrity.
-
Click Create.
Access draws a relationship line between the two tables. If you selected the Enforce Referential Integrity check box, the line appears thicker at each end. In addition, again only if you selected the Enforce Referential Integrity check box, the number 1 appears over the thick portion on one side of the relationship line, and the infinity symbol (∞) appears over the thick portion on the on the other side of the line, as shown in the following figure.
Notes:
-
To create a one-to-one relationship Both of the common fields (typically the primary key and foreign key fields) must have a unique index. This means that the Indexed property for these fields should be set to Yes (No Duplicates). If both fields have a unique index, Access creates a one-to-one relationship.
-
To create a one-to-many relationship The field on the one side (typically the primary key) of the relationship must have a unique index. This means that the Indexed property for this field should be set to Yes (No Duplicates). The field on the many side should not have a unique index. It can have an index, but it must allow duplicates. This means that the Indexed property for this field should be set to either No or Yes (Duplicates OK). When one field has a unique index, and the other does not, Access creates a one-to-many relationship.
Top of Page
Create a table relationship by using the Field List pane to add a field
You can add a field to an existing table that is open in Datasheet view by dragging it from the Field List pane. The Field List pane shows fields available in related tables and also fields available in other tables in the database.
When you drag a field from an "other" (unrelated) table and then complete the Lookup Wizard, a new one-to-many relationship is automatically created between the table in the Field List pane and the table to which you dragged the field. This relationship, created by Access, does not enforce referential integrity by default. To enforce referential integrity, you must edit the relationship. See the section Edit a relationship for more information.
Open a table in Datasheet view
Open the Field List pane
The Field List pane shows all of the other tables in your database, grouped into categories. When you work with a table in Datasheet view, Access displays fields in either of two categories in the Field List pane: Fields available in related tables and Fields available in other tables. The first category lists all of the tables that have a relationship with the table with which you are currently working. The second category lists all of the tables with which your table does not have a relationship.
In the Field List pane, when you click the plus sign (+) next to a table name, you see a list of all the fields available in that table. To add a field to your table, drag the field that you want from the Field List pane to the table in Datasheet view.
Add a field and create a relationship from the Field List pane
-
With the table open in Datasheet view, press ALT+F8. The Field List pane appears.
-
Under Fields available in other tables, click the plus sign (+) next to a table name to display the list of fields in that table.
-
Drag the field that you want from the Field List pane to the table that is open in Datasheet view.
-
When the insertion line appears, drop the field into position.
The Lookup Wizard starts.
-
Follow the instructions to complete the Lookup Wizard.
The field appears in the table in Datasheet view.
When you drag a field from an "other" (unrelated) table and then complete the Lookup Wizard, a new one-to-many relationship is automatically created between the table in the Field List and the table to which you dragged the field. This relationship, created by Access, does not enforce referential integrity by default. To enforce referential integrity, you must edit the relationship. See the section Edit a relationship for more information.
Top of Page
Edit a relationship
You change a relationship by selecting it in the Relationships window and then editing it.
-
Carefully position the cursor so that it points to the relationship line, and then click the line to select it.
The relationship line appears thicker when it is selected.
-
With the relationship line selected, double-click it.
–or–
On the Design tab, in the Tools group, click Edit Relationships.
The Edit Relationships dialog box appears.
Open the Edit Relationships dialog box
-
On the Database Tools tab, in the Relationships group, click Relationships.
The Relationships window appears.
If you have not yet defined any relationships and this is the first time you are opening the Relationships window, the Show Table dialog box appears. If the dialog box appears, click Close.
-
On the Design tab, in the Relationships group, click All Relationships.
All tables with relationships are displayed, showing relationship lines. Note that hidden tables (tables for which the Hidden check box in the table's Properties dialog box is selected) and their relationships will not be shown unless Show Hidden Objects is selected in the Navigation Options dialog box.
-
Click the relationship line for the relationship that you want to change. The relationship line appears thicker when it is selected.
-
Double-click the relationship line.
-or-
On the Design tab, in the Tools group, click Edit Relationships.
The Edit Relationships dialog box appears.
-
Make your changes, and then click OK.
The Edit Relationships dialog box allows you to change a table relationship. Specifically, you can change the tables or queries on either side of the relationship, or the fields on either side. You can also set the join type, or enforce referential integrity and choose a cascade option. For more information about the join type and how to set it, see the section Set the join type. For more information about how to enforce referential integrity and choose a cascade option, see the section Enforce referential integrity.
Set the join type
When you define a table relationship, the facts about the relationship inform your query designs. For example, if you define a relationship between two tables, and you then create a query that employs the two tables, Access automatically selects the default matching fields based upon the fields specified in the relationship. You can override these initial default values in your query, but the values supplied by the relationship will often prove to be the correct ones. Because matching and bringing together data from more than one table is something you will do frequently in all but the most simple databases, setting defaults by creating relationships can be time saving and beneficial.
A multiple table query combines information from more than one table by matching the values in common fields. The operation that does the matching and combining is called a join. For instance, suppose you want to display customer orders. You create a query that joins the Customers table and the Orders table on the Customer ID field. The query result contains customer information and order information for only those rows where a corresponding match was found.
One of the values you can specify for each relationship is the join type. The join type tells Access which records to include in a query result. For example, consider again a query that joins the Customers table and the Orders table on the common fields that represents the Customer ID. Using the default join type (called an inner join), the query returns only the Customer rows and the Order rows where the common fields (also called the joined fields) are equal.
However, suppose you want to include all Customers — even those who have not yet placed any orders. To accomplish this, you have to change the join type from an inner join to what is known as a left outer join. A left outer join returns all of the rows in the table on the left side of the relationship and only those that match in the table on the right. A right outer join returns all of the rows on the right and only those that match on the left.
Note: In this case, "left" and "right" refer to the position of the tables in the Edit Relationships dialog box, not the Relationships window.
You should think about the result you will most often want from a query that joins the tables in this relationship, and then set the join type accordingly.
Set the join type
-
In the Edit Relationships dialog box, click Join Type.
The Join Properties dialog box appears.
-
Click your choice, and then click OK.
The following table (using the Customers and Orders tables) shows the three choices that are displayed in the Join Properties dialog box, the type of join they use, and whether all rows or matching rows are returned for each table.
| Choice | Relational join | Left table | Right table |
| 1. Only include rows where the joined fields from both tables are equal. | Inner join | Matching rows | Matching rows |
| 2. Include ALL records from 'Customers' and only those records from 'Orders' where the joined fields are equal. | Left outer join | All rows | Matching rows |
| 3. Include ALL records from 'Orders' and only those records from 'Customers' where the joined fields are equal. | Right outer join | Matching rows | All rows |
When you choose option 2 or option 3, an arrow is shown on the relationship line. This arrow points to the side of the relationship that shows only matching rows.
Make changes in the Join Properties dialog box
-
On the Database Tools tab, in the Relationships group, click Relationships.
Note: If you have not yet defined any relationships and this is the first time you are opening the Relationships window, the Show Table dialog box appears. If the dialog box appears, click Close.
-
On the Design tab, in the Relationships group, click All Relationships.
All tables that have relationships are displayed, showing relationship lines. Note that hidden tables (tables for which the Hidden check box in the table's Properties dialog box is selected) and their relationships will not be shown unless Show Hidden Objects is selected in the Navigation Options dialog box.
-
Click the relationship line for the relationship that you want to change. The relationship line appears thicker when it is selected.
-
Double-click the relationship line. The Edit Relationships dialog box appears.
-
Click Join Type.
-
In the Join Properties dialog box, click an option, and then click OK.
-
Make any additional changes to the relationship, and then click OK.
Top of Page
Enforce referential integrity
The purpose of referential integrity is to prevent orphan records – records that reference other records that no longer exist. You enforce referential integrity by enabling it for a table relationship. Once enforced, Access rejects any operation that would violate referential integrity for that table relationship. This means that Access will reject both updates that change the target of a reference and deletions that remove the target of a reference. To have Access propagate referential updates and deletions so that all related rows are changed accordingly, see the Set the cascade options section.
Turn referential integrity on or off
-
On the Database Tools tab, in the Relationships group, click Relationships.
-
On the Design tab, in the Relationships group, click All Relationships.
All tables with relationships are displayed, showing relationship lines. Note that hidden tables (tables for which the Hidden check box in the table's Properties dialog box is selected) and their relationships will not be shown unless Show Hidden Objects is selected in the Navigation Options dialog box.
-
Click the relationship line for the relationship that you want to change. The relationship line appears thicker when it is selected.
-
Double-click the relationship line. The Edit Relationships dialog box appears.
-
Select or clear Enforce Referential Integrity.
-
Make any additional changes to the relationship, and then click OK.
If you enforce referential integrity, the following rules apply:
-
You cannot enter a value in the foreign key field of a related table if that value doesn't exist in the primary key field of the primary table — doing so creates orphan records.
-
You cannot delete a record from a primary table if matching records exist in a related table. For example, you cannot delete an employee record from the Employees table if there are orders assigned to that employee in the Orders table. You can, however, choose to delete a primary record and all related records in one operation by selecting the Cascade Delete Related Records check box.
-
You cannot change a primary key value in the primary table if doing so would create orphan records. For example, you cannot change an order number in the Orders table if there are line items assigned to that order in the Order Details table. You can, however, choose to update a primary record and all related records in one operation by selecting the Cascade Update Related Fields check box.
Notes: If you have difficulty enabling referential integrity, note that the following conditions are required to enforce referential integrity:
-
The common field from the primary table must be a primary key or have a unique index.
-
The common fields must have the same data type. The one exception is that an AutoNumber field can be related to a Number field that has a FieldSize property setting of Long Integer.
-
Both tables exist in the same Access database. Referential integrity cannot be enforced on linked tables. However, if the source tables are in Access format, you can open the database in which they are stored and enable referential integrity in that database.
Set the cascade options
You might encounter a situation where you have a valid need to change the value on the "one" side of a relationship. In such a case, you need Access to automatically update all of the affected rows as part of a single operation. That way the update is completed in full so that your database is not left in an inconsistent state — with some rows updated and some not. Access helps you avoid this problem by supporting the Cascade Update Related Fields option. When you enforce referential integrity and choose the Cascade Update Related Fields option, and you then update a primary key, Access automatically updates all fields that reference the primary key.
You might also need to delete a row and all related records — for instance, a Shipper record and all related orders for that shipper. For this reason, Access supports the Cascade Delete Related Records option. When you enforce referential integrity and select the Cascade Delete Related Records check box, Access automatically deletes all records that reference the primary key when you delete the record that contains the primary key.
Turn cascade update and/or cascade delete on or off
-
On the Database Tools tab, in the Relationships group, click Relationships.
-
On the Design tab, in the Relationships group, click All Relationships.
All tables with relationships are displayed, showing relationship lines. Note that hidden tables (tables for which the Hidden check box in the table's Properties dialog box is selected) and their relationships will not be shown unless Show Hidden Objects is selected in the Navigation Options dialog box.
-
Click the relationship line for the relationship that you want to change. The relationship line appears thicker when it is selected.
-
Double-click the relationship line.
The Edit Relationships dialog box appears.
-
Select the Enforce Referential Integrity check box.
-
Select either the Cascade Update Related Fields or the Cascade Delete Related Records check box, or select both.
-
Make any additional changes to the relationship, and then click OK.
Note: If the primary key is an AutoNumber field, selecting the Cascade Update Related Fields check box will have no effect, because you cannot change the value in an AutoNumber field.
Top of Page
Delete a table relationship
Important: When you remove a relationship, you also remove referential integrity support for that relationship, if it is enabled. As a result, Access will no longer automatically prevent the creation of orphan records on the "many" side of a relationship.
To remove a table relationship, you must delete the relationship line in the Relationships window. Position the cursor so that it points to the relationship line, and then click the line. The relationship line appears thicker when it is selected. With the relationship line selected, press DELETE.
-
On the Database Tools tab, in the Relationships group, click Relationships.
-
On the Design tab, in the Relationships group, click All Relationships.
All tables with relationships are displayed, showing relationship lines. Note that hidden tables (tables for which the Hidden check box in the table's Properties dialog box is selected) and their relationships will not be shown unless Show Hidden Objects is selected in the Navigation Options dialog box.
-
Click the relationship line for the relationship that you want to delete. The relationship line appears thicker when it is selected.
-
Press the DELETE key.
-
Access might display the message Are you sure you want to permanently delete the selected relationship from your database?. If this confirmation message appears, click Yes.
Note: If either of the tables employed in the table relationship are in use — perhaps by another person or process, or in an open database object, such as a form — you will not be able to delete the relationship. You must close any open objects that employ these tables before you try to remove the relationship.
Top of Page
Create, edit, or delete a relationship in an Access web app
There are important differences when working with relationships in an Access web app.
Create a relationship
The Relationships window isn't available in an Access web app. Instead of creating a relationship in an Access web app, you create a lookup field that gets values from a related field in another table. For example, let's say you have an Employees table and you want to add a lookup to a Regions table so you can show which region each employee works in.
Note: The field that your lookup will use as the source for values must already exist before you create your lookup field.
Here's how you create a lookup field in an Access web app:
-
Open the table where you want to create a new lookup field by double-clicking it in the navigation. (Hint: you may need to click Home > Navigation Pane to see the available tables.)
In the above example, click the Employees table.
-
Click in the Field Name column just below the last field in the table and type a name for your new lookup field.
In the example, type Region as the field name.
-
In the Data Type column, click the arrow and select Lookup.
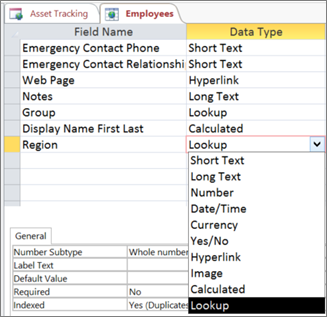
The Lookup Wizard starts.
-
On the first page of the Lookup Wizard, select I want the lookup field to get values from another table or query. More options appear in the dialog box.
-
Select the name of the table or query that should provide the values for your lookup.
In the example, select Table: Regions.
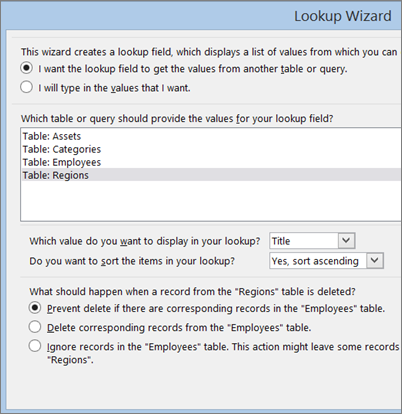
(Names of the tables in the image correspond to the example we're using.)
-
After you select the table, use the Which value do you want to display in your lookup list to select the field that you want to use as a display value for your lookup field. By default, Access selects the first text field it can find in the selected table.
In the example, you would leave the selected field, Title, as the display value.
-
Use the Do you want to sort the items in your lookup list to set the sorting, if you want.
-
Under What should happen when a record from the "Regions" table is deleted, set the type of relationship you want between the two tables and whether you want to enforce referential integrity. (The name of the table in this question varies depending on which table you selected in step 5.)
The Lookup Wizard defaults to Prevent delete if there are corresponding records in the "Employees" table, because that's the safest option in most cases. In the example, this option means you can't delete a value from the Regions table if that region is being used in records in the Employees table. So, if employee records are using a region, such as "West" and you try to delete "West" from the Regions table, Access will prevent you from deleting it. In this case, you need to reset all employee records using that value to something else, before you can delete "West" from the Regions table. The last option could work in this example, because that would allow you to delete "West" from the Regions table. The region value would be automatically removed from Employee records that were set to "West," leaving the value blank. Choosing the second option would delete all employee records from the Employees table that have the region set to "West." That's called a cascading delete and would delete much more data than you want in the example. Be careful when choosing that option.
Edit a relationship
The Relationships window isn't available in an Access web app. You use a field in one table as the source (lookup field) for values in the related field in another table.
-
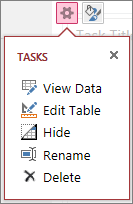
Open the table that contains the lookup you want to change by clicking Edit Table.
-
Select the field that gets its values from another table.
-
On the Design tab, under Table Tools, click Modify Lookups.
-
Follow the steps in the wizard to make the changes that you want. You can change the following:
-
The field that is the source of values
-
The sort order of the values
-
The width of the field, and whether to hide the key column
-
The label for the lookup field
-
Whether data integrity is enabled
-
If data integrity is enabled, whether deletes are cascaded or restricted
Delete a relationship
The Relationships window isn't available in an Access web app. You use a field in one table as the source (lookup field) for values in the related field in another table. In order to delete a relationship between two tables in an Access web app, you need to delete the lookup field and its associated data.
-
Open the table that contains the lookup field you want to delete by clicking Edit Table.
-
Select the lookup field that gets its values from another table in the web app.
-
On the Design tab, under Table Tools, click Delete Fields.
-
Access displays the message Do you want to permanently delete the selected fields(s) and all the data in the field(s)? Click Yes to confirm deleting the lookup field and its data.
Note: You might also be prompted by Access to delete one or more indexes when deleting the lookup field. If this confirmation message appears, click Yes.
-
Click Save to save your table design changes.
Top of Page
Create or modify a relationship in an Access 2010 web database
To create a relationship in an Access 2010 web database, you use the Lookup Wizard. The Relationships window is not available in a web database. You use a field in one table as the source for values in the related field in another table.
Note: The field that you use as the source for values must already exist before you can use the Lookup Wizard.
Create a relationship in an Access 2010 web database by using the Lookup Wizard
-
Open the table that should get its values from the other table.
-
To the right of the last field, click Click to Add, and then click Lookup & Relationship.
Note: You might need to scroll horizontally to see Click to Add.
-
On the first screen of the Lookup Wizard, select I want the lookup field to get the values from another table, and then click Next.
-
Select the table that has the source values, and then click Next.
-
In the Available Fields box, double-click the field that has the source values, and then click Next.
-
Optionally, specify a sort order for the lookup field. Click Next.
-
Optionally, adjust the width of the lookup field – a good idea if the values are long. Click Next.
-
Enter a name for the new field. If you want to make sure that the values in the two tables always match, select the Enable Data Integrity check box, and then click one of the following:
-
Cascade Delete – this option means that if you delete a record from one table, corresponding records in the other table are also deleted.
-
Restrict Delete – this option means that if you attempt to delete a record from one table but there is a corresponding record in the other table, the delete operation is not allowed.
Note: Do not select Allow Multiple Values in the Lookup Wizard when you are using the wizard to create a relationship.
Modify a relationship in an Access 2010 web database
-
Open the table that gets its values from another table.
-
Select the field that gets its values from another table.
-
On the Fields tab, in the Properties group, click Modify Lookups.
-
Follow the steps in the wizard to make the changes that you want. You can change the following:
-
The field that is the source of values
-
The sort order of the values
-
The width of the field, and whether to hide the key column
-
The label for the lookup field
-
Whether data integrity is enabled
-
If data integrity is enabled, whether deletes are cascaded or restricted
Top of Page