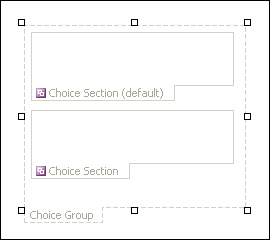
A choice group is a control that is used to present a set of mutually exclusive choices to users. By default, a choice group contains two choice sections, one of which appears to the user as the default choice on the form.
When to use a choice group
Use a choice group when you want to:
-
Give your users the option to choose between two or more sections on a form.
-
Design a form template based on an existing XML Schema that contains an xsd: choice element. In this case, a choice group lets you accommodate that schema element in your form template so that users can work with it.
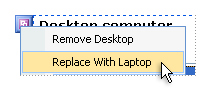
Choice groups contain two or more choice sections. By default, one of these sections appears on the form, and users can choose to remove it or replace it with a different section. For example, on a purchase request form, you can have a section for requesting a new desktop computer appear by default, but allow users to remove the section entirely or replace it with a section for requesting a laptop computer.

The choice sections inside the choice group contain the controls that users interact with when they fill out the form. Choice sections are always contained within choice groups. Thus, if you try to add a choice section by itself to your form template, Microsoft Office InfoPath automatically creates a choice group in which to contain it.
Related controls
InfoPath includes other controls that are similar to choice groups but that serve different purposes. To decide which of these controls works best on your form template, refer to the following list:
Section Sections are similar to the choice sections in a choice group, in that you use them to present users with a related set of controls. However, sections are used purely for organizational purposes — users cannot remove or replace them when filling out a form, as they can with choice sections.
Optional section When you add a choice group to your form template, the default section always appears when a user first opens a form that is based on your form template. Optional sections, on the other hand, are hidden by default. Users can choose whether to include an optional section on the form. For example, on the purchase request form mentioned earlier, some users may want to include comments about the computer that they plan to order. You can insert an optional section on the form template and add a rich text box labeled "Notes" inside that optional section. Users can then add the notes section when and if they want it by clicking instructional text on the form.
Repeating section Like repeating choice groups, repeating sections allow users to add more than one section to their form, depending on their needs. Use a repeating section on your form template when your goal is to allow your users to insert, but not replace, multiple instances of a section.
Repeating choice group Repeating choice groups are just like choice groups, except that users can insert more than one of them on their form. For example, on the purchase request form mentioned earlier, users can choose to request a desktop computer or a laptop computer. However, in some cases, a user might want to request both types of computers or multiple computers of each type. If a repeating choice group is used on the form, the user can choose to fill out the section that contains desktop request information. Then the user can insert a second instance of the choice group in order to fill out the section that contains laptop request information.
Top of Page
The user experience
In both appearance and behavior, choice groups resemble sections and other layout-related controls. The key differences are that users can replace the default section inside a choice group with an alternative section or delete the choice group entirely.
When users move their cursor over the default choice section, a small purple button appears in the upper-left corner of the section. When users click this button, a shortcut menu shows commands for removing or replacing the default section.
Tip: With a choice group, users can remove or replace the default section, but they can't insert multiple instances of it on the form. If you want users to be able to insert additional sections on their form, you should use a repeating choice group instead of a choice group. From the user's perspective, the experiences are similar. However, in addition to seeing shortcut menu commands for removing or replacing the default section, the user also sees commands for inserting multiple instances of the choice group.
Top of Page
Compatibility considerations
When you design a form template in InfoPath, you can choose to design a browser-compatible form template. When you design a browser-compatible form template, choice groups and choice sections are unavailable in the Controls task pane because they cannot be displayed in a Web browser.
Top of Page
Insert a choice group
The procedure for inserting a choice group on a form template differs slightly depending on whether you are designing a new, blank form template or basing the design of your form template on a database or other external data source.
The following illustration shows how a choice group looks when it is selected in design mode.
Controls can be bound or unbound. When a control is bound, it is connected to a field or group in the data source so that data entered into the control is saved in the underlying form (.xml) file. When a control is unbound, it is not connected to a field or group, and data entered into the control is not saved. When you select or move your pointer over a control, text and a binding icon appear in the upper-right corner of the control. The text indicates the group or field to which the control is bound in the data source. The icon indicates whether the control is correctly bound to that group or field. When the binding is correct, a green icon appears. If there's something wrong with the binding, you'll see a blue or red icon instead.
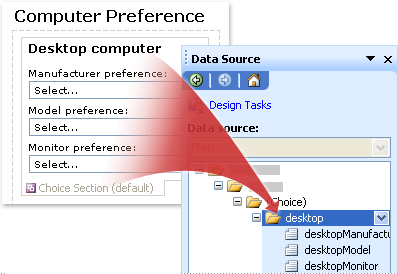
The data source for the form template consists of fields and groups that appear in a hierarchical view in the Data Source task pane. Choice sections are always bound to groups. Each control in a choice section is bound to a field that is part of the choice section's group. In the following example, the Desktop computer choice section on the form template is bound to the desktop group in the Data Source task pane.
Insert a choice group on a new, blank form template
When you design a new, blank form template, the Automatically create data source check box in the Controls task pane is selected by default. This enables InfoPath to automatically create fields and groups in the data source as you add controls to the form template. These fields and groups are represented by folder and file icons in the Data Source task pane.
As you insert a choice group, InfoPath creates groups that are bound to the choice sections inside that choice group. In addition, InfoPath creates a special kind of group to visually indicate the relationship between the choice group on the form template and the data source. This type of group includes the word (choice) next to its label in the data source.
-
On the form template, place the cursor where you want to insert the control.
-
If the Controls task pane is not visible, click More Controls on the Insert menu, or press ALT+I, C.
-
Under Insert controls, click Choice Group.
A choice group containing two choice sections appears on the form template.
-
To insert additional choice sections inside the choice group, place the cursor inside the choice group on the form template, and then click Choice Section in the Control task pane.
-
To add controls to the choice sections inside the choice group, do one of the following:
-
To add controls to the default choice section, drag the controls that you want from the Controls task pane onto the choice section on your form template that is labeled Choice Section (default).
-
To add controls to the alternative choice sections, drag the controls that you want from the Controls task pane onto the choice section on your form template that is labeled Choice Section.
Insert a choice group on a form template that is based on an existing data source
If you base the design of your form template on an existing Extensible Markup Language (XML) file, database, or Web service, InfoPath derives the fields and groups in the Data Source task pane from that existing data source. For example, suppose that you base the design of your form template on an XML Schema, and that schema includes an xsd: choice element. In this circumstance, you can insert a choice group by dragging the appropriate group from the Data Source task pane onto your form template. If you instead use the Controls task pane to insert a choice group, InfoPath prompts you to bind the choice group to an existing group in the data source, as described in the following procedure:
-
On the form template, place the cursor where you want to insert the control.
-
If the Controls task pane is not visible, click More Controls on the Insert menu, or press ALT+I, C.
-
Under Insert controls, click Choice Group.
-
In the Choice Group Binding dialog box, select a group with the word (choice) next to its name, and then click OK.
-
Add two or more choice sections to the choice group on the form template, and then bind them to the appropriate groups in the data source.
Note: The groups that you choose must be part of the (choice) group that you selected in step 4.
-
Add controls to each choice section, and then bind those controls to the appropriate fields in the data source.
Note: The fields must be part of the groups that you selected in step 5. InfoPath uses the names of those fields for the control labels. If necessary, change the label text.
Top of Page
Layout tips
Use the following tips to help you refine the appearance, size, and other aspects of the choice groups and choice sections:
-
Because the shortcut menu button appears only when users move their pointer over a choice section, new users may not understand how to replace the default choice section. When you design your form template, consider adding a brief explanation above the choice section that tells users how to replace one choice section with another.
-
By default, the borders around the choice sections are not visible to users filling out the form. As a result, users see only the controls inside the sections when they open your form. To visually separate a choice section from the text and controls surrounding it, or to simply draw users' attention to the section, you can use the Borders and Shading dialog box to add borders or color to the choice sections within a choice group.
-
To change the size of several choice sections at once, select the choice sections whose size you want to change. On the Format menu, click Properties, and then make the necessary adjustments on the Size tab.
-
On occasion, the text inside the controls in a choice section and the labels to the left of those controls may appear to be slightly out of alignment. To quickly realign them, double-click the control, click Align on the Size tab, and then click Apply. To realign labels and controls that are in different cells in a layout table, right-click the cell that contains the label, click Table Properties on the shortcut menu, and then click Center under Vertical alignment on the Cell tab.
Top of Page


 This feature is available only to

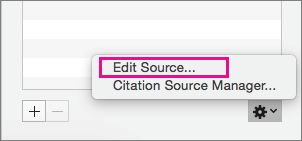
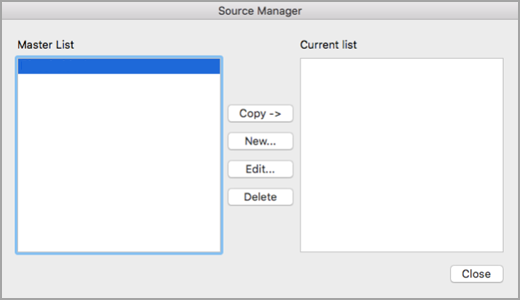

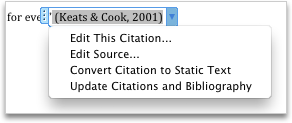
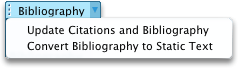
 , and then click Citation Source Manager.
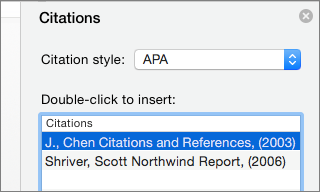
 , enter part of the citation.
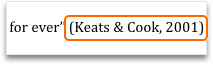

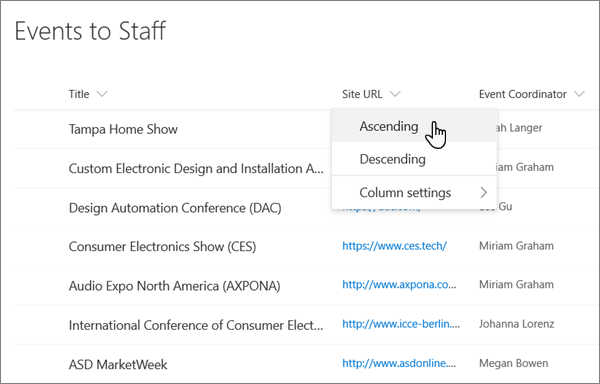
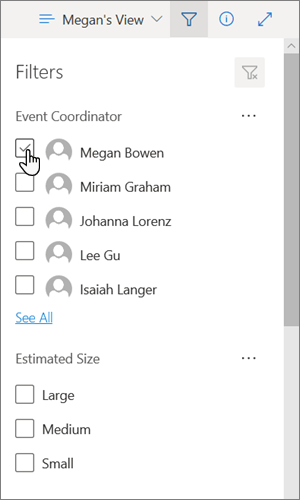
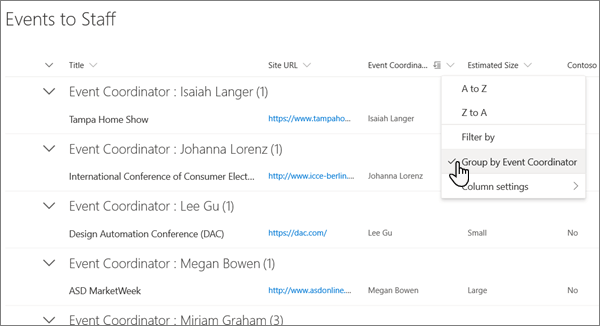
 . When the pane options, you'll see all the filter options for all columns that can be filtered. Select the checkbox or checkboxes accordingly.