Note: Sign in to Outlook on the web using your work or school account.
In Outlook on the web, you use the People page to create, view, and edit contacts, contact lists, and groups.
Note: If the instructions don't match what you see, you might be using an older version of Outlook on the web. Try the Instructions for classic Outlook on the web.
Getting to the People page
To go to the People page, sign in to Outlook on the web and select the People icon  at the bottom of the page
What you'll see on the People page
-
Use the Search box to search for a person or a contact list.
-
The toolbar provides menus and commands for creating and modifying your contacts, contact lists, and groups depending on the context
-
Favorites shows everyone you've added to your favorites.
-
Your contacts shows all saved contacts and contact lists in all folders.
-
Your contact lists shows all contact lists in all folders.
-
Folders: The default folder called Contacts contains contacts and contact lists. You can also create your own folders.
-
Groups: Member shows groups you're a member of, and Owner shows groups where you're the owner.
-
The middle pane shows favorites, contacts, contact lists, or groups depending on what you selected in the navigation pane. Use the filter menu to sort and to choose how contact names are displayed.
-
The right pane shows details about the contact, contact list, or group that's selected in the middle pane.
Working with contact folders
By default, contacts and contact lists are stored in the Contacts folder under Folders in the navigation pane. You can also create your own contact folders to keep certain contacts or contact lists together and find them more easily.
-
To create a new contact folder: Under Folders, select New folder and type a name. Then select the folder and add contacts to it.
-
To rename or delete a contact folder that you created, right-click the folder and then select Rename or Delete.
Create, view, and edit contacts
New contacts are saved in your default Contacts folder, and you will also see them under Your contacts. If you want to save the new contact in a different folder, select the folder before creating the contact.
Add a new contact from scratch
-
Select the People icon
at the bottom of the navigation pane. -
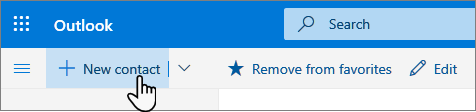
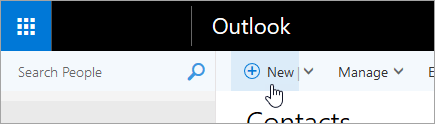
On the People page, on the toolbar, select New contact.
-
Enter details for the contact. Select Add more to add more information, such as the contact's address and birthday.
-
Select Create.
Add a contact from someone's profile card
When you click someone's name or picture in Outlook or other Office apps and services, you'll see their profile card with information about them. From their profile card, you can save them to your own contacts, for example if you want to add Notes or other information.
Here's how you can add a contact from an email message:
-
In Mail, open an email message in the reading pane, and then select the name of the sender or recipient you want to add to your contacts.
-
On the profile card that opens, select
 > Add to contacts.
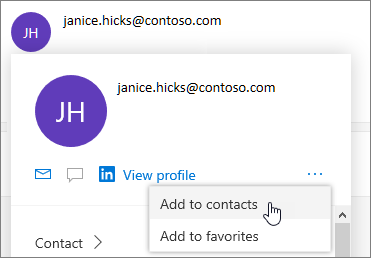
-
Add more information if you want. Select Add more to add more information, such as the contact's address and birthday.
-
Select Create.
Note: The contact is saved in your default Contacts folder on the People page.
Add people in your organization to your saved contacts
If your company has a directory set up, you'll be able to see information about your colleagues without saving them as contacts. You can search for them or select their name or picture from an email message. Their profile card will show information collected from other systems (directory). If you want to add other information, such as notes, you can save your colleagues to your own contacts. The new contact is auto-linked to the existing directory contact. Only you will see the information you add.
Add a contact to favorites
To add someone to your favorites, select the contact, and then select Add to favorites on the toolbar.
Tip: Favorite contacts who have an email address will also show up in the navigation pane in Mail, so you can see all their email in one place.
View and edit contact information
On the People page, select a contact in the middle pane to see or edit information about them. What you see is a version of the profile card. What tabs and sections you see may vary.
-
Files: Recent files that the contact has shared with you.
-
Email: Recent email messages and email attachments between you and the contact.
-
LinkedIn: If the contact has a public LinkedIn profile with the same email that you've saved for that contact, you'll see LinkedIn information here.
To edit a contact, select Edit contact next to Contact Information, or select Edit on the toolbar.

Add a photo to your contacts
-
On the People page, select a contact.
-
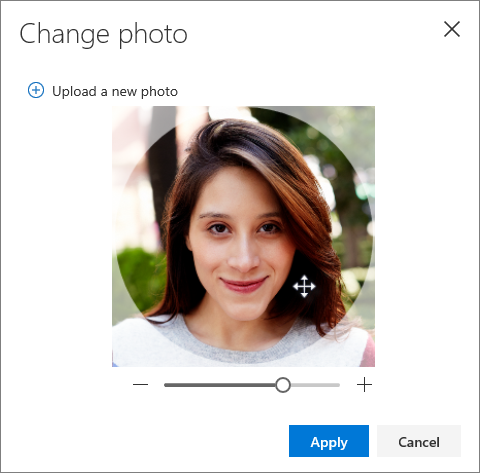
Select the camera icon.

-
Select Upload a new photo, choose the file you want to use, and then select Open to upload.
-
If you want to reposition the photo, click inside the circle and drag the pointer. To zoom in or out, use the slider below the photo.
-
Select Apply, and then select Done.
Change how contacts are displayed and sorted
To change how contact names are displayed, select Settings and then Display contacts by > First name or Last name.
To select sorting, use the sort menu at the top of the list . For example, select Sort by > Last name.
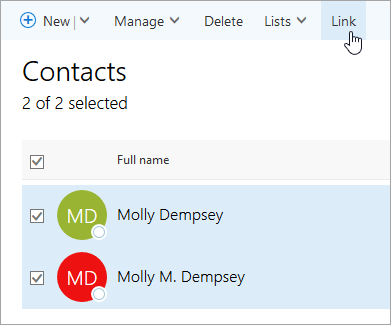
Link contacts
You can link contacts to indicate that they're related, for example if you have several entries for the same person. Linked contacts appear as a single contact.
To link contacts:
-
On the People page, select two or more contacts, and then select Link contacts in the panel that appears.
To unlink a linked contact:
-
On the People page, select the contact, select Linked contacts on the toolbar, and then select Unlink.
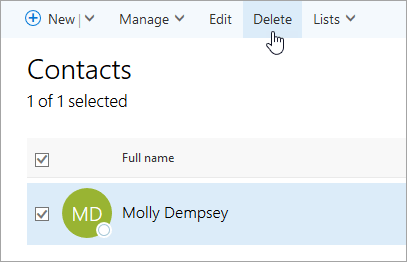
Delete a contact
-
Select one or more contacts, and then select Delete.
-
Select Delete to confirm.
Create, view, and edit contact lists
A contact list is a collection of email addresses, and is useful for sending email to a group of people. Contact lists are sometimes referred to as distribution lists.
For example, create a contact list named My Book Club and add all the members of your book club to it. When you want to send an email message to everyone in the club, just enter "My Book Club" in the To line of the email.
Create a contact list
Note: By default, contact lists are created in the default Contacts folder, and you can also see them under Your contact lists. If you want to save the contact list in a different folder, select the folder before you select New contact list. After you create a contact list in a folder, it isn't possible to move it to a different folder.
-
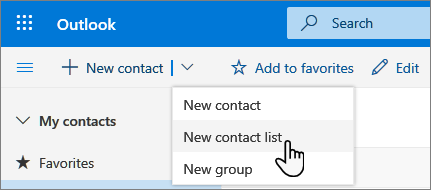
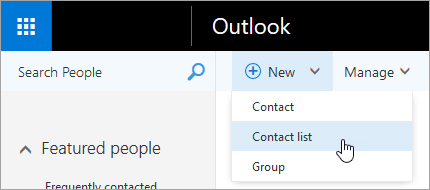
On the People page, on the toolbar, select the arrow next to New contact, and then select New contact list.
-
Enter a name for the list, and then add names or email addresses.
-
Select Create.
Tip: If you want to group contacts for other reasons than sending email, you can create a folder instead. Then add contacts to the folder.
Add more people to a contact list
-
On the People page, select Your contact lists in the navigation pane, or search for the contact list name.
-
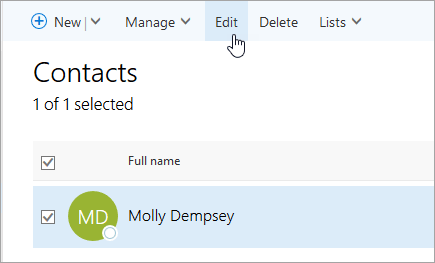
Select the contact list, and then select Edit.
-
Enter names or email addresses.
-
Select Save.
Remove people from a contact list
-
On the People page, select Your contact lists in the navigation pane, or search for the contact list name.
-
Select the contact list, and then select Edit.
-
Select the x for the name or email address you want to remove.
-
Select Save.
Delete a contact list
-
Select the contact list you want to delete, and select Delete.
-
Select Delete to confirm.
Instructions for classic Outlook on the web
Getting to the People page
-
Sign in to Outlook on the web. For help, see Sign in to Outlook on the web.
-
At the top of the screen, select the App Launcher
 > Outlook.
Can't find the app you're looking for? From the app launcher, select All apps to see an alphabetical list of the Microsoft 365 apps available to you. From there, you can search for a specific app.
-
Click People.
What you'll see on the People page
The following screen shot shows what you'll see on the People page.

Here's a description of what you'll see:
-
The Search People box, which you use to search for a contact or a contact list
-
The toolbar, which provides menus and commands for creating and modifying your contacts and contact lists depending on the context
-
Featured people, which shows people you frequently contact, you're meeting with, you've marked as favorites, or you may want to follow up with
-
Your contacts, which contains all of your contact folders
-
The middle pane, which shows the contacts and contact lists that are contained in the item that's selected in the navigation pane
-
The contact card, which shows details about the contact or contact list that's selected in the middle pane
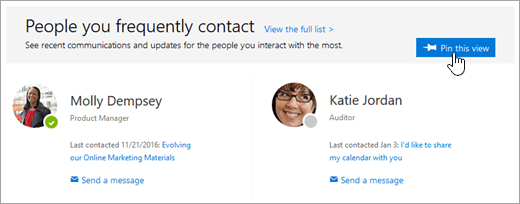
Pin your favorite view
Choose how your People page should look by pinning one of these views from the list under Featured people:
-
People you frequently contact: See recent communications and updates for the people you interact with the most.
-
People on your calendar today: See who you'll be meeting with and what you'll be working on today.
-
Favorites: People you've chosen as Favorites will appear here, giving you quick access to their latest email.
-
People you may want to follow up with: Find flagged items and messages where you've been @mentioned, along with unread messages from people you contact most often.
-
All contacts: This is the classic People view, which shows all your contacts in one place.
To pin a view as your starting point, select Pin this view.
To change your starting point, choose Unpin this view from the top menu bar of the view you pinned, or choose Pin this view from the top menu bar of one of the other views under Featured people.
Note: Depending on your Outlook version, not all of these views may be available.
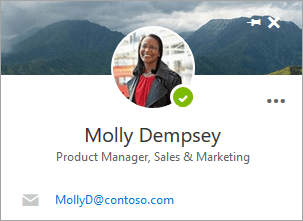
Select a person to see more about them
When you choose one of your contacts, a pane opens on the right. Here, you'll see more information about your contact, such as their email, phone, and office location. You'll also see who they're connected to in the organization, and what groups they belong to.
At the bottom part of the pane, you'll see your interaction with the contact. View email messages you've exchanged, files shared with you, and any common meetings or events in the past or the future.
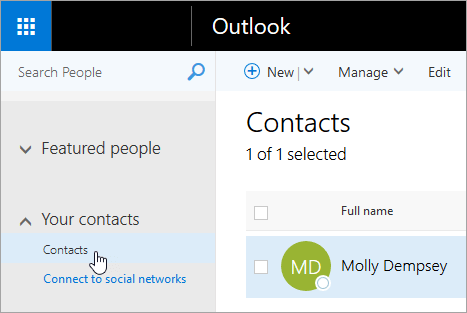
Understanding contact folders
When you create a contact or contact list from scratch, it gets stored in the contact folder that's selected in the navigation pane. You can create contact folders to keep certain contacts or contact lists together and find them more easily.
Your contacts, which is in the navigation pane of the People page, contains all of your contact folders. When Your contacts is collapsed, you can select it to expand it and see all of your contact folders.
When Your contacts is expanded, the Contacts folder appears directly under it, as shown in the screen shot. You get the Contacts folder automatically. It contains all of your local contacts unless you create other folders and add contacts to them.
For more information, see Working with contact folders later in this article.
Creating a contact from scratch
-
Under Your contacts in the navigation pane, select the folder that you want to create the contact in. If Your contacts is selected rather than a particular folder, the new contact is created in the Contacts folder.
Note: Before you create a new contact, make sure you select the folder in the navigation pane that you want to create it in. After you create a contact, it isn't possible to move it to a different folder. To store a contact in a different folder after you create it, delete the contact and then re-create it in the other folder.
-
On the toolbar, select New.
-
In the Add contact form that opens, fill in the details that you want.
You can select the
 icon to see options for that type of information. For example, select next to Phone to add phone numbers.
 -
Select
 Save when you're done.
Creating a contact from an email message
To quickly add any sender or recipient that's in an email message to your Contacts folder, do the following:
-
Select the App Launcher icon
 > Mail.
 -
In an email message in the reading pane, select the name of the sender or recipient that you want to add to your contacts.
-
On the contact card that appears for that person, select More actions
> Add to contacts.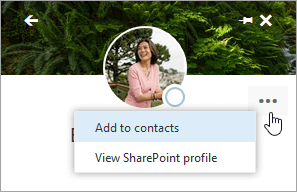
-
In the Add contact form that opens, add more information about the contact as you like.
-
Select
Save to add the card to your Contacts folder.IMPORTANT: When you create a contact in this way, it isn't possible to save the contact in a different folder or to move it to a different folder.
Creating a contact list
A contact list is a collection of contacts. It's sometimes also called a distribution list. You can specify a contact list as a recipient when you compose an email message. When you send the message, it goes to all of the contacts in the list at the same time. For example, you might create a contact list named "My book club" and add all of the members of your book club to it. Then to address a message to everyone in the club, you would only have to enter "My book club" on the To: line of the email.
To create a contact list
-
Under Your contacts in the navigation pane, select the folder that you want to create the contact list in. If Your contacts is selected rather than a particular folder, the new contact list will be created in the Contacts folder.
Note: Before you create a new contact list, make sure you select the folder in the navigation pane that you want to create it in. After you create a contact list, it isn't possible to move it to a different folder. To store a contact list in a different folder after you create it, delete the contact list and then re-create it in the other folder.
-
On the toolbar, select the down arrow next to New, and then select New contact list.
-
In the blank form that opens, enter the Contact list name, the contact list Members, and optional Notes.
-
Select
Save when you're done.
Editing a contact or contact list
You can edit contacts or contact lists that you create or import into Outlook on the web. You can't edit contacts that you get by connecting to a social network account such as LinkedIn. For information about importing contacts from another email account or email program, see Import contacts to Outlook.
Note: To store a contact list in a different folder after you create it, delete the contact list and then re-create it in the other folder.
-
In the middle pane, check the box next to the contact or contact list that you want to edit, and then select Edit on the toolbar.
-
Make the changes that you want.
-
Select
Save when you're done.
Working with contact folders
-
To create a contact folder, right-click or press and hold Your contacts in the navigation pane, and then select New folder.
-
To rename or delete any contact folder that you created, right-click the folder and then select Rename or Delete.
-
To move any contact folder that you created to a location named Other contacts so that the folder is still visible but out of the way, right-click the folder and then select Move to "Other contacts". You'll see the folder appear under Other contacts.
To move a folder from Other contacts back to the main list of your folders under Your contacts, right-click the folder and then select Move to "Your contacts".
Viewing your contacts and contact lists
On the People page, when you select an item in the navigation pane, the middle pane displays contacts that are in that item, as follows:
-
When you select Featured people, the middle pane displays the people you frequently contact, people on your calendar today, your favorite people, and people you may want to follow up with. If you pinned a view, it appears at the top of the middle pane.
-
When you select Your Contacts, the middle pane displays all of your contacts and contact lists.
-
When you select a particular contact folder, the middle pane displays only contacts and contact lists that are in that folder.
Using the filter menu to narrow and sort the contact display
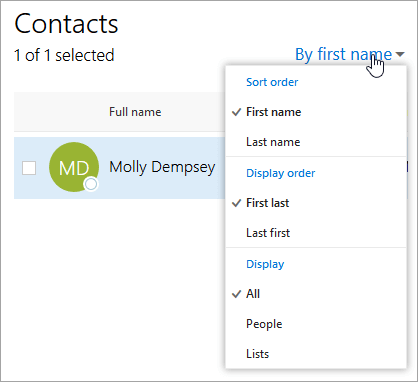
When you select Your contacts or a particular contact folder, a drop-down menu at the top of the middle pane lets you narrow and sort the contacts and contact lists that are displayed there. The name of the menu describes the sort order that's currently being used. The default menu name is By first name, because that's the default sort order.
When you select the menu to open it, you'll see that it contains the following three sections:
-
The Sort order section, where you can sort by First name or Last name.
-
The Display order section, where you can sort by First last or Last first to control how each name appears.
-
The Display section, where you can choose People if you want to view only the contacts that are people, Lists to view only the contacts that are contact lists, or All to view both.
Deleting a contact or a contact list
You can delete contacts or contact lists that you created or imported into Outlook on the web. You can't delete contacts that you get by connecting to a social network account, such as LinkedIn.
-
Select the contact or contact list.
-
Select Delete.
Searching for a contact or contact list
In the Search people box at the top of the navigation pane, enter a search term.
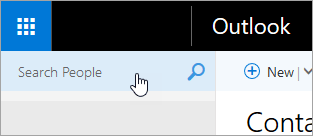
-
To search for a contact, enter their name or email address in the Search people box, and then select the search icon
 or press Enter.
 -
To search for a contact list, enter part or all of the name of the contact list in the Search people box, and then select the search icon
or press Enter.
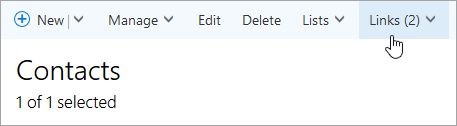
Linking and unlinking contacts
You can link contacts to each other to indicate that they are somehow related. In addition, Outlook on the web automatically detects contacts that have the same or very similar names and links them so that they appear as a single contact.
Link contacts
-
Select the check box next to each contact in the middle pane, and then on the toolbar, select Link.
Unlink contacts
-
In the middle pane, select the check box next to a linked contact.
-
On the toolbar, select the Links drop-down menu.
-
On the drop-down menu, select the
 next to the contact that you want to unlink from the others.
Automatic linking
To see which contacts Outlook on the web has automatically linked for a particular contact and to see suggestions for other, similar contacts to link that contact to, follow these steps:
-
Select the check box to the left of the contact name. If Outlook on the web has automatically linked any contacts that have the same or similar names, a Links drop-down menu will appear on the right side of the toolbar.
-
On the toolbar, select the Links drop-down menu.
Still need help?
Get help with Outlook.com:
Note: You will need to sign in first to get support. If you can't sign in, go to Account support.

You can also try the Microsoft Virtual Agent.
Get help with Outlook on the web for business:

If you're using Microsoft 365 operated by 21Vianet in China, see Contact Microsoft 365 for business support - Admin Help.
No comments:
Post a Comment