You can add document libraries for special purposes, such as added protection for confidential documents. Information Rights Management (IRM) helps protect files from being distributed without permission after they have been downloaded. For added protection, it's a straightforward task to set alerts on a library to see and record who is accessing it.
Note: To use IRM, the Office 365 Admin must enable it. For more information, see Set up Information Rights Management (IRM) in SharePoint admin center.
Note: You need to be a member of the Designers group or have contributor permission to modify a team site. A safe way to practice changing a team site is to create and use a subsite under the team site. For more information, see Create a subsite under the existing site.
Create a document library for confidential documents
-
Sign in to Office 365 with your work or school account, and then navigate to your team site (In the app launcher
 , click Sites, and then locate your team site).
Can't find the app you're looking for? From the app launcher, select All apps to see an alphabetical list of the Office 365 apps available to you. From there, you can search for a specific app.
-
Click Site Settings
 > Add an App.
 -
On the Your Apps page, choose Document Library.
-
Enter a name for the new document library, such as ConfidentialDocs, and then choose Create.
Your new document library appears in the Quick Launch (the navigation links on the side or top of the page) under Recent.
-
To set up IRM on the library, do the following:
-
In the library, click Library > Library Settings, and then in the Settings page, click Information Rights Management.
-
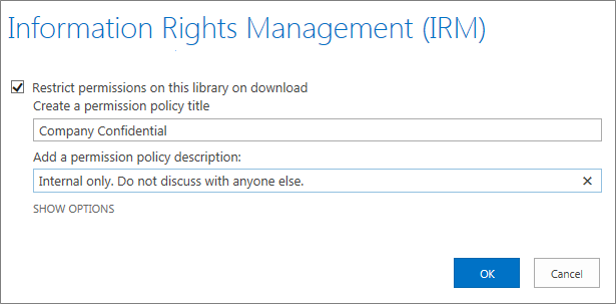
Click Restrict permissions on this library on download.
-
Enter a name in the Create a permission policy title box, such as Company Confidential.
-
Enter a description in the Add a permission policy description box, such as Internal only: Do not discuss with anyone else.

-
-
Click OK.
Set an alert on the library
-
Sign in to Office 365 with your work or school account, and then navigate to your team site (In the app launcher
 , click Sites, and then locate your team site).
Can't find the app you're looking for? From the app launcher, select All apps to see an alphabetical list of the Office 365 apps available to you. From there, you can search for a specific app.
-
In the library, click Library > Alert Me > Set Alert on this library, accept all the default settings, and then click OK.

Do more with library alerts (Extra credit!)
-
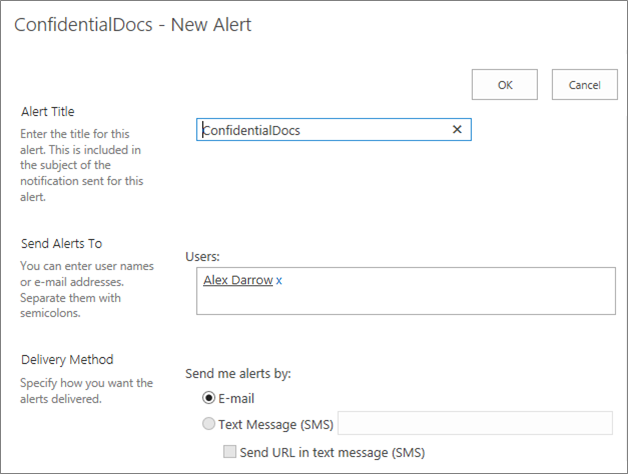
Click Alerts Library > Alert Me > Set Alert on this library.
-
Under Alert Title, enter Confidential Documents Library.
-
Under Send Alerts To, add one or two users on your team to also be notified.
-
Under Send me an alert when, click Someone else changes a document.
-
Under When to Send Alerts, select Send a daily summary.
Want more?
My manager urged me to add security to our confidential documents.
Information Rights Management – also called IRM – helps protect files from being distributed without permission once they've been downloaded.
First, I'll create a new library. I click the Settings icon, then Add an App.
I'll choose Document Library, enter the name, ConfidentialDocs, and then click Create.
Notice that my new library appears in the Quick Launch under Recent.
I click ConfidentialDocs to open the library.
I select the Library tab, then Library Settings.
On the Settings page, I click Information Rights Management.
I select the option to Restrict permissions on this library on download.
Under Create a permission policy title, I enter "Company Confidential."
Under Add a permission policy description, I'll type "Internal only. Do not discuss with anyone else." And I click OK.
One more thing: By setting an alert on this library, I can be notified when anyone accesses these docs.
In the Quick Launch, I click ConfidentalDocs.
I select the Library tab, click Alert Me, and choose Set Alert on this library.
I'll accept the default settings, then click OK.
Now, any document I upload to this library will be protected.
No comments:
Post a Comment