Print a project schedule
Printing a view, report, or calendar in Project is very similar to printing in other Office programs:
-
Choose File > Print > Print.

Note: In Project 2007: Choose File > Print > OK.
But getting only the specific project information you want into your printout involves a little prep work before you hit the print button. Read on to see how to get the right information onto the page for yourself or your stakeholders.
Get ready to print
Prepare a view for printing
Format the view
-
Change the view so it shows only the data you want to share. For example:
-
Hide subtasksto show only top-level tasks.
-
Sort tasks or dates to highlight specific info.
-
Hide columns temporarily so they don't appear in the printout.
-
Set print and page layout options
-
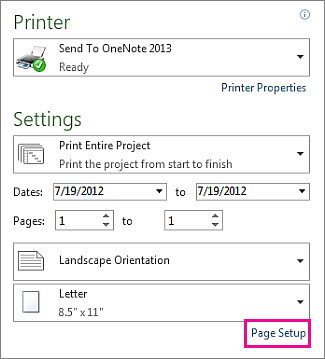
Choose File > Print.
-
Under Settings, choose how much of the project to print. You can print the whole thing or pick date and page ranges.
-
Set other printing options, like the number of copies, page orientation, and paper size.
Add a header, footer, or legend
You can include headers and footers on each printed page. Some views also include a legend of the types of Gantt bars on each printed page. You can add, remove, or change the headers, footers, and legends like this:
-
Choose File > Print > Page setup (just below the Settings section).
-
Select the Header, Footer, or Legend tab.
-
Type your text in the Left, Center, or Right text box.
-
Use the buttons below the text box to format the text or add elements:
| | Page numbers | | Time |
| | Total pages | | File name |
| | Date | | Picture |


Want to get rid of the legend completely? On the Legend tab, under Located on, select None.
Need to change what Gantt bars show up in the legend? That's handled in the Bar Styles dialog box. See Change the legend on a printed view for instructions.
Prepare a report for printing
Format the report
Create and customize the report until it shows exactly the information you want to print. You can add charts, tables, and links, as well as change colors and add visual effects.
See the print layout as you work on the report
You can see how your printed report will look while you're still working on it.
-
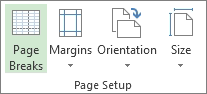
Click anywhere in the report, and then choose the Report Tools Design tab.
-
In the Page Setup group, choose the option you want to see: Page Breaks, Margins, Orientation, or Size.
-
The report shows guidelines that change based on your choices.
For example, choose Page Breaks to see how much of the report will show up on a printed page. Then choose Size to pick a different paper size or rearrange the report elements until they all fit on a page.
To set other print options, like the number of copies or which pages to print, choose File > Print and choose options under Settings.
Add a header or footer
-
Choose File > Print > Page setup (just below the Settings section).
-
Choose the Header or Footer tab.
-
Type your text in the Left, Center, or Right text box.
-
Use the buttons below the text box to format the text or add elements:
| | Page numbers | | Time |
| | Total pages | | File name |
| | Date | | Picture |
Note: Report printouts don't have legends.
Print a calendar showing specific weeks or months
In the Calendar view, you can specify the number of months that you want to print on each page.
-
Choose View > Calendar.
-
Chose File > Print > Page Setup, and then select the View tab.
-
To specify months, under Print, select Months per page, and then choose 1 or 2.
To specify the number of weeks to show, select Weeks per page, and then type or select the number of weeks that you want to display in the adjacent box. If you want the weeks on the printed calendar to have the same height as those in the view, select Week height as on screen.
Alternatively, you can change the number of weeks per page by magnifying the view. On the View tab, choose Zoom > Zoom and select the number of weeks that you want to appear or the date range that you want to show.
Note that the calendar will become unreadable if you try to print too many weeks per page. See the tips below for ideas about how to format your calendar to make it more readable.
-
If you want to include the previous and next month calendars, under Details, select the Print previous/next month calendars in legend check box.
Note that you cannot print a readable Calendar view of an entire year. Instead, use a Gantt Chart view and follow these tips:
-
Change the timescale of the Gantt Chart to accommodate your year view. For example, you can change the timescale to show quarters over months and to use abbreviations for quarters and months.
-
Reduce the font size to accommodate more text on the page.
-
Collapse all of the tasks so that only summary tasks are shown.
-
In the Page Setup dialog box, use the Fit to boxes to print the view on one page. On the Print page, set the Dates boxes to print the entire year.
Notes:
-
If you are printing the Calendar view, you can specify the range of dates to print by using the Dates boxes on the Print page.
-
You can format the Calendar view to maximize the amount of information shown on a page by formatting the timescale and the text styles.
-
You can specify only a date range or a number of consecutive weeks. You cannot select nonconsecutive weeks for viewing or printing.
Other ways to share project info
-
Save the project as a PDF, and then print or email it to stakeholders.
-
Create a timeline of key tasks and milestones, and then drop it into an email, document, or slide.
-
Copy data from fields in any view, then paste them into Word or Excel.
-
Let Project help you set up a SharePoint tasks list that syncs with your project. Your team members can view the schedule and update their work in SharePoint, and you'll see the changes in Project. And vice-versa.
These instructions are specific to Microsoft Project 2007.
What do you want to do?
Prepare a view for printing
-
On the View menu, choose the view that you want to print.
-
On the File menu, choose Page Setup, and then select the Page tab.
-
If you want to change the page orientation, select Orientation, choose Portrait (vertical) or Landscape (horizontal).
-
If you want to scale the pages, under Scaling, select Adjust to, and then type the percentage at which you want information to appear on your printed pages in the % normal size box.
-
If you want to adjust the page fit, under Scaling, select Fit to, and then specify the number of pages that you want in the pages wide by and tall boxes.
-
If you want to change the paper size, select the paper size that you want in the Paper Size box.
Notes:
-
You can specify how much of the timescale that you want to include when you print the view. In the Print dialog box, select Dates in the Timescale section, and then select the time range in the From and To lists.
-
The default setting for scaling is 100%. Increasing the setting to 125% expands the image, printing less information on each page but enlarging the text and graphics. Decreasing the setting to 75% condenses the image, printing more information on each page.
-
You cannot adjust the page fit in the Calendar view or Resource Graph view.
-
A view may not fit the number of pages that you specify. For example, if a printed view is four pages wide by one page tall, it may not fit into one wide by one tall. In that case, the more constraining of the two numbers determines the page fit.
-
If you adjust the page fit in the Network Diagram view, you cannot adjust for page breaks. Because the number of pages overrides the ability to spread the Network Diagram boxes out to avoid page breaks, the Adjust for page breaks option is unavailable. This option is found under Box Layout in the Layout dialog box (choose Layout on the Format menu).
Prepare a report for printing
This procedure helps you prepare basic reports for printing. If you want to prepare Visual Reports for printing, use Microsoft Office Excel 2007 or Microsoft Office Visio 2007.
-
Choose View > Reports.
-
Select the report type that you want, and then choose Select. If you chose Custom as the report type, choose a report in the Reports list, choose Setup, and then go to step 4.
-
Select the report that you want, and then choose Select.
-
Choose Page Setup, and then select the Page tab.
-
If you want to change the page orientation, under Orientation, select Portrait (vertical) or Landscape (horizontal).
-
If you want to scale the pages, under Scaling, select Adjust to, and then type the percentage at which you want information to appear on your printed pages in the % normal size box.
-
If you want to change the paper size, select the paper size that you want in the Paper Size box.
Note: The default setting for scaling is 100%. Increasing the setting to 125% expands the image, printing less information on each page but enlarging the text and graphics. Decreasing the setting to 75% condenses the image, printing more information on each page.
Change the time range for printing the Calendar view
In the Calendar view, you can specify the number of months that you want to print on each page.
-
Choose View > Calendar.
-
On the File menu, choose Page Setup, and then select the View tab.
-
If you want to specify months, under Print, select Months per page, and then choose 1 or 2.
If you want to specify the number of weeks to show, select Weeks per page, and then type or select the number of weeks that you want to display in the adjacent box. If you want the weeks on the printed calendar to have the same height as those in the view, select Week height as on screen.
Alternatively, you can change the number of weeks per page by magnifying the view. On the View menu, choose Zoom. Under Zoom to, select the number of weeks that you want to appear, or specify the date range that you want to show.
Note that the calendar will become unreadable if you try to print too many weeks per page. See the tips below for ideas about how to format your calendar to make it more readable.
-
If you want to include the previous and next month calendars, under Details, select the Print previous/next month calendars check box.
Note that you cannot print a readable Calendar view of an entire year. Instead, use a Gantt Chart view and follow these tips:
-
Change the timescale of the Gantt Chart to accommodate your year view. For example, you can change the timescale to show quarters over months and to use abbreviations for quarters and months.
-
Reduce the font size to accommodate more text on the page.
-
Collapse all of the tasks so that only summary tasks are shown.
-
In the Page Setup dialog box, use the Fit to boxes to print the view on one page. In the Print dialog box, set the Dates boxes to print the entire year.
Notes:
-
If you are printing the Calendar view, you can specify the range of dates to print by using the Dates boxes in the Print dialog box.
-
You can format the Calendar view to maximize the amount of information shown on a page by formatting the timescale and the text styles.
-
You can specify only a date range or a number of consecutive weeks. You cannot select nonconsecutive weeks for viewing or printing.
Print notes when printing a view or report
Notes can be printed on the last page of a view. The notes that are printed are those that are most closely associated with the view. For example, if you choose to print notes when you print the Gantt Chart view, then the task notes are printed.
-
On the View menu, choose the view that you want.
If you want to use a view that is not on the View menu, choose More Views, select the view that you want to use in the Views list, and then choose Apply.
-
On the File menu, choose Page Setup, and then select the View tab.
-
Select the Print notes check box.
-
Choose Print.
You can also print notes in columns along with their associated tasks by printing a report that contains the information that you want to print.
-
On the Report menu, choose Reports.
-
In the Reports dialog box, select a report category that you want to use, and then choose Select.
-
In the next dialog box, select a report, and then choose Edit.
-
In the Report dialog box, select the Details tab, and then select the Notes check box.
Note: Some reports won't allow you to specify that notes be printed.
-
Choose OK, and then choose Close.
-
On the File menu, choose Print.
No comments:
Post a Comment