Add a label or text box to a worksheet
You use a label and a text box together for basic data entry.
What do you want to do?
Learn about labels and text boxes
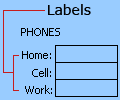
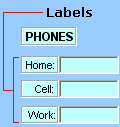
A label is text that identifies the purpose of a cell or text box or that displays descriptive text, such as titles, captions, or brief instructions. In addition, a label can display a descriptive picture. Use a label for flexible placement of instructions, to emphasize text, and when merged cells or a specific cell location is not a practical solution.
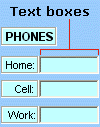
A text box is a rectangular box in which you can view, enter, or edit text or data that is bound to a cell. A text box can also be a static text field that presents read-only information. Use a text box as an alternative to entering text in a cell, when you want to display an object that floats freely. You can also use a text box to display or view text that is independent of row and column boundaries, preserving the layout of a grid or table of data on the worksheet.
| Label (Form control) | Label (ActiveX control) | Text Box (ActiveX control) |
Add a label (Form control)
-
If the Developer tab is not available, display it.
Display the Developer tab
-
Click the File tab, click Options, and click Customize Ribbon.
-
Under Main Tabs , select the Developer check box, and then click OK.
-
-
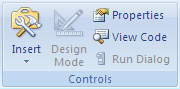
On the Developer tab, in the Controls group, click Insert and then, under Form Controls, click Label
 .
.
-
Click the worksheet location where you want the upper-left corner of the label to appear.
-
To specify the control properties, right-click the control, and then click Format Control.
Add a label (ActiveX control)
-
If the Developer tab is not available, display it.
Display the Developer tab
-
Click the File tab, click Options, and click Customize Ribbon.
-
Under Main Tabs , select the Developer check box, and then click OK.
-
-
On the Developer tab, in the Controls group, click Insert and then, under ActiveX Controls, click Label
 .
. -
Click the worksheet location where you want the upper-left corner of the label to appear.
-
To edit the ActiveX control, make sure that you are in design mode. On the Developer tab, in the Controls group, turn on Design Mode
 .
. -
Click the worksheet location where you want the upper-left corner of the label to appear.
-
To specify the control properties, on the Developer tab, in the Controls group, click Properties
 .
.Tip: You can also right-click the label, and then click Properties.
The Properties dialog box appears. For detailed information about each property, select the property, and then press F1 to display a Visual Basic Help topic. You can also type the property name in the Visual Basic Help Search box. The following section summarizes the properties that are available.
Summary of properties by functional categories
| If you want to specify | Use this property |
| General: | |
| Whether the control is loaded when the workbook is opened. (Ignored for ActiveX controls.) | AutoLoad (Excel) |
| Whether the control can receive the focus and respond to user-generated events. | Enabled (Form) |
| Whether the control can be edited. | Locked (Form) |
| The name of the control. | Name (Form) |
| The way the control is attached to the cells below it (free floating, move but do not size, or move and size). | Placement (Excel) |
| Whether the control can be printed. | PrintObject (Excel) |
| Whether the control is visible or hidden. | Visible (Form) |
| Text: | |
| Font attributes (bold, italic, size, strikethrough, underline, and weight). | Bold, Italic, Size, StrikeThrough, Underline, Weight (Form) |
| Descriptive text on the control that identifies or describes it. | Caption (Form) |
| How text is aligned in the control (left, center, or right). | TextAlign (Form) |
| Whether the contents of the control automatically wrap at the end of a line. | WordWrap (Form) |
| Size and position: | |
| Whether the size of the control automatically adjusts to display all contents. | AutoSize (Form) |
| The height or width in points. | Height, Width (Form) |
| The distance between the control and the left or top edge of the worksheet. | Left, Top (Form) |
| Formatting: | |
| The background color. | BackColor (Form) |
| The background style (transparent or opaque). | BackStyle (Form) |
| The color of the border. | BorderColor (Form) |
| The type of border (none or single-line). | BorderStyle (Form) |
| The foreground color. | ForeColor (Form) |
| Whether the control has a shadow. | Shadow (Excel) |
| The visual appearance of the border (flat, raised, sunken, etched, or bump). | SpecialEffect (Form) |
| Image: | |
| The bitmap to display in the control. | Picture (Form) |
| The location of the picture relative to its caption (left, top, right, and so on). | PicturePosition (Form) |
| Keyboard and mouse: | |
| The shortcut key for the control. | Accelerator (Form) |
| A custom mouse icon. | MouseIcon (Form) |
| The type of pointer that is displayed when the user positions the mouse over a particular object (for example, standard, arrow, or I-beam). | MousePointer (Form) |
Add a text box (ActiveX control)
-
If the Developer tab is not available, display it.
-
Display the Developer tab
-
Click the File tab, click Options, and click Customize Ribbon.
-
Under Main Tabs , select the Developer check box, and then click OK
-
-
On the Developer tab, in the Controls group, click Insert, and then under ActiveX Controls, click Text Box
 .
. -
Click the worksheet location where you want the upper-left corner of the text box to appear.
-
To edit the ActiveX control, make sure that you are in design mode. On the Developer tab, in the Controls group, turn on Design Mode
. -
To specify the control properties, on the Developer tab, in the Controls group, click Properties
.Tip: You can also right-click the text box, and then click Properties.
The Properties dialog box appears. For detailed information about each property, select the property, and then press F1 to display a Visual Basic Help topic. You can also type the property name in the Visual Basic Help Search box. The following section summarizes the properties that are available.
Summary of properties by functional categories
| If you want to specify | Use this property |
| General: | |
| Whether the control is loaded when the workbook is opened. (Ignored for ActiveX controls.) | AutoLoad (Excel) |
| Whether the control can receive the focus and respond to user-generated events. | Enabled (Form) |
| Whether the control can be edited. | Locked (Form) |
| The name of the control. | Name (Form) |
| The way the control is attached to the cells below it (free floating, move but do not size, or move and size). | Placement (Excel) |
| Whether the control can be printed. | PrintObject (Excel) |
| Whether the control is visible or hidden. | Visible (Form) |
| Text: | |
| Whether a word or a character is the basic unit used to extend a selection. | AutoWordSelect (Form) |
| Font attributes (bold, italic, size, strikethrough, underline, and weight). | Bold, Italic, Size, StrikeThrough, Underline, Weight (Form) |
| Whether selected text remains highlighted when the control does not have the focus. | HideSelection (Form) |
| The default run time mode of the Input Method Editor (IME). | IMEMode (Form) |
| Whether the size of the control adjusts to display full or partial lines of text. | IntegralHeight (Form) |
| The maximum number of characters a user can enter. | MaxLength (Form) |
| Whether the control supports multiple lines of text. | MultiLine (Form) |
| Placeholder characters, such as an asterisk (*), to be displayed instead of actual characters. | PasswordChar (Form) |
| Whether the user can select a line of text by clicking to the left of the text. | SelectionMargin (Form) |
| The text in the control. | Text (Form) |
| How text is aligned in the control (left, center, or right). | TextAlign (Form) |
| Whether the contents of the control automatically wrap at the end of a line. | WordWrap (Form) |
| Data and binding: | |
| The range that is linked to the control's value. | LinkedCell (Excel) |
| The content or state of the control. | Value (Form) |
| Size and position: | |
| Whether the size of the control automatically adjusts to display all the contents. | AutoSize (Form) |
| The height or width in points. | Height, Width (Form) |
| The distance between the control and the left or top edge of the worksheet. | Left, Top (Form) |
| Formatting: | |
| The background color. | BackColor (Form) |
| The background style (transparent or opaque). | BackStyle (Form) |
| The color of the border. | BorderColor (Form) |
| The type of border (none or a single-line). | BorderStyle (Form) |
| The foreground color. | ForeColor (Form) |
| Whether the control has a shadow. | Shadow (Excel) |
| The visual appearance of the border (flat, raised, sunken, etched, or bump). | SpecialEffect (Form) |
| Whether an automatic tab occurs when a user enters the maximum allowable characters into the control. | AutoTab (Form) |
| Keyboard and mouse: | |
| Whether drag-and-drop is enabled. | DragBehavior (Form) |
| The selection behavior when entering the control (select all or do not select). | EnterFieldBehavior (Form) |
| The effect of pressing ENTER (create a new line or move focus). | EnterKeyBehavior (Form) |
| A custom mouse icon. | MouseIcon (Form) |
| The type of pointer that is displayed when the user positions the mouse over a particular object (for example, standard, arrow, or I-beam). | MousePointer (Form) |
| Whether tabs are allowed in the edit region. | TabKeyBehavior (Form) |
| Specific to Text Box: | |
| Whether the control has vertical scroll bars, horizontal scroll bars, or both. | ScrollBars (Form) |
Notes:
-
To create a text box with a set of placeholder characters that accepts a password, use the PasswordChar property. Make sure that you protect the linked cell or other location in which the text is stored.
Security Note:
-
Use strong passwords that combine uppercase and lowercase letters, numbers, and symbols. Weak passwords don't mix these elements. Strong password: Y6dh!et5. Weak password: House27. Passwords should be 8 or more characters in length. A pass phrase that uses 14 or more characters is better.
-
It is critical that you remember your password. If you forget your password, Microsoft cannot retrieve it. Store the passwords that you write down in a secure place away from the information that they help protect.
-
-
To create a scrolling, multiple-line text box with horizontal and vertical scroll bars, set MultiLine to True, AutoSize and WordWrap to False, ScrollBars to 3, and LinkedCell to the cell address (such as D1) that you want to contain the text. To enter a new line, the user must press either CTRL+ENTER or SHIFT+ENTER, which generates a special character that is stored in the linked cell.
Thank you so much for share;
ReplyDeleteBeing one of the most popular web browsers that enjoy worldwide popularity, Google Chrome has received a chunk of compliments along with a number of complaints. One of the highest headaches that are troubling users is that Google Search Not Working on Android. Hope this blog helps you. Also, sharing make it more helpful and helpful blogs at oneclicktips blogs
Some Other Related Link for your Issues:- Oneclicktip Blogspot
This material is fabulous! It's full of incisive information and the points you make are rational and solid. I agree with much of this information. Business Card Boxes Wholesale
ReplyDeleteMicrosoft Office Tutorials: Add A Label Or Text Box To A Worksheet >>>>> Download Now
ReplyDelete>>>>> Download Full
Microsoft Office Tutorials: Add A Label Or Text Box To A Worksheet >>>>> Download LINK
>>>>> Download Now
Microsoft Office Tutorials: Add A Label Or Text Box To A Worksheet >>>>> Download Full
>>>>> Download LINK SL