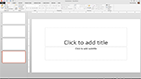
Animate text or objects
You can animate the text, pictures, shapes, tables, SmartArt graphics, and other objects in your PowerPoint presentation.
Effects can make an object appear, disappear, or move. They can change an object's size or color.
1:54
There's also a related video about animating text.
Add animations to text, pictures, shapes, and more in your presentation
-
Select the object or text you want to animate.
-
Select Animations and choose an animation.
-
Select Effect Options and choose an effect.
Manage animations and effects
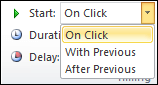
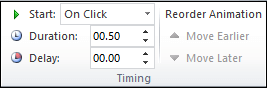
There are different ways to start animations in your presentation:
-
On Click: Start an animation when you click a slide.
-
With Previous: Play an animation at the same time as the previous animation in your sequence.
-
After Previous: Start an animation immediately after the previous one happens.
-
Duration: Lengthen or shorten an effect.
-
Delay: Add time before an effect runs.
Add more effects to an animation
-
Select an object or text with an animation.
-
Select Add Animation and choose one.
Change the order of animations
-
Select an animation marker.
-
Choose the option you want:
-
Move Earlier: Make an animation appear earlier in the sequence.
-
Move Later: Make an animation occur later in the sequence.
-
Add animation to grouped objects
You can add an animation to grouped objects, text, and more.
-
Press Ctrl and select the objects you want.
-
Select Format > Group > Group to group the objects together.
-
Select Animations and choose an animation.
Add animation to an object
-
Select the object that you want to animate.
-
On the Animations tab of the ribbon, in the Animation group, click the More
 button, and then select the animation effect that you want.
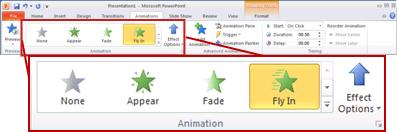
The most popular effects are shown. If you want even more choices, click a More option at the bottom of the gallery.
Select a heading below to open it and see the detailed instructions.
Change the speed of the animation effect
The speed of the effect is determined by the Duration setting.
-
On the slide, select the animation effect that you want to change.
-
On the Animations tab, under Timing options, in the Duration box, enter the number seconds that you want the animation effect to last.
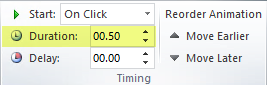
(Maximum: 59 seconds. Minimum: .01 seconds. You can type a duration or use the up or down arrows to select a standard incremental value.)
Change how the animation effect starts
-
On the slide, select the animation effect that you want to change.
-
On the Animations tab, under Timing options, open the Start list, and choose one of the three options described below:
Select
To start the animation effect
On Click
When you click the slide
With Previous
At the same time as the previous animation effect in the list. (One click starts two or more animation effects at the same time.)
After Previous
Immediately after the previous animation effect in the list finishes playing. (No additional click is required to make this animation effect start.)
Set the time between animation effects
The Delay option determines how much time elapses before a specific animation effect begins—either after you click or after a prior animation effect concludes.
-
On the slide, select the animation effect that you want to change.
-
On the Animations tab, under Timing options, in the Delay box, specify an amount of time in seconds.

Change the order of the animation effects on a slide
To reorder a set of animations on a slide:
-
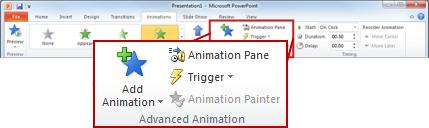
Open the Animation pane: On the Animations tab, in the Advanced Animation group, select Animation Pane.
-
In the Animation pane, select the animation effect that you want to reorder.
-
On the Animations tab of the ribbon, in the Timing group, under Reorder Animation select one of these options:
-
Select Move Earlier to move the effect up one place in the animation order.
-
Select Move Later to move the effect down one place in the animation order.
You can select an option multiple times, if necessary, to move your selected effect to the appropriate place in the animation order.
-
Remove an animation effect
When you animate an object, a small numerical marker appears just to the left of that object to indicate the presence of an animation effect and its place in the sequence of animations on the current slide.
-
Select the numeral of the animation that you want to remove.
-
Press the Delete key on your keyboard.
For a more complete discussion, see Change, remove, or turn off animation effects.
Apply multiple animation effects to a single object
-
Select the text or object that you want to add multiple animations.
-
On the Animations tab, in the Advanced Animation group, click Add Animation.
Test your animation effect
After you add one or more animation effects, to validate that they work, do the following:
-
On the Animations tab, in the Preview group, click Preview.

Copy animation effects from one object to another
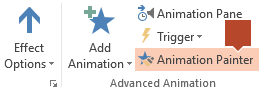
Avoid having to manually animate several objects in the same way: Use the Animation Painter to copy animations from one object to another. For full details and a quick video demonstration, see Duplicate animations with the Animation Painter.
Apply an animation effect
-
Select the text or object that you want to animate.
An "object" in this context is any thing on a slide, such as a picture, a chart, or a text box. Sizing handles appear around an object when you select it on the slide.
-
On the Animations tab of the ribbon, in the Animations group, select the animation effect that you want from the Animate list.
If your selected object is a text box, you'll have two options for each type of animation in the Animate list:
-
All At Once: The animation occurs for all the text at the same time.
-
By 1st Level Paragraphs: The animation occurs individually in turn for each paragraph of the text box.
-
Select a heading below to open it and see the detailed instructions.
Remove an animation effect
-
Select the text or object that you want to remove the animation from.
-
On the Animations tab, in the Animations group, select No Animation from the Animate list.
For a more complete discussion, see Change, remove, or turn off animation effects.
Create and apply a custom animation effect to text or objects
To gain more control over how and when effects are applied, you can create and apply a custom animation. For example, you can make text grow or shrink, spin or shimmer, and you can set an animation so that you hear the sound of applause when a picture is revealed. You can apply more than one animation, so you can make a line of text fly in with or without sound, and then make the text fly out. You can use emphasis, entrance, or exit options in addition to preset or custom motion paths.
You create custom animations in the Custom Animation task pane, which shows important information about an animation effect, including the type of effect, the order of multiple effects in relation to each other, and a portion of the text of the effect.
1. Icons indicate the timing of the animation effect in relation to the other events on the slide. Choices include the following:
-
Start On Click (mouse icon, shown here): The animation effect begins when you click the slide.
-
Start With Previous (no icon): The animation effect begins at the same time as the previous effect in the list starts playing (that is, one click executes two or more animation effects).
-
Start After Previous (clock icon): The animation effect begins immediately after the previous effect in the list finishes playing (that is, no additional click is required to make the next animation effect start).
2. Select an item in the list to see the menu icon (down arrow), and then click the icon to reveal the menu.
3. Numbers indicate the order in which animation effects play. Numbers also correspond to the labels associated with animated items in Normal view with the Custom Animation task pane displayed.
4. Icons represent the type of animation effect. In this example, it is an Emphasis effect.
Animated items are noted on the slide by a non-printing numbered tag. This tag corresponds to the effects in the Custom Animation list, and the tag is displayed to the side of the text or object. The tag appears only in Normal view with the Custom Animation task pane displayed.
To apply a custom animation effect in Office PowerPoint 2007, do the following:
-
Select the text or object that you want to animate.
-
On the Animations tab, in the Animations group, click Custom Animation.
-
In the Custom Animation task pane, click Add Effect, and then do one or more of the following:
-
To make the text or object enter with an effect, point to Entrance, and then click an effect.
-
To add an effect, such as a spin effect, to text or an object that is already visible on the slide, point to Emphasis, and then click an effect.
-
To add an effect that makes text or an object leave the slide at some point, point to Exit, and then click an effect.
-
To add an effect that makes text or an object move in a specified pattern, point to Motion Paths, and then click a path.
-
-
To specify how the effect is applied to your text or object, right-click the custom animation effect in the Custom Animation list, and then click Effect Options on the shortcut menu.
-
Do one of the following:
-
To specify settings for text, on the Effect, Timing, and Text Animation tabs, click the options that you want to use to animate the text.
-
To specify settings for an object, on the Effect and Timing tabs, click the options that you want to use to animate the object.
-
Effects appear in the Custom Animation list in the order that you add them.
Apply sound effects to bullets of text
Use the steps below to apply sound effects to the bullets of text that you added animation effects to. To start, your slide looks something like this.
And the Custom Animation task pane looks something like this.
Do the following:
-
In the Custom Animation task pane, in the Custom Animation list, click the arrow to the right of the animation effect applied to the first bullet of text, and then click Effect Options.
-
On the Effect tab, under Enhancements, in the Sound list, do one of the following:
-
Select a sound.
-
To add a sound from a file, select Other Sound, and then locate the sound file that you want to use.
-
-
Repeat steps 1 and 2 for each bullet of text that you want to add a sound effect to.
Test your animation effect
After you add one or more animation effects, to validate that they work, do the following:
-
At the bottom of the Custom Animation task pane, click Play.
Apply an animation
-
Select the object or text on the slide that you want to animate.
An "object" in this context is any thing on a slide, such as a picture, a chart, or a text box. Sizing handles appear around an object when you select it on the slide. (For animation purposes, a paragraph within a text box is also an object, but it won't have sizing handles when you select it; instead the entire text box has sizing handles.)
-
On the Animations tab of the ribbon, open the gallery of animations, and select the one you want.

-
On the Animations tab, open the Effect Options list to select from among the available options. Effect options are available for text or for choosing the direction or intensity of an animation. (Not all animations have Effect options.)
-
To preview the animation, on the View tab of the ribbon, in the Start Slide Show group, select From Current Slide.

-
In Slide Show view, click the slide to make an animation effect play.
Remove an animation effect
-
Select the animated object.
-
On the Animations tab of the ribbon, open the gallery of animations and select None.
Change the order of animation effects
When you animate an object, a small numerical marker appears just to the left of that object to indicate the presence of an animation effect and its place in the sequence of animations on the slide. These markers appear when the Animation tab of the ribbon is selected.
-
On the slide, select an animated object.
-
On the Animation tab of the ribbon, in the Timing group, click Move Earlier or Move Later.
Each click changes the object's position in the order by one increment. The numbering in the animation markers changes to reflect the ordering of the effects.
See Also
Make text appear one line, one word, or one letter at a time
Add an animated GIF to a slide
Apply multiple animation effects to one object
Add a motion path animation effect
No comments:
Post a Comment